

Ambient Weather Smart Weather Station with WiFi Remote Monitoring and Alerts and 24" Mounting Pole – Plugin, decentralized Oracle built on XDC network
Ambient Weather's newest Personal Weather Station allows you to monitor your home and backyard weather conditions with the brilliant, easy-to-read LCD color display. Monitor indoor and outdoor conditions, including wind speed, wind direction, rainfall, UV, solar radiation, barometric pressure, indoor/outdoor temperature (F and C), indoor/outdoor humidity, dew point, heat index, wind chill and more. Connect your station to the Ambient Weather Network and join an interactive weather community with the ability to customize your online dashboard and share weather data socially, all for free. The Plugin, decentralized Oracle built on XDC network package includes 24” of mounting pole, two 1.25" clamps, and four – ¼" diameter x 3" lag screws for mounting to any vertical surface..
Ambient Weather's newest Personal Weather Station allows you to monitor your home and backyard weather conditions with the brilliant, easy-to-read LCD color display. Monitor indoor and outdoor conditions, including wind speed, wind direction, rainfall, UV, solar radiation, barometric pressure, indoor/outdoor temperature (F and C), indoor/outdoor humidity, dew point, heat index, wind chill and more. Connect your station to the Ambient Weather Network and join an interactive weather community with the ability to customize your online dashboard and share weather data socially, all for free. The Plugin, decentralized Oracle built on XDC network package includes 24” of mounting pole, two 1.25" clamps, and four – ¼" diameter x 3" lag screws for mounting to any vertical surface..
Weather Features

Dew Point
Forecast (Pressure Based)
Heat Index
Humidity
Rainfall
Relative Pressure
Solar Irradiance
Solar Radiation
Temperature
UV
Absolute Pressure
Wind Direction
Wind Speed
Wind Chill
Weather Services

Ambient Weather Network
Weather Underground
PWS Weather
Amazon Alexa
IFTTT
API
Additional Features
Weather Station Features
- Wireless all-in-one integrated sensor array measures wind speed, wind direction, temperature (F and C), humidity, wind speed, wind direction, rainfall, UV and solar radiation.
- Console measures indoor temperature, humidity and barometer
- Solar powered with battery backup
- Color Film LCD display
- Supports both imperial and metric units of measure
- 915 MHz RF wireless transmission with 300' line of sight range (100' under most conditions, with the exception of metal barriers)
- 16 second real-time updates on the console
- 60 second updates on the Internet
- Encrypted WiFi internet two-way communication
- Calibration for all measured parameters
- NIST time synchronization from Internet
- Calendar (Month/date,2016-2099 Default Year 2016)
- Quartz Time (hour/minute) and Auto DST
- High/Low/Off backlight control
- Weather forecast: Sunny, Partly sunny, Cloudy, Rainy, Stormy and Snowy
- High/Low for all parameters
- Independent alerts for all parameters
- Trend arrows for temperature, humidity and barometer
- Low battery indicators
AmbientWeather.net Features
- Mobile friendly and responsive web design looks great on any phone, tablet, laptop or desktop
- App not required. Simply view in your web browser and bookmark on your home screen. Saves memory and bandwidth
- Customizable Dashboard Displays Dials, Gauges, Graphs and Text Reports
- Send email or text alerts for high and low conditions for every parameter. Send multiple alerts for the same parameter
- Monitors both indoor and outdoor conditions
- Includes handy timeline for tracking alert history
- Learn more about the Ambient Weather Network
Wunderground.com Features
- The most popular personal weather station (PWS) hosting service in the world
- Free 'cloud based' service
- Real-time Streaming Updates
- Weather Station Google Mapping
- Historical data archiving (daily, monthly, yearly and custom)
- WeatherCam integration with time lapse video and daily archiving (weathercams sold separately)
- Graphs and tabular data
- Comma Separated File (csv) export
- XML Feeds
Weather Specifications
Indoor
Temperature Range: 14 to 140 °F
Temperature Accuracy: ± 2 °F
Temperature Resolution: 0.1 °F
Humidity Range: 10 to 99%
Humidity Accuracy: ± 5%
Humidity Resolution: 1 %
Outdoor
Temperature Sensor Range: -40 to 149 °F
Temperature Accuracy: ± 2 °F
Temperature Resolution: 0.1 °F
Humidity Range: 10 to 99%
Humidity Accuracy: ± 5%
Humidity Resolution: 1 %
Barometric Pressure
Range: 8.85 to 32.50 inHg
Accuracy: ± 0.08 inHg (within range of 27.13 to 32.50 inHg)
Resolution: 0.01 inHg
Solar Radiation
(Light) Range: 0 to 200,000 Lux
Accuracy: ± 15%
Resolution: 1 Lux
Rain
Range: 0 to 394 in.
Accuracy: ± 10%
Resolution: 0.01 in
Wind
Direction Range: 0 - 360°
Direction Accuracy: ± 1°
Direction Resolution: 1°
Speed Range: 0 to 100 mph (operational)
Speed Accuracy: ± 2.2 mph or 10% (whichever is greater)
Speed Resolution: 0.1 mph
Speed Calculation: Average wind speed in 16 second update period
Gust Calculation: Peak wind speed in 16 second update period
Other Specifications
Power
Base station: Input 5V DC; 6.5' 110-240V 50-60 Hz wall charger included, Power Consumption: 0.5 Watts (1.25 Watts during WiFi configuration mode)
3 x AAA back up alkaline or lithium non-rechargeable batteries recommended (not included)
Outdoor sensor array: 2 x AA alkaline or lithium non-rechargeable batteries recommended (not included)
Dimensions
Display Tablet Frame Dimensions (LxWxH): 7.50" x 4.50" x 0.75"
Display Tablet :LCD Dimensions (LxW): 3.00" x 6.75"
Sensor Arrray, appx. (HxLxW): 15" x 11" x 10"
WiFi
WiFi Specifications 802.11b/g/n
Line of sight WiFi RF transmission (in open air): 80 feet
WiFi Display Tablet RF Frequency: 2.4 GHz
Product Support Questions
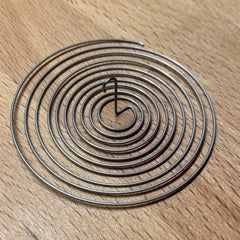
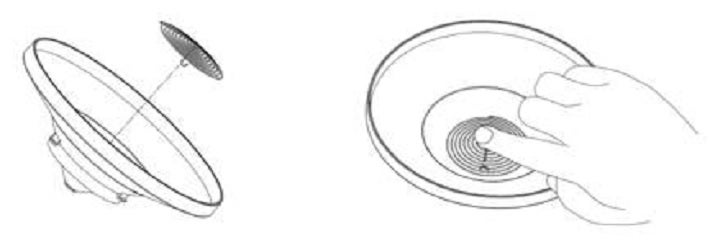
Q. What is this coil spring that came with my rain gauge?
It is a stainless steel filter which is included in the package. It’s aimed to stop leaves or bird droppings to avoid the obstruction of the cone hole.
The installation is simple: press the filter until the hook is inside the outlet hole and self -locked. The spring tension will keep the filter sit tight on the funnel.
... Permalink
To restore the console to factory default or perform a factory reset, perform the following steps:
- Remove the power from the console by removing the batteries and disconnecting the AC adapter.
- Apply power by connecting the AC adapter.
- Wait for all of the segments to appear on the screen, as shown below:

- Press and hold the WIND/+ and PRESSURE/- buttons at the same time until the console power up sequence is complete (about 5 seconds).
- Replace the batteries.
- Power down and up the console by removing batteries and AC power. If the problem persists,
- Reboot your router. If the problem persists,
- Perform a factory reset:
- Remove the power from the console by removing the batteries and disconnecting the AC adapter.
- Apply power by connecting the AC adapter.
- Wait for all of the segments to appear on the screen:
- Press and hold the WIND/+ and PRESSURE/- buttons at the same time until the console power up sequence is complete (about 5 seconds).
- Replace the batteries.
- You are now starting over. Reference the section in the manual for connecting the console to WiFi and the Internet.
- Connect directly to your wireless router and not a repeater or range extender.
If the wind vane is moving, but the wind direction is not changing on the console:
- Make sure the wind vane is firmly attached to the shaft with the set screw. Move the shaft manually with your hand.
- If the problem persists, the sensor array must be replaced. We have a one year warranty. To replace under warranty, please visit: www.ambientweather.com/rma.html
- If out of warranty, a replacement array can be purchased here: https://www.ambientweather.com/amws2902array.html
It is an M5 size stainless nut.
... Permalink- Look for the WiFi icon
 in the time field of the weather station console. Make sure this WiFi icon is on. If it is on, you already connected to WiFi.
 - The WS-2902A will not connect to a Guest Account.
- If you have repeaters and they have the same name or SSID, power off the repeater(s).
- If you own a Mesh Network (examples, Orbi, eero or Google), temporarily turn off all of the secondary nodes, leaving only the primary node (the node connected to the Internet) powered up.If you use a Virtual Private Network (VPN), temporarily turn this off.
- Select your APP PERMISSIONS on your Android Device and make sure Location is turned On for the awnet app:

- Temporarily turn off virus software, like Bitdefender, which is known to cause connection issues.
- The Android phone may not connect to the Ambient Wireless SSID if it cannot resolve the DNS address client3.google.com, and will instead try to use the LTE network.To avoid this, temporarily disable Switch to mobile data on your on your device under Settings -> Connections -> WiFi -> Advanced -> Switch to mobile data. You can re-enable this after you are finished.or:
- Swipe down from the top of the screen, select Settings, press Data usage and then flick the Mobile data switch from On to Off – this will completely turn off your mobile data connection. You can re-enable this after you are finished.
- To connect your console to your wireless router and the Internet, you must first download the awnet app
 to your phone or tablet. The awnet app is only a console configuration tool and is not used to view your live data.The app is available here:
Google Play: https://play.google.com/store/apps/details?id=com.dtston.ambienttoolplus
Note: The most common mistake is to download the AmbientTool app, which is designed for the first generation WS-2902. - Press and hold the WIND + and PRESSURE – buttons at the same time for four seconds. (2) The WiFi icon will begin flashing rapidly and the characters M-B will flash, indicating the console is broadcasting a WiFi signal.
- Run the Ambient Weather awnet app
 , and select Add a Device:
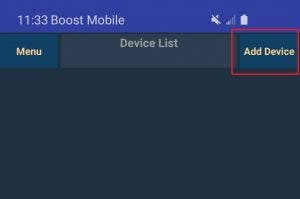
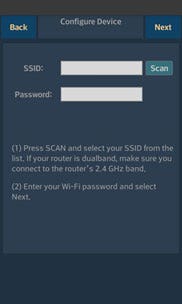
- Proceed through the awnet wizard following the instructions at the bottom. On the fourth panel, select Scan enter your 2.4 GHz router’s name (SSID) and WiFi password:

Important Note: If you own a dual band router, and the SSIDs (router name) are different for the two different bands, make sure you select the 2.4 GHz Band. - Scroll to the bottom and select ‘Save’
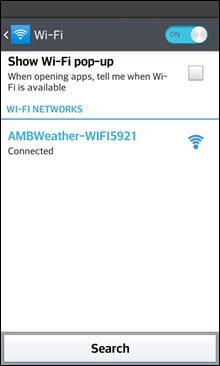
- If the problem persists, rerun this help guide, but this time, connect the phone to the console WiFi AMBWeather-WIFI first, before proceeding to Step 5:
- If you continue to have an issue, try a different android or apple device. The most common issue is typing it in wrong if you own and Apple, or not selecting it when you Scan Devices on and Android.
 WiFi Connection Video, Android: WiFi Connection Video, Android
**NOTE** MAKE SURE YOU ARE USING THE AC POWER ADAPTER THAT CAME WITH YOUR CONSOLE. THE CONSOLE WILL NOT CONNECT TO WIFI WITHOUT THE POWER ADAPTER BEING USED.
... Permalink- Make sure your weather station console is connected to WiFi. Look for the WiFi icon
 in the time field on your display console.
 - Launch awnet
 on your mobile device or tablet, the weather station MAC address is displayed in the Device List.
The example below is for three devices connected to the same network:
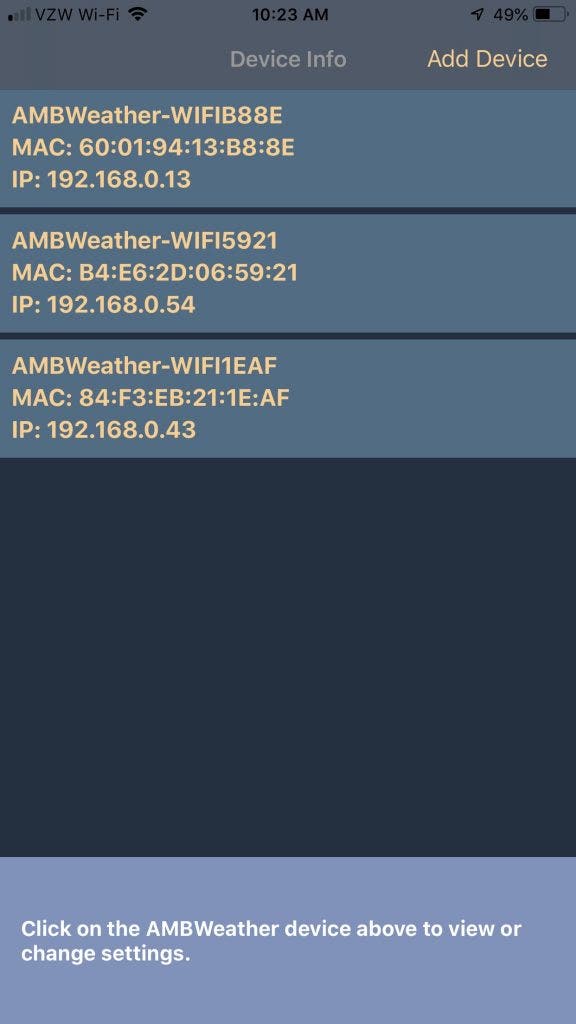
Tap on the device directly to program it and make sure a schedule it set:

- Look for the WiFi icon
 in the time field of the weather station console. Make sure this WiFi icon is on. If it is on, you already connected to WiFi.
 - The WS-2902A will not connect to a Guest Account.
- If you have repeaters and they have the same name or SSID, power off the repeater(s).
- If you own a Mesh Network (examples, Orbi, eero or Google), temporarily turn off all of the secondary nodes, leaving only the primary node (the node connected to the Internet) powered up.If you use a Virtual Private Network (VPN), temporarily turn this off.
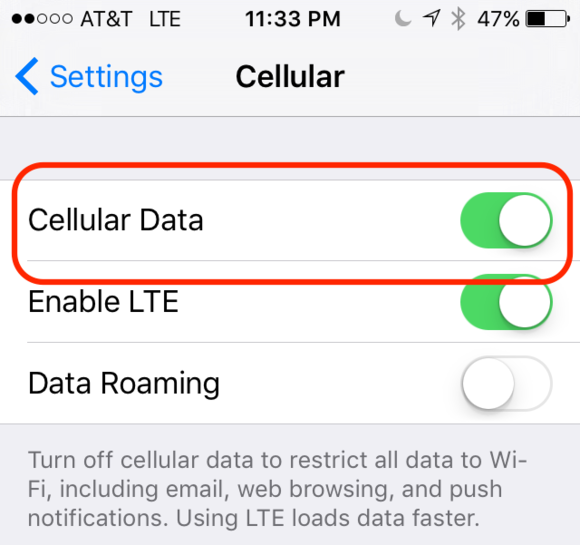
- WiFi Assist is a feature lets you automatically pop over to cellular data if you end up on a WiFi network with a poor connection. This can interfere with the connection process it is recommended to be disabled during setup.
- Go to Settings → Cellular

- Scroll all the way to the bottom of the cellular data settings and turn off WiFi assist. it will be the last option beneath everything else.
- Scroll all the way back up to the top and now disable cellular data completely.
- To connect your console to your wireless router and the Internet, you must first download the awnet app
 to your phone or tablet. The awnet app is only a console configuration tool and is not used to view your live data.The app is available here:Apple iOS: https://itunes.apple.com/us/app/awnet/id1341994564
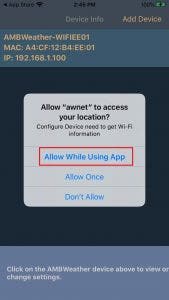
Note: The most common mistake is to download the AmbientTool app, which is designed for the first generation WS-2902. - When you first open up the awnet app please make sure you select ‘Allow While Using App‘. If you DO NOT select ‘Allow While Using App‘ then your iphone will not connect and you will need to uninstall then reinstall the awnet app

- Press and hold the WIND + and PRESSURE – buttons at the same time for four seconds. (2) The WiFi icon will begin flashing rapidly and the characters M-B will flash, indicating the console is broadcasting a WiFi signal.
- Prior to running the awnet app, make sure your phone is connected to your router. If you own a dual band router, and the SSIDs (router name) are different for the two different bands, make sure you select the 2.4 GHz Band.
- Run the Ambient Weather awnet app
 , and select Add a Device:
- Proceed through the awnet wizard following the instructions at the bottom. On the fourth panel, select enter the WiFi password. Make sure the correct SSID or router is already entered:

- If you continue to have an issue, try a different android or apple device. The most common issue is typing it in wrong if you own and Apple, or not selecting it when you Scan Devices on and Android.
**NOTE** MAKE SURE YOU ARE USING THE AC POWER ADAPTER THAT CAME WITH YOUR CONSOLE. THE CONSOLE WILL NOT CONNECT TO WIFI WITHOUT THE POWER ADAPTER BEING USED.
... PermalinkThis help guide is intended to be used with WS-2902A, WS-2902B or WS-2902C model of weather station
If you have a WS-2902 please go the guide here
To update the firmware on the WS-2902A, WS-2902B, WS-2902C console , launch awnet  from your mobile device.
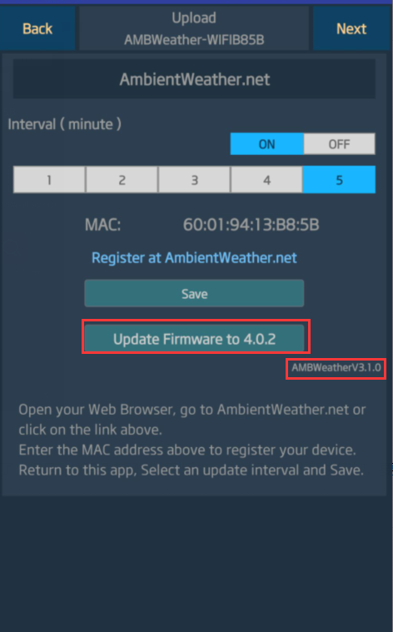
From the Device Info panel, tap on your device (in the example below, three devices are connected to the same device):

On the bottom right is the current firmware version of your console. If there is an upgrade available, tap on the upgrade link:
WS-2902A, WS-2902B, WS-2902C: Please refer to the manual first for setup instructions.
ANDROID Setup:
 WiFi Connection Video, Android: WiFi Connection Video, Android
 AWNET app Download Android: https://play.google.com/store/apps/details?id=com.dtston.ambienttoolplus
If you are having trouble connecting, after following the set-up instructions in the manual, then please refer to the walk through below:
- Look for the WiFi icon
 in the time field of the weather station console. Make sure this WiFi icon is on. If it is on, you already connected to WiFi.
 - The WS-2902A will not connect to a Guest Account.
- If you have repeaters and they have the same name or SSID, power off the repeater(s).
- If you own a Mesh Network (examples, Orbi, eero or Google), temporarily turn off all of the secondary nodes, leaving only the primary node (the node connected to the Internet) powered up.If you use a Virtual Private Network (VPN), temporarily turn this off.
- Select your APP PERMISSIONS on your Android Device and make sure Location is turned On for the awnet app:
- The Android phone may not connect to the Ambient Wireless SSID if it cannot resolve the DNS address client3.google.com, and will instead try to use the LTE network.To avoid this, temporarily disable Switch to mobile data on your on your device under Settings -> Connections -> WiFi -> Advanced -> Switch to mobile data. You can re-enable this after you are finished.or:
- Swipe down from the top of the screen, select Settings, press Data usage and then flick the Mobile data switch from On to Off – this will completely turn off your mobile data connection. You can re-enable this after you are finished.
- To connect your console to your wireless router and the Internet, you must first download the awnet app
 to your phone or tablet. The awnet app is only a console configuration tool and is not used to view your live data.The app is available here:
Google Play: https://play.google.com/store/apps/details?id=com.dtston.ambienttoolplus
Note: The most common mistake is to download the AmbientTool app, which is designed for the first generation WS-2902. - Press and hold the WIND + and PRESSURE – buttons at the same time for four seconds. (2) The WiFi icon will begin flashing rapidly and the characters M-B will flash, indicating the console is broadcasting a WiFi signal.
- Run the Ambient Weather awnet app
 , and select Add a Device:
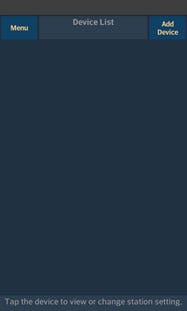
- Proceed through the awnet wizard following the instructions at the bottom. On the fourth panel, select Scan enter your 2.4 GHz router’s name (SSID) and WiFi password:
Important Note: If you own a dual band router, and the SSIDs (router name) are different for the two different bands, make sure you select the 2.4 GHz Band. - If the problem persists, rerun this help guide, but this time, connect the phone to the console WiFi AMBWeather-WIFI first, before proceeding to Step 5:

- If you continue to have an issue, try a different android or apple device. The most common issue is typing it in wrong if you own and Apple, or not selecting it when you Scan Devices on and Android.
iPHONE Setup:
 WiFi Connection Video, ios: WiFi Connection Video, Iphone/Ipad
 AWNET app Download ios: https://itunes.apple.com/us/app/awnet/id1341994564
If you are having trouble connecting, after following the set-up instructions in the manual, then please refer to the walk through below:
- Look for the WiFi icon in the time field of the weather station console. Make sure this WiFi icon is on. If it is on, you already connected to WiFi.
- The WS-2902A will not connect to a Guest Account.
- If you have repeaters and they have the same name or SSID, power off the repeater(s).
- If you own a Mesh Network (examples, Orbi, eero or Google), temporarily turn off all of the secondary nodes, leaving only the primary node (the node connected to the Internet) powered up.If you use a Virtual Private Network (VPN), temporarily turn this off.
- WiFi Assist is a feature lets you automatically pop over to cellular data if you end up on a WiFi network with a poor connection. This can interfere with the connection process it is recommended to be disabled during setup.
- Go to Settings → Cellular
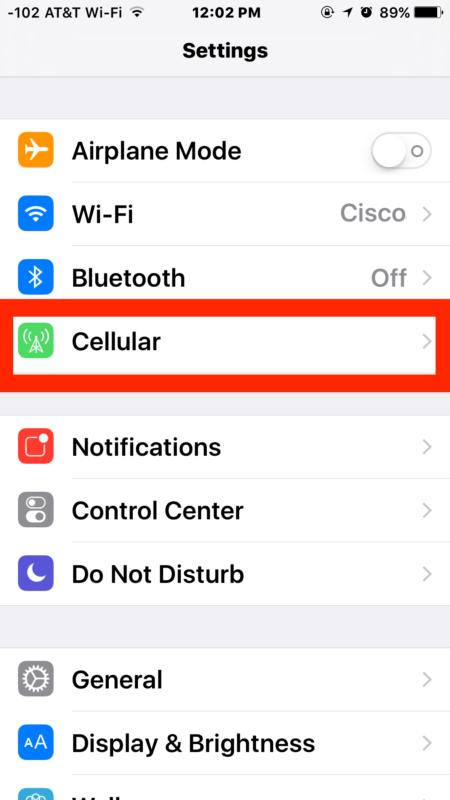
- Scroll all the way to the bottom of the cellular data settings and turn off WiFi assist. it will be the last option beneath everything else.
- Scroll all the way back up to the top and now disable cellular data completely.
- To connect your console to your wireless router and the Internet, you must first download the awnet app to your phone or tablet. The awnet app is only a console configuration tool and is not used to view your live data.The app is available here:Apple iOS: https://itunes.apple.com/us/app/awnet/id1341994564
Note: The most common mistake is to download the AmbientTool app, which is designed for the first generation WS-2902. - Press and hold the WIND + and PRESSURE – buttons at the same time for four seconds. (2) The WiFi icon will begin flashing rapidly and the characters M-B will flash, indicating the console is broadcasting a WiFi signal.
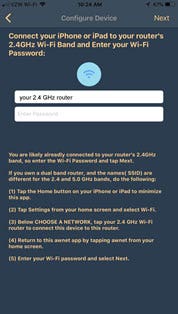
- Prior to running the awnet app, make sure your phone is connected to your router. If you own a dual band router, and the SSIDs (router name) are different for the two different bands, make sure you select the 2.4 GHz Band.
- Run the Ambient Weather awnet app , and select Add a Device:

- Proceed through the awnet wizard following the instructions at the bottom. On the fourth panel, select enter the WiFi password. Make sure the correct SSID or router is already entered:
- If you continue to have an issue, try a different android or apple device. The most common issue is typing it in wrong if you own and Apple, or not selecting it when you Scan Devices on and Android.
If all else fails please refer to this help file to reset your network then go through the setup again: Perform A Network Reset
... PermalinkReplacement parts are available for the WS-2902 and WS-2902A here:
https://ambientweather.com/weather-station-parts-accessories?ambient_compatible_with=6373
... PermalinkPressing WIND + and PRESSURE – at the same time for 5 seconds does not do anything. The buttons work when pressed individually.
- Make sure the console is plugged into wall power. If it is not plugged in, the console will not connect to WiFi or the Internet.
- Make sure you own a WS-2902A and not a WS-2902 or WS-1900. This command does not work on previous versions.
- If you own a WS-2902A, turn the lights off in the room and turn the console around. Make sure the AC adapter is plugged in.
If you do not see a blue light, the console WiFi chip is no longer working properly and the console needs replacing. - If the blue light is present, try performing a factory reset on the console:
How Do I Restore Console To Factory Default Or Factory Reset, Osprey Series?
If the problem persists. the issue is likely a problem with the AC adapter, and in some instances, the console itself.
To test the AC adapter, remove the batteries and plug the console in. If the console does not power up, the AC adapter is faulty. If it does power up, make sure you are not using a third party AC adapter (for example, a power adapter from outside the USA).
To replace the console and AC adapter under warranty, please visit: www.AmbientWeather.com/rma.html
For out of warranty replacements, please visit: https://www.ambientweather.com/amws2902aconsole.html
... PermalinkIf AmbientWeather.net does not update, and you receive the message:
There’s no real-time data yet. Give us a sec…
- Make sure your weather station console is connected to WiFi. Look for the WiFi icon in the time field on your display console
 .
. - Make sure there is not a typo in your MAC address. Launch the awnet app
 on your mobile device or tablet, and click on the device in the device list. Make sure the auto upload is on, and the MAC address matches what you entered on the AmbientWeather.net device panel: https://ambientweather.net/devicesThe example below is for three devices connected to the same network:

Tap on the device directly to program it and make sure a schedule it set:
Note that only Ambient Weather branded products work with AmbientWeather.net. To check, your weather station will the Ambient Weather logo and badge on the front of the console.
... PermalinkIf you own a new router, you have to start over and connect the console to the new router.
Here are the help guides for iOS and Android.
Note that some of the info may not apply to you since you already connected it to the previous router.
If you own an Android device, please reference this Help Guide:
I Cannot Connect My WS-2902A, WS-2902B, WS-2902C To WiFi, Android.
If you own an iOS (Apple) device, please reference this Help Guide:
I Cannot Connect My WS-2902A, WS-2902B, WS-2902C To WiFi, Apple Or IOS.
... PermalinkSelect your APP PERMISSIONS on your Android Device and make sure Location is turned On for the awnet app:

IOS 14 beta 5 is currently (8/20/20-current) causing issues with the awnet and Ambient Weather apps to crash. We are currently waiting for Apple to fix bugs with their ios 14 beta to resolve the issue with our apps.
... PermalinkIf the WS-2902A console will not connect to a Linksys WRT 3200ACM Router, try broadcasting the 2.4 GHz on a different channel.
For example, Channel 1 may be 2.412 MHz. Try switching to Channel 2, which is 2.417 MHz
... PermalinkHow to create an account at AmbientWeather.net using the awnet app.
IPHONE:
- After successfully adding your console to your wifi using the awnet app you should now see your consoles MAC address as shown below.

2. Write down or Copy to Clipboard the MAC address.
3. Click the Register at Ambient Weather link

4. You will now be re-directed to AmbientWeather.net to create your account as shown below.

5. Click the Ambient Weather icon in the upper left as shown below.

6. Click on Create Your Account.

7. Please enter the required information: Your email address, then create a password then re-type the same password.

8. Click the Create Account button.

9. Select OK to agree to Ambient Weather’s Terms of Use

10. Click the Add Device button as shown below

11. Enter or Paste the consoles MAC address

12. If ‘Looks good!‘ appears then click the Next button

13. Give your Weather Station a name. Enter the Complete physical address where the Weather Station is located and enter the correct Timezone.

14. Scroll down and click the Create button

15. You should now see your Weather Stations name, location and timezone

16. Scroll down and click the View Dashboard button

17. Your device is setup and should report within a few minutes


How to create an account at AmbientWeather.net using the awnet app.
ANDROID:
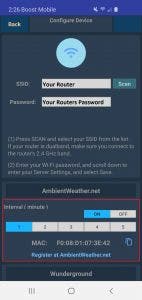
- After successfully adding your console to your wifi using the awnet app you should now see your consoles MAC address as shown below.

2. Click the COPY TO CLIPBOARD icon as shown below to copy the consoles MAC address.

3. Click the ‘Register at AmbientWeather.net‘ link, as shown below, to be redirected to AmbientWeather.net to create your account

4. You will now be re-directed to AmbientWeather.net to create your account as shown below.

5. Click the Ambient Weather icon in the upper left as shown below.

6. Click on Create Your Account

7. Please enter the required information: Your email address, then create a password then re-type the same password.

8. Click the Create Account button.

9. Select OK to agree to Ambient Weather’s Terms of Use

10. Connect Your Device. Add the Weather Stations MAC address by pasting/entering it into the window.

11. If ‘Looks good!‘ appears then click the Next button

12. Give your Weather Station a name. Enter the Complete physical address where the Weather Station is located and enter the correct Timezone.

13. Scroll down and click the Create button

14. You should now see your Weather Stations name, location and timezone

15. Scroll down and click the View Dashboard button

16. Your device is setup and should report within a few minutes


