Ambient Weather Support
Outdoor Weather Sensors
This can be caused by the fan in the unit you can attempt to apply lubricant to the fan which is inside of the thermo-hygrometer assembly.
- Remove two screws from Solar radiation shield.
- Apply lubricant to the fan shaft.
To edit the label name on the console, select the Settings button ![]() , and then the down arrow
, and then the down arrow  9 times until Multi Channel Sensor Setup is highlighted and press plus
 ![]() to view the channel settings.
to view the channel settings.


To edit the channel name, Press or key to select the channel name. The name field will turn green.
Press the ![]() key to view the keyboard, and enter the sensor name. Press
key to view the keyboard, and enter the sensor name. Press ![]()


 to scroll to the character and press
  to select the character. Press ‘OK’ to save your newly labeled Sensor. Press
  to return to the setup page.


What is a Lightning Detector?
A lightning detector is a device that detects lightning produced by thunderstorms.
Personal lightning detectors are popular among golfers, campers, law enforcement, sports officials, and other persons who work or recreate outdoors.
Personal lightning detectors function by detecting the electromagnetic pulse (EMP) emitted by a lightning strike. By measuring the strength of the detected EMP, the device can then estimate how far away the detected strike was. When exposed to multiple detected strikes, some personal lightning detectors can even calculate and extrapolate the direction of the storm's movement relative to its position (approaching, departing, or stationary).
How does a Personal Lightning Detector Work?
Have you ever heard the crackling of a lightning strike on your AM radio? A lightning strike has a distinct waveform that can be processed and analyzed by detector hardware and software.
Through the application of electronics and software, personal lightning detectors identify and track storm activity within 40 to 75 miles of your location.
The antenna detects electromagnetic field emissions from lightning activity within a storm cell. It then converts this data into digital signals and feeds them to its microprocessor for analysis.
In addition to identifying the waveforms characteristic of storm activity, personal lightning detectors perform continuous analysis of background electromagnetic interference (EMI) at your location.
Personal Lightning Detector Limitations
Although personal lightning detectors do function well in regards to their ability to detect nearby lightning, they are quite basic in functionality when compared to professional lightning detectors.
For example, they cannot tell where a lightning strike was located or from which direction the lightning is approaching, only that lightning is in the area. Also, since a personal lightning detector is triggered by EMPs, interference from other EMP-emitting devices (such as electronic equipment, appliances, nuclear weapons, fluorescent lights, and even car engines) can sometimes result in either false alarms or missed strikes.
This interference often has the additional effect of preventing personal lightning detectors from functioning properly while indoors. Despite these limitations, personal lightning detectors continue to increase in popularity among individuals and professionals.
PC Based Lightning Detectors
Similar to portable lighting detectors, PC lightning detectors connect directly to your PC and provide detailed strike data on your PC. An example and popular PC lightning detector is manufactured by Boltek.
Networked Lightning Detectors:
By networking lightning detectors through the power of the internet, an accurate strike location can be determined through triangulation (a geometric process determing the exact coordinates from three or more sources). On AmbientWeather.net, when one of our WH31L sensors registers a lightning strike it appears on the maps as a grayish circle. Darker circles are more recent and the radius of the circle shows the estimate of where the strike took place. The more Ambient Weather WH31L sensors in an area allows users to triangulate locations of local lightning strikes by comparing the overlapping grayish circles.
Siting your Lightning Detector
Lightning sensors detect a specific radio frequency wave form generated by lightning strikes. However, electronic devices like motors starting (HVAC units, lawn equipment), and fluorescent lighting can emit noisy electromagnetic field (EMF) signature that can generate a false positive lightning strike. To avoid false lightning strikes, move the detector away from any electrical noise-generating devices. Although electrical noise can be random in nature, another way to determine installation location is by using a portable AM radio set in between stations where you can hear white noise only and hold the radio close to the installation location. Any crackling heard on the radio may be detected by the WH31L lightning detector.
Ambient offers the WH31-SRS (https://ambientweather.com/wh31-srs-solar-radiation-shield) Solar Radiation Shield and Mounting Bracket to help users mount their WH31L sensor in the ideal location. The WH31-SRS includes hardware for pole mounting (up to 1.25" OD), vertical mounting to a horizontal surface (deck, top of a post/wall) or horizontal mounting to a vertical surface (fence post, wall).
... Permalink
If the lightning sensor has a weak signal, please check the following:
- Make sure both the console firmware: How Do I Update The WiFi Firmware, WS-2000 And WS-5000? are up to date.
- Make sure all the dip switches in the Lightning sensor are in the down position. Power down and up the sensor after changing the dip switch positions for changes to take effect.
- Power down the WS-2000 console then power it back up.
- Re-register the Lightning sensor through the Sensor ID screen.
- Ensure that the sensor is within 300 ft line of sight with your indoor console.
- We recommend the WH31-SRS as an enclosure for the lightning detector. https://ambientweather.com/wh31-srs-solar-radiation-shield


Lightning sensors detect a specific radio frequency wave form generated by lightning strikes.
However, electronic devices like motors starting (HVAC units, lawn equipment), and fluorescent lighting can emit noisy electromagnetic field (EMF) signature that can generate a false positive lightning strike.
To avoid false lightning strikes, move the detector away from any electrical noise-generating devices.
Although electrical noise can be random in nature, another way to determine installation location is by using a portable AM radio set in between stations where you can hear white noise only, and hold the radio close to the installation location. Any crackling heard on the radio may be detected by the WH31L lightning detector.
The following is a guide on how to properly mount the PM2.5/PM25 sensor, and perform preventative maintenance:
Mounting Guidelines:
Place the sensor in a shaded, well ventilated, non-moisture condensing area. Although the sensor is designed for outdoor use, it is best to mount in a well protected area, such as under a patio or carport.
The solar panel is sensitive to low light, but will still require monthly charging from the USB power port.
With PM2.5 sensors, fog reflects the light, and can result in a higher reading. This is characteristic to the inherent sensor design. The condition occurs during rainy or foggy weather.
Mounting orientation is not important. It can be mounted vertically or horizontally, as long as the vents are not blocked.
Preventive Maintenance:
Periodic cleaning of the PM2.5 sensors fan may need to be done if readings do not seem to change. To clean the fan you would remove the battery compartment of the sensor. Then carefully remove the sensor body from the protective shell. There are 2 small gauge wires connecting the solar cell to the sensor body. Please be careful to not pull on the wires and cause them to break. You would then use a can of compressed air to gently blow out any debris from the sensor fan(Warning: Do not use an air compressor)
Carefully separate the sensor body from the protective shell
ADVANCED CLEANING PROCEDURE:
(Note, if you’re not experienced/comfortable with performing something this complex please do not attempt as the unit may get damaged and void the warranty)
If an issue persists of the readings still being low then usually some pests have gotten into the internal sensor itself. You can carefully remove the screws from the main sensor housing and inspect/clean any pests, spider webs, eggs, etc. It is recommended to use Q-Tips to remove the debris.

To access the internal Detecting Chamber please refer to the images below.
Step 1: Remove the rubber coverings of the 3 screws.

Step 2: Remove the 3 screws.

Step 3: Remove the Protective Top Cover

Step 4: Carefully lift up and flip over the Sensor Board.


Step 5: Carefully clean the sensor board and Detecting Chamber then re-assemble in the reverse order.

... Permalink
If the display console only displays km, make sure your firmware is up to date. This issue was resolved in Version 1.6.3:
Ambient Weather WS-2000 And WS-5000 Firmware Download Center
Currently, at this time, no.
AQI is calculated individually for each pollutant. The overall pollutant with the highest AQI becomes the reported AQI. Since AmbientWeather.net only monitors (at this time) PM2.5, the only AQI value they could calculate would be the PM2.5 AQI. If, by chance, the PM10 AQI is higher than the PM2.5 AQI, then AmbientWeather.net would be reporting the wrong AQI value.
AQI, is a unitless index derived by the EPA.
Reference:
https://www.epa.gov/sites/production/files/2014-05/documents/zell-aqi.pdf
The U.S. EPA PM2.5 AQI model is on Page 11.
... PermalinkCan the PM25/PM2.5 sensor measure pollen?
No. Pollen doesn’t have much effect on the AQI for particle pollution. Most pollen particles are much larger than the particles we measure for the AQI. The size of PM2.5 is 2.5 micrometers in diameter or smaller while pollen particles are usually well over 10 micrometers. Pollen particles can sometimes rupture and break into smaller airborne particles in the PM2.5 range, but their contribution is too small to make a difference in the AQI.
... PermalinkThe saturated salt solution test is an easy method for testing the accuracy of your humidity sensor. Most electronic sensors are accurate from +/- 3 to 5% humidity, and some weather stations or weather centers can be calibrated from the display console by applying a bias.
- Mix common table salt with tap water until you have a completely saturated solution with no standing water.
- Place about 1 inch of the saturated salt solution in an open container or bowl that is approximately 4 inches high. The 3 inches above the solution will contain air with a predictable humidity value. You can use a cut away container as shown in the figure below. One edge of the container is cut slightly lower to rest the sensor on the lip.
- Place this container and the sensors in a waterproof zip lock plastic bag, as shown in the figure below. Leave one of the corners open and remove all of the remaining air with a straw. Close the air tight bag.
- Leave the sensor in the bag for four days or 96 hours to completely stabilize.
- The sensor should read 75% plus or minus the sensors rated margin of error. For example, if the sensor is rated at +/- 5%, the display should read between 70 and 80% relative humidity.
- If the sensor is adjustable or calibrateable, set the humidity on the display to 75%.
- Repeat this procedure once per year to account for electronic drift (sensor contamination).


The images above show a table salt slurry of 1″ height mixed in a container about 3″ tall. This solution is then placed in a plastic bag with the sensor.
- Place the sensor inside next to the indoor console sensor. Wait about 24 hours for stabilization. The sensors should agree within the accuracy specifications. Most digital capacitive hygrometer sensors are accurate within +/- 5%. Thus, the sensors should agree within 10% when considering full tolerance stack up.Note that humidity accuracy, like most other measurement parameters, are a percentage of full scale, and not a percentage of point.
- Sling psychrometers are very accurate. Perform a formal calibration. The humidity should agree within 5% of the rating. You can also make your own calibration kit. For details, visit:
Testing The Accuracy Of A Hygrometer - Saturated Salt Test?
3. Place the sensor in a shaded area on the north side of the structure to avoid direct and radiant heat.
4. Humidity is significantly impacted by external factors like location and water (grass, lakes, rivers, etc). Insure proper installation. You cannot use a source like the National Weather Service. There are several reasons:
- The NWS may update once per hour.
- The NWS has strict installation guidelines (no unnatural structures, bodies of water, or unnatural vegetation nearby).
5. If the problem persists, we have a one year warranty. Visit: www.AmbientWeather.com/rma.html
... Permalink
None of the Ambient Weather Stations support repeaters or boosters at this point in time.
... PermalinkHow do I connect my new ws-7078 array to my console?
To connect the array to your console
1.Press reset on the bottom of the array

2.On the back of the console press the sensor/wifi button once fast
Note: It can take several minutes for the console to connect to the array.

... Permalink
How to Refresh Your Browsers Cache
Clearing Cache Memory
To ensure you see the latest version of a site you need to clear the cache memory. This is done by doing a force refresh by pressing both control and F5 buttons simultaneously on your keyboard (depending on your browser). Most times a simple force cache refresh won’t work and you need to clear the cache by hand. On this site you can find step by step guides for Chrome, Firefox 3, Firefox 2, Internet Explorer 8, Internet Explorer 7, Internet Explorer 6, Safari and more on how to refresh your cache.

Force Refresh
Someone just told you to “force reload” your browser to fix something. Depending on your operating system all you need to do is the following key combination:
Windows: ctrl + F5
Mac/Apple: Apple + R or command + R
Linux: F5
Cache And Privacy
Internet cache can be a threat to your privacy as everyone who has access to your computer can see some personal information by simply opening the cache folder.
Also when the cache fills up, performance can slow down and your hard drive may run out of space.
Internet Service Provider Cache
In the same way that your web browser has a cache of recent web pages, your Internet Service Provider (ISP) may be doing some caching on your behalf.
In some (rare) cases, even though you are using shift-refresh to get new data from a webpage, the pages still seem to be old. This may be because your Internet Service Provider also has a cache and their cache may not be set up quite right, and they are not downloading the latest web pages.
When you encounter this problem you will have to communicatie with your ISP to fix this problem
Command Prompt: Ipconfig /Flushdns

Simply moving your display console (or receiver) to a different location may easily fix the communication issue.
We recommend the following best practices for trouble free wireless communication.
- Fresh Batteries. If applicable, make sure there are fresh batteries in both the console and remote. Remember to power up the console last when changing batteries. Do not use rechargeable batteries. They have a lower voltage and lower range than non-rechargeable batteries.
- Electro-Magnetic Interference (EMI). Keep the console several feet away from computers, TVs and electronic cables.
- Radio Frequency Interference (RFI). If you have other 433/915 MHz devices and communication is intermittent, try turning off these other devices for troubleshooting purposes. You may need to relocate the transmitters or receivers to avoid intermittent communication.
- Cold Weather. If the temperature is below < 10 degF, use e2 energizer batteries (Lithium), available in most stores batteries are sold (blue in color). Alkaline and NMH (nickel metal hydride) batteries do not operate below 10 degF.
- Sensor orientation. To insure proper communication, mount the remote sensor on a vertical surface, such as a wall. Do not lay the sensor flat if this is a small remote sensor.
- Line of Sight Rating. This device is rated at 300 feet line of sight (no interference, barriers or walls) but typically you will get 100 feet maximum under most real-world installations, which include passing through barriers or walls.
- Metal Barriers. Radio frequency will not pass through metal barriers such as aluminum siding. If you have metal siding, align the remote and console through a window to get a clear line of sight.
- Defective Sensor. It is possible the remote sensor is defective. If you have not done so already, to replace under one year warranty, please visit AmbientWeather.com/rma.html
The following is a table of reception loss vs. the transmission medium. Each “wall” or obstruction decreases the transmission range by the factor shown below.
| Medium | RF Signal Strength Reduction |
| Glass (untreated) | 5-15% |
| Plastics | 10-15% |
| Wood | 10-40% |
| Brick | 10-40% |
| Concrete | 40-80% |
| Metal | 90-100% |
It may be as simple as placing the remote(s) (powered up with fresh batteries) about 10-20 feet away from the console, power down and up the console by removing one or more batteries, disconnecting from AC power (if applicable), wait 30 seconds, and put the batteries back in, then wait several minutes to synchronize.
DO NOT TOUCH ANY BUTTONS and look for the search icon. Wait until the search icon turns off before pressing any buttons.
If you have more than one sensor, make sure they are programmed to transmit on different channels.
If the problem persists, we have a one year warranty. Please visit: www.AmbientWeather.com/rma.html
... PermalinkOfficial Barometric Pressure Source for WM-5 Calibration
WM-5 barometric pressure.
1.Use your existing Ambient Weather Account.
-
- Log into your account on www.AmbientWeather.net
- Go to devices, in the left column
- Click on blue Ambient globe.
- Refer to the "Barometer Calibration" section that show a local "official" reporting weather station

2.If you don't have an Ambient Weather Network account visit.

![]()
Enhanced by a powerful network of weather stations, the Ambient Weather Network
provides the most accurate hyperlocal conditions for your neighborhood, activity,
or business. Connect your compatible Ambient Weather Station to access your data
remotely and join one of the fastest-growing weather communities. Personalize your
data tiles, set alerts, and share your weather updates with other weather enthusiasts
on our platform, which is always ad-free and free of charge!

How Do I calibrate the RH/Humidity for my WM-5?
First, locate the calibration sticker that was supplied with your WM-5. It will have two numbers displayed. You will need to calibrate your unit to these numbers. With the unit on, press and hold the on/off button for 10 seconds. The display will turn off and then back on, displaying the number 700.

Enter the first voltage input number into this screen by pressing the mode button to scroll up (omitting the decimal). Note: When in humidity calibration mode, the mode button only scrolls up, not down, so it is important that you do not miss the number you are entering. When finished, press the on/off button again, you will see the number 3000

Enter the second voltage input number using the same procedure as before. To store the changes, press the on/off button. The unit will then shut off with the new values stored internally. NOTE: Each unit has unique voltage input numbers. It is crucial that you do not lose your instrument’s numbers.
If you lose the voltage input number you can enter these values.
0%=0.780
75.3%=3.041
... PermalinkTo reset the rain totals you will need to access the Web GUI. To acccess the Web GUI you first press and hold the Temp and Rain buttons together on the console for 5-10 seconds.

The console will then flash the wifi icon by time and date.

Then on your phone, tablet or computer go to settings, and then the wifi networks. Select the consoles access point. It will start with WN1965B-WIFI

It will say connected without wifi or no internet or sometimes it will checkmark. After that you open a web browser and type into the web address bar 192.168.4.1. If it pops up a screen that say login, use Admin for the username, make sure the password is blank, then click the login button.

It will then let you access the user interface. On the left click on rain totals.

It will then pop up the rain total screen. Here is will let you adjust to rain totals. If you are going to clear all the rain totals, at the bottom click reset.

Then the console will reset the rain totals.
... PermalinkTo Calibrate the sensors you will need to access the Web GUI. To acccess the Web GUI you first press and hold the Temp and Rain buttons together on the console for 5-10 seconds.
The console will then flash the wifi icon by time and date.
Then on your phone, tablet or computer go to settings, and then the wifi networks. Select the consoles access point. It will start with WN1965B-WIFI
It will say connected without wifi or no internet or sometimes it will checkmark. After that you open a web browser and type into the web address bar 192.168.4.1. If it pops up a screen that say login, use Admin for the username, make sure the password is blank, then click the login button.
It will then let you access the Web GUI. On the left click on Calibration.

It will then pop up the Calibration screen. Here is will let you adjust the sensors. In this example we highlighted UV gain. Just click on it and type in the adjustment. Then at the bottom click save

Then the console will calibrate to the new entry.
... PermalinkIf your console did not come with the MAC address on a sticker on the back of the console, there are 2 other ways of finding the MAC address. In the console settings with the mode button and via the Web GUI
Via the Mode Button

On the console press the mode button on the side of the console 6 times. It will then show the MAC address on the console display. It will be the first set of numbers left to right that are on the display.
Via the Web GUI
To acccess the Web GUI you first press and hold the Temp and Rain buttons together on the console for 5-10 seconds.
The console will then flash the wifi icon by time and date.
Then on your phone, tablet or computer go to settings, and then the wifi networks. Select the consoles access point. It will start with WN1965B-WIFI
It will say connected without wifi or no internet or sometimes it will checkmark. After that you open a web browser and type into the web address bar 192.168.4.1. If it pops up a screen that say login, use Admin for the username, make sure the password is blank, then click the login button.
It will then let you access the Web GUI. On the left click on Local Network.
It will then show you the MAC address for the console

Can I Use My Observer (WS-1000-WiFi) Series Console With The Osprey Sensor Array?
The WS-2002 console is compatible.
The console will just need to be calibrated to the array. You would just need to adjust the wind gain and rain gain on the calibration screen.
To enter the calibration screen on the console press the gear (setup button) icon 3 times.


Wind Gain =2.17

Rain Gain = 1.18

There are two versions of firmware:
- Console Firmware
- WiFi Firmware
The WS-2000 firmware must be updated to the following revisions in order to support the PM25, PM25IN, and AQIN Sensor:
- Firmware Revision Number (console): 1.4.4
- WiFi Firmware: AMBWeatherV4.1.4
To check the firmware version:
How do I Check my Firmware Versions
You must upgrade both versions of firmware for proper PM25 sensor operation:
Console Firmware:
How do I update firmware, WS-2000?
WiFi Firmware:
How do I update WiFi firmware, WS-2000/WS-5000
... PermalinkTo Calibrate the Multi CH T& H sensors you will need to access the Web GUI. To access the Web GUI you first press and hold the Temp and Rain buttons together on the console for 5-10 seconds.
The console will then flash the wifi icon by time and date.
Then on your phone, tablet or computer go to settings, and then the wifi networks. Select the consoles access point. It will start with WN1965B-WIFI
It will say connected without wifi or no internet or sometimes it will checkmark. After that you open a web browser and type into the web address bar 192.168.4.1. If it pops up a screen that say login, use Admin for the username, make sure the password is blank, then click the login button.
It will then let you access the Web GUI. On the left click on Calibration.
Once in calibration scroll down and select Multi CH T&H Calibration

On the next screen it will then let you calibrate the Multi CH T&H sensors.
After entering the calibrations click save.

Then the console will calibrate to the new entry.
... PermalinkHow to re-register a sensor through the Sensor ID screen.
Enter Setup mode as shown below.


Return to the Home Screen to view the WH31L Lightning Sensor Data or whatever sensor you re-registerd
Temperature reads too high (or inaccurate) when placed in the sun or close to a radiant heat source, like a house, building or structure.
- Place the sensor inside next to the indoor console sensor. Wait about 1 hour for stabilization. The sensors should agree within the accuracy specifications. Most RTD (resistive thermal device) sensors are accurate within +/- 2 degF. Thus, the sensors should agree within 4 degF.
- Mercury or red spirit thermometers are very accurate. Inside your house, place a red spirit thermometer next to the digital thermometer. The thermometers should agree within 2 degF.
- If the sensor is separate, place the sensor in a shaded area on the north side of the structure to avoid direct and radiant heat.
- Temperature sensors that do not have radiation shields will absorb solar energy and read higher than the ambient temperature. To prevent this problem, purchase a solar radiation shield from Ambient Weather.
- We have a one year warranty and a 30 day return policy. For details, please visit: www.AmbientWeather.com/rma.html
- While at the website, enter the part number of the transmitter in the Search by Keyword to locate the product.
The WH31, WH31B and WH31E are 8-channel thermo-hygrometers that support a variety of Ambient Weather Stations
The WH31 and WH31E include a radio controlled clock (RCC). The WH31B does not.
The WH31 and WH31E are only required for the WS-3000 Series, which includes a Radio Controlled Clock.
Our Internet Connected weather stations receive the time from the Internet Time Server (NIST.gov).
... PermalinkThe WS-3000-X8 is designed to display eight sensors at the same time. The display is similar to as follows:
The WS-3000-X5 displays 5 sensors and a graph:

You can convert the display from 8 sensors to 5 sensors (or visa versa) by downloading and installing the firmware for the WS-3000:
Ambient Weather WS-3000 Download Center
You can share the same field for sensors 5, 6, 7 and 8 and use the scroll mode to view each parameter. Please reference your User Manual for assigning more than one sensor to a field.
... PermalinkUser Manual (required):
Download the current User Manual for the WS-3000.

Software (optional):
The WS-3000 Software allows you to program the console, set alarms and download archived data from SD Card.
1. Download the software from the link below.
2. Run the installer.
3. Connect the USB Cable.
4. Run the software
.
Firmware Updates:
Important Note: The WS-3000-X3 and WS-3000-X5 includes a graph on the display. The WS-3000-X8 removes the graph so all 8 sensors can be displayed at the same time.
Important Note: WS-3000 sold pre-05/2022 require firmware versions V1.2.2 for -X3 and -X5 configurations and V1.1.9 for -X8 configuration.
- WS-3000-X3 and WS-3000-X5::
 Version 1.2.2
Instructions:- Download the firmware file above.
- Extract the file (Firmware.bin).
- Copy the extracted files to the root directory of a blank Micro SD Card from your computer.
- Power down the WS-3000 Display Console.
- Insert the Micro SD Card into the WS-3000 Display Console Micro SD card slot.
- Power up the console.
- WS-3000-X8:
 Version 1.1.9
Instructions:- Download the firmware file Firmware.bin above.
- Copy the Firmware.bin file to the root directory of a blank Micro SD Card from your computer.
- Power down the WS-3000 Display Console.
- Insert the Micro SD Card into the WS-3000 Display Console Micro SD card slot.
- Power up the console.
In order to stay up to date with the latest Ambient Weather firmware or app updates, sign up for email notifications below. This way, you'll always be notified when a new update is available for your station or app.
... Permalink
What is the correct Timezone/Time Zone setting for my location:
Here is a list of Time Zones:
| Hours from GMT | Time Zone | Cities |
| -12 | IDLW: International Date Line West | — |
| -11 | NT: Nome | Nome, AK |
| -10 | AHST: Alaska-Hawaii Standard CAT: Central Alaska HST: Hawaii Standard |
Honolulu, HI |
| -9 | YST: Yukon Standard | Yukon Territory |
| -8 | PST: Pacific Standard | Los Angeles, CA, USA |
| -7 | MST: Mountain Standard | Denver, CO, USA |
| -6 | CST: Central Standard | Chicago, IL, USA |
| -5 | EST: Eastern Standard | New York, NY, USA |
| -4 | AST: Atlantic Standard | Caracas |
| -3 | — | São Paulo, Brazil |
| -2 | AT: Azores | Azores, Cape Verde Islands |
| -1 | WAT: West Africa | — |
| 0 | GMT: Greenwich Mean WET: Western European |
London, England |
| 1 | CET: Central European | Paris, France |
| 2 | EET: Eastern European | Athens, Greece |
| 3 | BT: Baghdad | Moscow, Russia |
| 4 | — | Abu Dhabi, UAE |
| 5 | — | Tashkent |
| 6 | — | Astana |
| 7 | — | Bangkok |
| 8 | CCT: China Coast | Bejing |
| 9 | JST: Japan Standard | Tokyo |
| 10 | GST: Guam Standard | Sydney |
| 11 | — | Magadan |
| 12 | IDLE: International Date Line East NZST: New Zealand Standard |
Wellington, New Zealand |
Note: There are no half settings. Example: If your time zone is 5.5 then you would select a whole number such as 5 or 6.
... PermalinkTo set the dip switches in an 8 channel sensor, there are three dip switches with 8 different combinations.

| DIP SWITCH | FUNCTION | |||
| 1 | 2 | 3 | 4 | |
| DOWN | DOWN | DOWN | — | Channel 1 |
| UP | DOWN | DOWN | — | Channel 2 |
| DOWN | UP | DOWN | — | Channel 3 |
| UP | UP | DOWN | — | Channel 4 |
| DOWN | DOWN | UP | — | Channel 5 |
| UP | DOWN | UP | — | Channel 6 |
| DOWN | UP | UP | — | Channel 7 |
| UP | UP | UP | — | Channel 8 |
| — | — | — | DOWN | °F |
| — | — | — | UP | °C |
After you set the dip switches, you must always power down and up the remote sensor by removing and reinserting the batteries for the change to take effect.
Why do we do it this way instead of an 8 position switch? The reason is 8 position switches are much more difficult to implement, less reliable and takes up more space.
... PermalinkQ: Can I have a label name for each of my sensors?
A: Yes you can with Firmware version 1.2.6. Please follow the steps below to install the version 1.2.6 firmware


WS-3000-X3, WS-3000-X5, WS-3000-X8:

Instructions:
- Download the firmware file above.
- Extract the file (Firmware.bin).
- Copy the extracted files to the root directory of a blank Micro SD Card (Less than 32Gb in size, formatted for FAT32) from your computer.
- Power down the WS-3000 Display Console.
- Insert the Micro SD Card into the WS-3000 Display Console Micro SD card slot.
- Power up the console.
Sensor Labeling
You can label the location of each of your sensors from the pre-programmed menu.
To add a label, Press the  Mode Key to the Channel Reference Screen. Highlight ‘Setup’ for the Channel you wish to add a label to. Press the
  Selection key to access the Channel Reference screen. Use the
  Scroll keys to highlight the label you wish to use. Press the
  Selection key to save the selected Channel Reference. Press the
  Mode key till you return to the Home screen to view the newly added label.
To display additional sensors 6-8, you will need to set up the sensors to scroll within the same display area.
In the Normal mode, press the MENU key once to enter Setup Mode.
In the example below, we will have display area scroll Channels 5-8.
Select CH Area5:

and select Channels 6-8 to display in Display Area 5:

If firmware update file is not being read from your Micro SD Card:
- The Firmware.bin file must be the only file on the SD Card and not contained in a folder. Also, if you own a Mac, it may add a file extension to the name.
- Make sure the Micro SD Card is blank.
- We recommend an SD Card memory size of 32 GBytes or less. If the card is larger than 32 GBytes, it must be partitioned.
- Make sure the SD Card is FAT32 formatted. Right click on the SD Card Drive from your computer:

- Try a different SD Card.
- If the problem persists, we have a one year warranty. For details, please visit:www.AmbientWeather.com/rma.html
and we can attempt to update the firmware for you.
Here is how the sensors display on the console for the WS-3000×3, WS-3000×5 and WS-3000×8
WS-3000×3 showing sensors 1-3 With Bar Graph
WS-3000×5 showing sensors 1-5 With Bar Graph
WS-3000×5 showing additional sensors 6-8(optional) With Bar Graph 
The WS-3000×5 Will monitor up to 8 sensors. The WS-3000×5 Will display a bar graph with sensors 1-5 on the main screen then show any additional sensors(#6, #7 and #8) on the right section of the screen as shown in the image above.
WS-3000×5 Showing extreme temperature ranges:
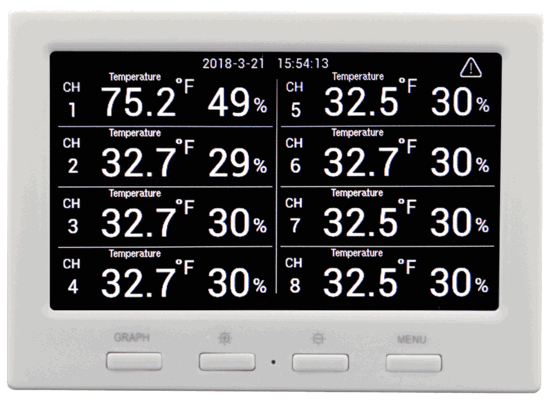
WS-3000×8 showing sensors 1-8 No Bar Graph
You can convert the display from 8 sensors to 5 sensors (or visa versa) by downloading and installing the firmware for the WS-3000: https://www.ambientweather.com/ws3000.html
You can share the same field for sensors 5, 6, 7 and 8 and use the scroll mode to view each parameter. Please reference your User Manual for assigning more than one sensor to a field.
Manuals:
WS-3000-x3: https://p10.secure.hostingprod.com/@site.ambientweatherstore.com/ssl/Manuals/WS-3000.pdf
WS-3000-x5: https://p10.secure.hostingprod.com/@site.ambientweatherstore.com/ssl/Manuals/WS-3000.pdf
WS-3000-x8: https://p10.secure.hostingprod.com/@site.ambientweatherstore.com/ssl/Manuals/WS-3000-X8.pdf
If your screen does not power up, the issue may be with the AC adapter. Measure the output voltage of the AC adapter, and it should be about 5 Volts.
If the AC adapter is not registering a voltage, we have a one year warranty here: www.AmbientWeather.com/rma.html
If out of warranty. the AC adapter is available here for purchase: https://www.ambientweather.com/amwewsacadre1.html
If the voltage is fine, the console needs replacing, we have a one year warranty here: www.AmbientWeather.com/rma.html
If out of warranty, the console is available here for purchase: https://www.ambientweather.com/amws3000c.html
... PermalinkIf the console no longer powers up, it will need replacing.
We have a one year warranty. For warranty replacements, please visit: www.AmbientWeather.com/rma.html
Otherwise, replacement consoles are available here:
https://www.ambientweather.com/amws3000c.html
... PermalinkYou cannot change the archive interval from the console, but you can change the archive interval from the PC software.
You can download the software here:
https://www.ambientweather.com/ws3000.html
Select Menu | Setup to set the time, date and display customization settings.
From this screen you can set the archive interval:


Virtual Weather Station Download Center WeatherSnoop For Mac How Do I Use Cumulus Software With EasyWeather?


EasyWeather Software For WS-1001-WiFi, WS-1002-WiFi Weather Station For PC And Mac


Ambient Weather VW-ANET AmbientWeather.net Website Access for Nano, WeatherBridge or WeatherBridgeProOur Price: $100.00

Ambient Weather ObserverIP Download Center

Ambient Weather WS-3000 Download Center


AmbientCamHD and AmbientCamHDA Download Center


Ambient Weather WS-8478 Falcon Download Center

Ambient Weather WS-1001-WiFi, WS-1002-WiFi Download Center

Ambient Weather WS-50 Firmware Download Center

Ambient Weather WS-2000 Download Center
... PermalinkIf one of the sensors does not communicate with the console, try swapping channels with another sensor.
For example, switch Sensor Channel 4 to 5 on one sensor and and 5 to 4 on another sensor. You will have to power down and up the remotes after you change the dip switches.
Place both sensors about 10 feet from the console, then power down and up.
Console : Input 5V DC; 6.5′ 110-240V 50-60 Hz wall charger included,
Console Power Consumption: 5V / 200 mA
DC barrel connector dimensions: 9.0mm ( L ) x 2.5mm ( OUT D) x 0.70mm ( Inner D)
... PermalinkIf data is not being written to your Micro SD Card:
- Make sure the Micro SD Card is blank.
- We recommend an SD Card memory size of 32 GBytes or less. If the card is larger than 32 GBytes, it must be partitioned.
- Make sure the SD Card is FAT32 formatted. Right click on the SD Card Drive from your computer:

- Try a different SD Card.
- If the problem persists, we have a one year warranty. For details, please visit:www.AmbientWeather.com/rma.html
To export a csv file to your computer, you must insert an SD Card into the memory card slot on the console.

Backup data to micro SD / TF card.
The SD card will record data into the HISTORY directory.
The file is comma separated value (csv) and can be imported into Microsoft Excel, or other text based applications.
The file format is as follows:
YYYYCH#A
where YYYY is the year, # is the channel number and A is the revision letter.
Example: 2016CH2A is the data for 2016, Channel 2, and A is the revision letter each time you change a units of measure or calibration setting.
Below is an example of the file output:
Time,Temperature(F),Humidity(%),Dewpoint(F),HeatIndex(F)
2016/02/18 08:05,48.7,32,20.3,48.7
2016/02/18 08:10,49.1,33,21.2,49.1
2016/02/18 08:15,49.1,31,19.8,49.1
... PermalinkTemperature can read too low (or inaccurate) at night when placed close to a radiant heat source, like a house, building or structure. It can also read lower then other stations in your area due to irrigation or sprinklers.
- Place the sensor inside next to the indoor console sensor. Wait about 1 hour for stabilization. The sensors should agree within the accuracy specifications. Most RTD (resistive thermal device) sensors are accurate within +/- 2 degF. Thus, the sensors should agree within 4 degF.
- Mercury or red spirit thermometers are very accurate. Inside your house, place a red spirit thermometer next to the digital thermometer. The thermometers should agree within 2 degF.
- For colder temperature verification, place the sensor with the red spirit thermometer in the regrigerator or freezer.
- If the sensor is separate, place the sensor in a shaded area on the north side of the structure to avoid direct and radiant heat.
- Temperature sensors that do not have radiation shields will absorb solar energy and read higher than the ambient temperature. To prevent this problem, purchase a solar radiation shield from Ambient Weather.
- We have a one year warranty and a 30 day return policy. For details, please visit: www.AmbientWeather.com/rma.html
- While at the website, enter the part number of the transmitter in the Search by Keyword to locate the product.
How to reset the WS-3000 console:

https://p10.secure.hostingprod.com/@site.ambientweatherstore.com/ssl/Manuals/WS-3000.pdf
... PermalinkIf the WS-3000 console just flashes or keeps trying to boot up then a firmware update should correct this. Please refer to the steps below to download and install the firmware for your console.
Firmware Updates:
Important Note: The WS-3000-X3 and WS-3000-X5 includes a graph on the display. The WS-3000-X8 removes the graph so all 8 sensors can be displayed at the same time.
- WS-3000-X3 and WS-3000-X5:
 Version 1.2.2
Instructions:- Download the firmware file above.
- Extract the file (Firmware.bin).
- Copy the extracted files to the root directory of a blank Micro SD Card (Less than 32Gb in size, formatted for FAT32) from your computer.
- Power down the WS-3000 Display Console.
- Insert the Micro SD Card into the WS-3000 Display Console Micro SD card slot.
- Power up the console.
- WS-3000-X8:
 Version 1.1.9
Instructions:- Download the firmware file Firmware.bin above.
- Copy the Firmware.bin file to the root directory of a blank Micro SD Card (Less than 32Gb in size, formatted for FAT32) from your computer.
- Power down the WS-3000 Display Console.
- Insert the Micro SD Card into the WS-3000 Display Console Micro SD card slot.
- Power up the console.
If the temperature or humidity does not match between what is displayed on the remote sensor and what is displayed on the console:
- If you own more than one remote sensor:
The sensor has a channel number displayed on it, next to the temperature. Make sure that that Channel Number displayed on sensor matches the channel number shown on the display. If they do not match, refer to your User Manual on how to switch the channel display. - It is possible the temperature or humidity were adjusted or calibrated unintentionally. Refer to your individual User Manual on how to remove or correct the adjustment from the console.
Here is an example:
- Remote sensor reads 70.0
- Console for the same sensor channel reads 71.2
- Adjust the console down 1.2 degrees to match 70.0.

This was a bug in the firmware that was fixed on September 4, 2018.
To resolve this issue:
- Download and install the latest Version of EasyTemp software here:https://www.ambientweather.com/ws3000.html
- Download and install the Firmware for the WS-3000-X8 console here:https://www.ambientweather.com/ws3000.html
- To install the firmware in the console, copy the file Firmware.bin from your computer to a blank Micro SD Card.
- Insert the SD Card into the console.
- Power down and up the console. Once the firmware update is complete, eject and delete the Firmware.bin file if you wish to use this SD Card for data collection.
Product Manual
https://ambientweather.com/mwdownloads/download/link/id/466/
Product Page
https://www.ambientweather.com/amws3000x8.html
Q: Which sensors work with the WS-2902B console?
A: The WS-2902B will ONLY work with the WH31/WH31B/WH31E, WH31P (probed) and PM25/PM25IN sensors.
The sensors are “pass-through”, which means they will not appear on the local display console, but are displayed on AmbientWeather.net.
It will NOT work with WH31L (lightning), WH31LA (leak alert), WH31SM (soil moisture) .
The following image is an example of a channel 1 sensor. The title is customizable on the website:


The lightning sensor show low battery on Ambientweather.net even after replacing batteries.
- Ensure the console hardware firmware is update to date using this
Guide - Ensure the console WIFI firmware is update to using this Guide
- Ambient Weather suggests the use of fresh lithium batteries in the WH31L. Batteries available here
Product Manual
https://ambientweather.com/mwdownloads/download/link/id/587/
Product Page
https://www.ambientweather.com/amwh31l.html

The soil sensor includes a silicon (sand-like) medium cap, which reduces the sensor sensitivity to different soil types, since the silicon is a “known medium”.
A 48 to 72-hour time period is required for the sensor to completely dry out from a completely saturated state when transferred from water and air.
When placed in soil, the soil moisture sensor responds faster, because moisture is transferred freely in a similar medium (dirt, soil) through osmosis, as opposed to air or water.
Product Manual
https://p10.secure.hostingprod.com/@site.ambientweatherstore.com/ssl/Manuals/WH31SM.pdf
Product Page
https://www.ambientweather.com/amwh31sm.html
The following is a guide on how to properly mount the PM2.5/PM25 sensor, and perform preventative maintenance:
Mounting Guidelines:
Place the sensor in a shaded, well ventilated, non-moisture condensing area. Although the sensor is designed for outdoor use, it is best to mount in a well protected area, such as under a patio or carport.
The solar panel is sensitive to low light, but will still require monthly charging from the USB power port.
With PM2.5 sensors, fog reflects the light, and can result in a higher reading. This is characteristic to the inherent sensor design. The condition occurs during rainy or foggy weather.
Mounting orientation is not important. It can be mounted vertically or horizontally, as long as the vents are not blocked.
Preventive Maintenance:
Periodic cleaning of the PM2.5 sensors fan may need to be done if readings do not seem to change. To clean the fan you would remove the battery compartment of the sensor. Then carefully remove the sensor body from the protective shell. There are 2 small gauge wires connecting the solar cell to the sensor body. Please be careful to not pull on the wires and cause them to break. You would then use a can of compressed air to gently blow out any debris from the sensor fan(Warning: Do not use an air compressor)


With PM2.5 sensors, fog reflects the light, and can result in a higher reading. This is characteristic to the inherent sensor design.
The condition occurs during rainy or foggy weather, where:
Outdoor Temperature – Dew point Temperature ≤ 2º C (3.6 ºF)
Thus, when the air is nearly saturated, the data is invalid.
Do your best to mount the sensor in a well drained area which is less prone to moisture condensation if possible.
Product Manual
https://ambientweather.com/mwdownloads/download/link/id/478/
Product Page
https://www.ambientweather.com/ampm25.html

The PM2.5 works with the following weather stations:
WS-0900-IP (discontinued)
Product Manual
https://ambientweather.com/mwdownloads/download/link/id/478/
Product Page
https://www.ambientweather.com/ampm25.html

The minimum battery voltage for the PM2.5 sensor is about 1.0 V.
Product Manual
https://ambientweather.com/mwdownloads/download/link/id/478/
Product Page
https://www.ambientweather.com/ampm25.html
Why does my PM25/PM2.5 not show up on AmbientWeather.net/ Ambient Dashboard app?
You will need to update your consoles firmware and your wifi firmware to the most current versions as shown below.
How Do I Update Firmware, WS-2000/WS-5000?
How Do I Update The WiFi Firmware, WS-2000 And WS-5000?
... Permalink