Ambient Weather Support
Weather Cameras
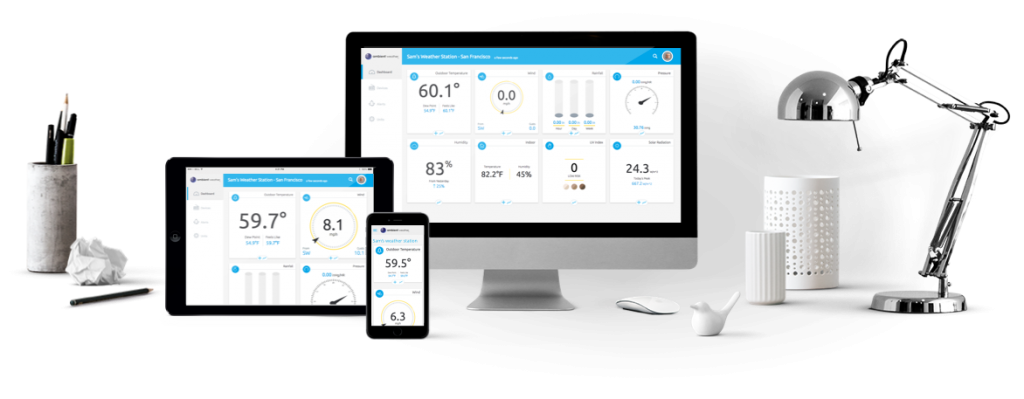
WeatherCam images can be uploaded, viewed, and shared on AmbientWeather.net as well as the Ambient Weather on iOS and Android apps.
Android: https://play.google.com/store/apps/details?id=net.ambientweather.dashboard&hl=en_US
iphone/ios: https://apps.apple.com/us/app
As of December 29, 2021, for FTP cameras Ambient now offers time lapse video of the uploaded screen shots with weather data overlay
From the devices panel, select Add WeatherCam.
Next, choose the format for your camera (FTP or URL):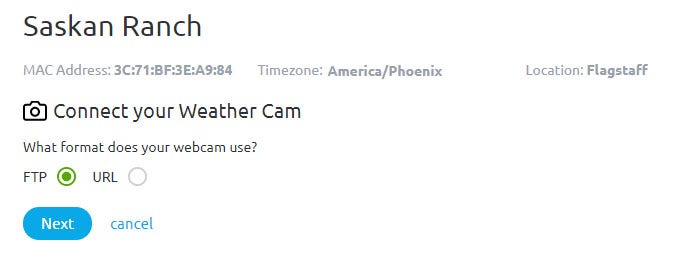
- FTP: Most network cameras include FTP upload.
- URL: If you are hosting on another website, provide a URL.
FTP option:
The website automatically generates the servername, username and password. Enter these credentials into your camera’s ftp network settings.
– Some cameras like Foscam may require you enter the server header ftp://ftp.ambientweather.net, rather than ftp.ambientweather.net.
– Select passive mode (PASV), if available.
– The maximum upload interval is one minute. Program an upload interval of 60 seconds or greater.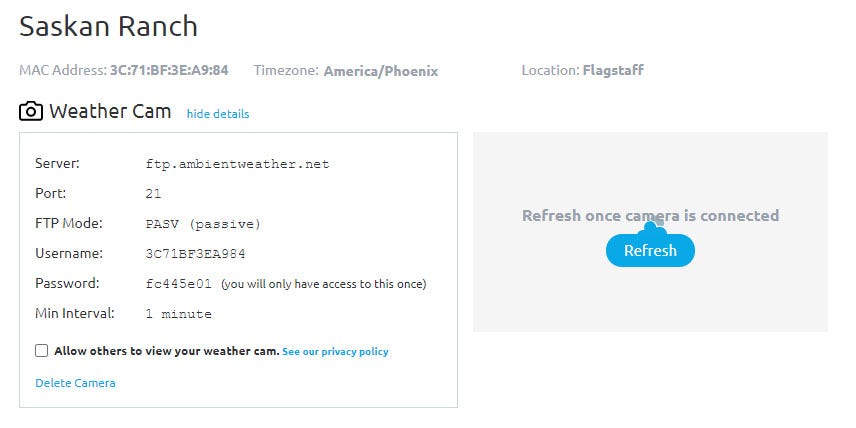
URL option:
Enter the static URL associated with your camera hosting software. An example for the Nest Camera is referenced below.

Once the camera image has successfully uploaded to the server, the image will appear next to the WeatherCam credentials.
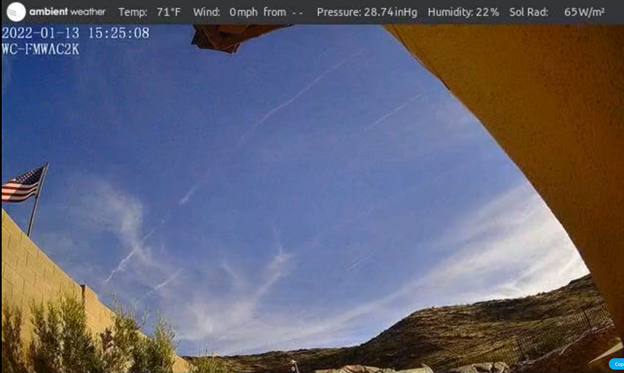
To make your WeatherCam public, select the checkbox “Allow others to view your weather cam“. It will take up to 48 hours for approval. Only images that point outside and show a portion of the sky will be approved.
Once your WeatherCam is public, it will be displayed on the WeatherCam map: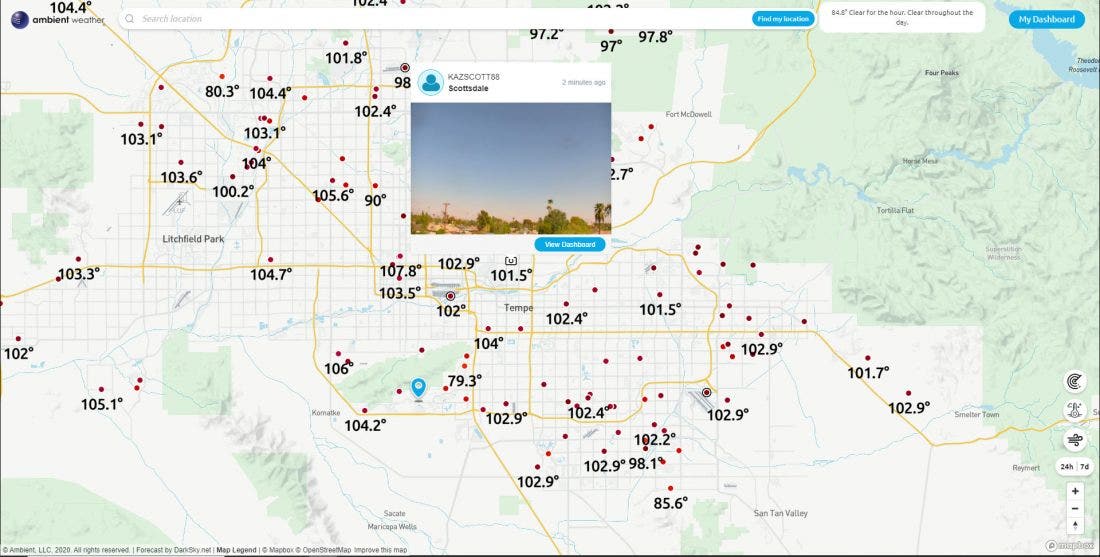
- If you changed routers, encryption or credentials, you will have to connect the console to the new router via Ethernet cable and then power down and up the camera.
- Reprogram the camera for the new WiFi router credentials per the Quick Start Guide for your Camera Version.
Once you have your camera powered on, you will need to download the Reolink software on your phone or computer to access your camera’s settings.
You can download this application from Reolink at the link below
The application is going to search for a device to add once this is added you can name the camera and place your own password you will now be present with the main camera screen

figure 1
Next, click on the cog/gear button to the right of your named camera (refer to figure 2)

figure 2
Next Select Surveillance and then FTP (refer to figure 3)

figure 3
From here click on ftp settings with the drop down and pull up the ambient weather.net on a different tab/browser. On the ambient weather app/website you will want to make your way to the devices tab and click on the add weather cam in light blue.
(Please advise you will have to have a weather station already set up and connected to Wi-Fi for this to work.)

Make sure your format is on FTP then click the next button on the ambient weather site. Afterwards you will receive a set of your own prompts to copy and paste onto your reolink settings page. (refer to figure 4)

figure 4
Note: Usernames and passwords are different from those in this guide please use this as reference only. Along with that you will need to add ftp:// in front of the sever name on the reolink app ex: ftp://ftp.ambientweather.net
once you have entered the FTP information the Reolink software will appear as below (refer to figure 5)

figure 5
Make sure to change the upload to image only and place the transport mode to PASV.
Make sure the max file is 100 and interval is at 1 minute. After this is done make sure to click test and if successful click save.
Note sometimes you will have to click on save before trying to test to get this to be successful
Below this you will see a schedule, make sure the schedule is Set on timer. You can tell if this is selected when you drag the mouse, and the boxes turn yellow along with being filled in completely like so drag from grid sun:0 to sat:23 (refer to figure 6).

figure 6
Click on the disk in the bottom right corner to save this setting.
Troubleshooting Guide
Q: What happens if your still not getting photos to update to ambient weather.net?
1: Wi-Fi maybe to slow, even though the camera does require an Ethernet port this doesn’t mean the Wi-Fi would be strong enough to collect data from your camera every minute, if this is the case try one or two things
- You can try to contact your isp provider to see what type of configuration you can make to your router so that you can get the most out of your camera. Advise getting the Ip address From your camera and see if your isp maybe blocking your camera from updating every minute due to spam
- You can purchase a Sd card and place this in your camera then you will have the ability to get recordings of your ftp photos every minute which should allow our website to pick up the photos and upload them properly.
2: Try changing your intervals to 5 minutes and make sure your file size is 100 or less.
... Permalink
To upload your Weather Underground camera to AmbientWeather.net, go to your WeatherUnderground.com time lapse video for today, and right click on the video, and select Inspect:
Look for a line that looks like this:
poster=”https://icons.wunderground.com/webcamramdisk/w/u/MyCamera/1/current.jpg”
This is an example, and your camera URL will look different.
Copy only this part for AmbientWeather.net:
https://icons.wunderground.com/webcamramdisk/w/u/MyCamera/1/current.jpg
Again, this is an example, and your URL will be different.
Enter this into the URL option on AmbientWeather.net:
Product Page
https://www.ambientweather.net

Our goal on the social media platform is to share weather images, observations, statements, and alerts.
What do you see outside? Post images of active weather events, nature, outside activities, anything related to the great outdoors. Camera view showing 80%+ of the sky / horizon
- Where a view of the sky is not available the scene should be of nature, without manmade structures or clutter
- Exceptions may be made for scenes with creative or artistic appeal
Please do not post indoor images, memes, pictures of your indoor console, or images that were not personally obtained from your camera.
Your text messages should be related to the weather only. We ask that you refrain from posting messages unrelated to weather-related events.
Example post that is acceptable: “It is raining cats and dogs.”
Example post that is not acceptable: “Heading to the gym after I finish my breakfast.”
Your social account will be suspended for posting any of the following:
- Nudity or other sexually suggestive content.
- Hate speech, credible threats or direct attacks on an individual or group.
- Political speech. There are plenty of other social media sites where you can freely express your political views; Ambient Weather is a politics-free zone.
- Content that contains self-harm or excessive violence.
- Fake or impostor profiles.
- Spam.
- Repeated violation of posting guidelines (example, posting images not related to the outdoors and nature).
If your social account is suspended, you can email support@ambientweather.com with your MAC address, and we will evaluate your appeal. Note that your weather station dashboard will perform as normal and your account will not be suspended.
Product Page
https://www.ambientweather.net
The AmbientWeather.net Weather Camera feature is intended for Weather Cameras. The Weather Camera feature is not intended or designed for use as a security / surveillance system. Do not rely on the AmbientWeather.net Weather Camera feature for security, surveillance or safety of individuals or property.
Below are examples of approved / denied camera views.
Approved:
- Camera view showing 80%+ of the sky / horizon
Denied:
- Any camera view not showing 80%+ of the sky / horizon
- Driveway not showing 80%+ of the sky / horizon
- Pile of leaves in your yard not showing 80%+ of the sky / horizon
- Shed not showing 80%+ of the sky / horizon
- Offensive imagery, including (but not limited to) material considered obscene, pornographic or threatening.
AmbientWeather.net reserves the right to approve or deny public facing camera views.
... PermalinkYou can not directly upload your camera image from your Nest camera to AmbientWeather.net, but you can reference a static URL from your Nest account.
- Go to your Nest account and login using a web browser: https://home.nest.com/ from your computer. You cannot change your privacy settings from your phone or tablet.
- Select the camera that you want to share and click on Settings settings icon for Nest
 in the top right corner of your browser window. Note: If you don’t see the Settings icon, increase the size of your web browser window to reveal it.
 - Tap Camera Sharing
 . You will need to scroll down the page a bit.
 - You now have two options: Share with password or Share publicly. Choose Share publicly: This lets anyone with t he link view your camera’s stream. No password is needed. Tap Agree & Share

- SHARE THIS LINK will be provided by Nest. It looks something like this:
https://video.nest.com/live/W0vWkESnqZ
This is NOT the share link you will use with AmbientWeather.net. - Open a new browser window, and Copy and Paste this share link (do not use the example link above – your link will look different).
- Right click on the video and select Inspect Element

- Look for a line that looks like this
“background-image: url(https://nexusapi-us1.camera.home.nest.com/get_image?uuid=62e9db0…&width=540&public=iXXXXXXXX);
Note: Please remove any “amp” in the code as this will cause issues.
- Below is an example of how it will appear

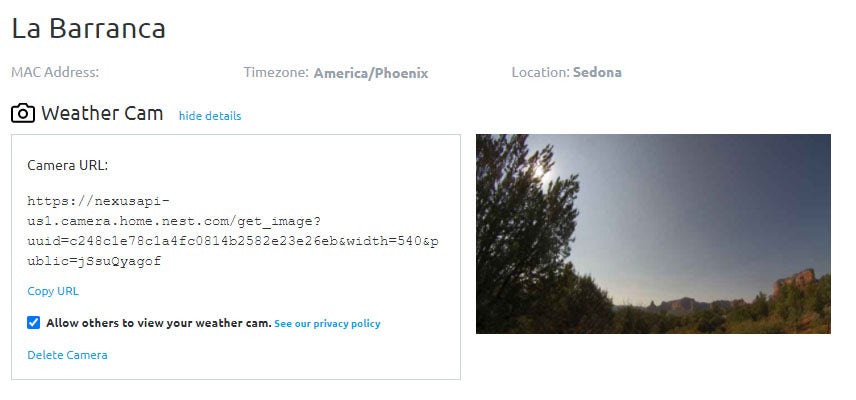
- Copy only this part for AmbientWeather.net:
https://nexusapi-us1.camera.home.nest.com/get_image?uuid=62e9db0…&width=540&public=iXXXXXXXX - Here is an example image link (your image link will look different):
https://nexusapi-us1.camera.home.nest.com/get_image?uuid=c248c1e78c1a4fc0814b2582e23e26eb&width=540&public=W0vWkESnqZ
- Enter this into the URL option on AmbientWeather.net:

- Note: URL cameras are currently no support by the AmbientWeather.net time lapse feature
• Log into AmbientWeather.net
• Go to your Devices panel
• Click “Add Weather Cam” for the device you want to add a camera to.

• Choose FTP
• Tap Next

- Copy the username and password, you will need this later to setup Blue Iris
- If you want to make your WeatherCam viewable by others, check the Allow others to view your weather cam box.

- Open Blue Iris and go to the settings.

In Blue Iris settings:
• Click the FTP Servers tab
• Click Add

Enter the following to add an FTP server to Blue Iris
• Description: AmbientWeather (or whatever you want to name it)
• Server address: ftp.ambientweather.net
• Base folder: /
• Login: (the login you copied from Step 3)
• Password: (the password you copied from Step 3)
• Idle disconnect: 5 sec
• Max connections: 1
• Check “passive transfer mode”
Click “Test” and you should see a “Successful” result message
If you do not see a “Successful” result message when you click Test, ensure the server address, login, and password are correct (See Step 3)
If test was Successful, click OK

- Right-Click on the camera you want to send images from and choose Camera settings…

In the camera settings:
• Click the Post tab
Configure the settings:
• Check Post JPEGs
• Quality %: 90
• Size: (default)
• Filename: image
• Queue an image update each 60 sec. will send images to Ambient Weather every 60 seconds – you can change this to your liking. Do not send images at less than 60 seconds!
Under Target:
• Check Post files to an FTP server
• Choose AmbientWeather from the dropdown
• Click OK
Blue Iris is now configured to upload FTP images to Ambient Weather.
You can verify images are uploading by going to “Blue Iris Status” and looking at the Cameras tab

You should see the number in the Posted column for the camera you configured increment each time an image is sent
You can verify images are uploading by going to your Ambient Weather device panel and clicking view details for the WeatherCam and then refresh.
... PermalinkBy default, Reolink cameras only FTP when motion is detected. You will need to turn this feature off, and then FTP on a fixed schedule.
This change cannot be made from the Android or iOS app, so you must download and install the Reolink Windows or Mac Client.
To download the client for PC or Mac, visit:
https://reolink.com/software-and-manual/
Launch the app and open the interface to your camera. Select Settings ![]() in the upper right hand corner:
in the upper right hand corner:

Select the Advanced button:

Select the FTP button:

Enter the FTP credentials provided on the AmbientWeather.net Devices panel associated with your Weather Station device:

Select the FTP Schedule Setup button. The default setting for the camera is motion (green).

Click the Normal (blue) button and then click and drag over the entire schedule to change it all to Normal (blue) and then click OK.

Click OK to acknowledge the confirmation.

WeatherCam images can be uploaded, viewed, and shared on AmbientWeather.net. This feature is currently available on the website version.
From the devices panel, select Add WeatherCam
Next, choose the format for your camera (FTP or URL):

- FTP: Most network cameras include FTP upload.
- URL: If you are hosting on another website, provide a URL.
FTP: option:
The website automatically generates the servername, username, and password. Enter these credentials into your camera’s ftp network settings.
– Some cameras like Foscam may require you to enter the server header ftp://ftp.kestrelmet.net, rather than ftp.kestrelmet.net.
– Select passive mode (PASV), if available.
– The maximum upload interval is one minute. Program an upload interval of 60 seconds or greater.

Enter the static URL associated with your camera hosting software. An example for the Nest Camera is referenced below.
Once the camera image has successfully uploaded to the server, the image will appear next to the WeatherCam credentials.
To make your WeatherCam public, select the checkbox “Allow others to view your weather cam“. It will take up to 48 hours for approval. Only images that point outside and show a portion of the sky will be approved.
Once your WeatherCam is public, it will be displayed on the WeatherCam map:
