Ambient Weather Support
All Weather Stations
When you want to change the name or label on the a tile on Ambientweather.net you can follow these easy steps
1. Open Ambientweather.net and access the dashboard.
2. double click the title of the tile you want to change and it will highlight blue
then begin typing to change the name.
You have changed the label on your tile on AmbientWeather.net
To check and update the firmware, you will need to access the Web GUI. To access the Web GUI, you first press and hold the Temp and Rain buttons together on the console for 5–10 seconds.

The console will then flash the Wi-Fi icon by time and date.

Then on your phone, tablet or computer go to settings, and then the Wi-Fi networks. Select the console's access point. It will start with WN1965B-WIFI

It will say connected without Wi-Fi or no internet, or sometimes it will checkmark. After that, you open a web browser and type into the web address bar 192.168.4.1. If it pops up a screen that say login, use Admin for the username, make sure the password is blank, then click the login button.

It will then let you access the Web GUI. On the left, click on Device settings
On this screen, you can now select to manually check for a firmware upgrade or can allow the station to
automatically upgrade the firmware when a new one is released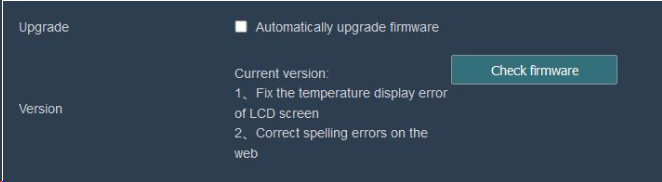
To obtain your CWOP ID using Weatherbridge:
- In the Weatherbridge Control Panel select the ‘Weather Network’ tab.
- Select CWOP from the ‘Add more Weather Networks’ drop down list
- In order to upload data, you need credentials from CWOP. Visit:
http://www.findu.com/citizenweather/cw_form.html. - Check your email for your CWOP ID.
- Enter your new CWOP ID into Weatherbridge
- Click the ‘Save’ button at the bottom
- You will soon be reporting to CWOP at the following URL: http://www.findu.com/cgi-bin/wx.cgi?call=YOUR_CWOP_ID


CITIZEN WEATHER PROGRAM REGISTRATION FORM
... PermalinkThe following is the Telnet protocol for direct communication protocol to the specified products listed below:
- Data exchange format:
Fixed header, CMD, SIZE, DATA1, DATA2, … , DATAn, CHECKSUM
Fixed header: 2 bytes, header is fixed as 0xffff
CMD: 1 byte, Command
SIZE: 1 byte, packet size,counted from CMD till CHECKSUM
DATA: n bytes, payloads,variable length
CHECKSUM: 1 byte, CHECKSUM=CMD+SIZE+DATA1+DATA2+…+DATAn
- Command and data structure definition:
typedef enum {
//
CMD_WRITE_SSID = 0x11,// send SSID and Password to WIFI module
CMD_BROADCAST = 0x12,// UDP cast for device echo,answer back data size is 2 Bytes
CMD_READ_ECOWITT = 0x1E,// read aw.net setting
CMD_WRITE_ ECOWITT = 0x1F, //write back awt.net setting
CMD_READ_WUNDERGROUND = 0x20,// read Wunderground setting
CMD_WRITE_WUNDERGROUND = 0x21, //write back Wunderground setting
CMD_READ_WOW = 0x22, // read WeatherObservationsWebsite setting
CMD_WRITE_WOW = 0x23, // write back WeatherObservationsWebsite setting
CMD_READ_WEATHERCLOUD = 0x24,// read Weathercloud setting
CMD_WRITE_WEATHERCLOUD = 0x25, //write back Weathercloud setting
CMD_READ_SATION_MAC = 0x26,// read MAC address
CMD_READ_CUSTOMIZED = 0x2A,// read Customized sever setting
CMD_WRITE_CUSTOMIZED = 0x2B, // write back Customized sever setting
CMD_WRITE_UPDATE = 0x43,// firmware upgrade
CMD_READ_FIRMWARE_VERSION = 0x50,// read current firmware version number
CMD_READ_USR_PATH = 0x51,
CMD_WRITE_USR_PATH = 0x52,
// the following command is only valid for GW1000, WH2650 and wn1900支持:
CMD_GW1000_LIVEDATA = 0x27, // read current data,reply data size is 2bytes.
CMD_GET_SOILHUMIAD = 0x28,// read Soilmoisture Sensor calibration parameters
CMD_SET_SOILHUMIAD = 0x29, // write back Soilmoisture Sensor calibration parameters
CMD_GET_MulCH_OFFSET = 0x2C, // read multi channel sensor offset value
CMD_SET_MulCH_OFFSET = 0x2D, // write back multi channel sensor OFFSET value
CMD_GET_PM25_OFFSET = 0x2E, // read PM2.5OFFSET calibration data
CMD_SET_PM25_OFFSET = 0x2F, // writeback PM2.5OFFSET calibration data
CMD_READ_SSSS = 0x30,// read system info
CMD_WRITE_SSSS = 0x31,// write back system info
CMD_READ_RAINDATA = 0x34,// read rain data
CMD_WRITE_RAINDATA = 0x35, // write back rain data
CMD_READ_GAIN = 0x36, // read rain gain
CMD_WRITE_GAIN = 0x37, // write back rain gain
CMD_READ_CALIBRATION = 0x38,// read sensor set offset calibration value
CMD_WRITE_CALIBRATION = 0x39,// write back sensor set offset value
CMD_READ_SENSOR_ID = 0x3A,// read Sensors ID
CMD_WRITE_SENSOR_ID = 0x3B, // write back Sensors ID
CMD_READ_SENSOR_ID_NEW = 0x3C,//// this is reserved for newly added sensors
CMD_WRITE_REBOOT = 0x40,// system restart
CMD_WRITE_RESET = 0x41,// reset to default
}CMD_LT;
//********************************************************************************************
#define SOIL_CH_MAX 8
#define WH31_CHANNEL 8
#define PM25_CH_MAX 4
#define LEAK_CH_MAX 4
typedef enum
{
//eWH24_SENSOR = 0x00,
eWH65_SENSOR = 0x00,
//eWH69_SENSOR,
eWH68_SENSOR,
eWH80_SENSOR, //80H(
eWH40_SENSOR,
eWH25_SENSOR,
eWH26_SENSOR,
eWH31_SENSORCH1,
eWH31_SENSORCH2,
eWH31_SENSORCH3,
eWH31_SENSORCH4,
eWH31_SENSORCH5,
eWH31_SENSORCH6,
eWH31_SENSORCH7,
eWH31_SENSORCH8,
eWH51_SENSORCH1,
eWH51_SENSORCH2,
eWH51_SENSORCH3,
eWH51_SENSORCH4,
eWH51_SENSORCH5,
eWH51_SENSORCH6,
eWH51_SENSORCH7,
eWH51_SENSORCH8,
eWH41_SENSORCH1,
eWH41_SENSORCH2,
eWH41_SENSORCH3,
eWH41_SENSORCH4,
//————-
eWH57_SENSOR,
eWH55_SENSORCH1,
eWH55_SENSORCH2,
eWH55_SENSORCH3,
eWH55_SENSORCH4,
eWH34_SENSORCH1 = 31,
eWH34_SENSORCH2 = 32,
eWH34_SENSORCH3 = 33,
eWH34_SENSORCH4 = 34,
eWH34_SENSORCH5 = 35,
eWH34_SENSORCH6 = 36,
eWH34_SENSORCH7 = 37,
eWH34_SENSORCH8 = 38,
// the sensor sequence can not be altered!!
//————-
eMAX_SENSOR
}SENSOR_IDT;
//——————————————————————————————————————————————–
#define ITEM_INTEMP 0x01//Indoor Temperature (℃) 2
#define ITEM_OUTTEMP 0x02//Outdoor Temperature (℃) 2
#define ITEM_DEWPOINT 0x03//Dew point (℃) 2
#define ITEM_WINDCHILL 0x04//Wind chill (℃) 2
#define ITEM_HEATINDEX 0x05//Heat index (℃) 2
#define ITEM_INHUMI 0x06//Indoor Humidity (%) 1
#define ITEM_OUTHUMI 0x07//Outdoor Humidity (%) 1
#define ITEM_ABSBARO 0x08//Absolutely Barometric (hpa) 2
#define ITEM_RELBARO 0x09//Relative Barometric (hpa) 2
#define ITEM_WINDDIRECTION 0x0A//Wind Direction (360°) 2
#define ITEM_WINDSPEED 0x0B//Wind Speed (m/s) 2
#define ITEM_GUSTSPEED 0x0C//Gust Speed (m/s) 2
#define ITEM_RAINEVENT 0x0D//Rain Event (mm) 2
#define ITEM_RAINRATE 0x0E//Rain Rate (mm/h) 2
#define ITEM_RAINHOUR 0x0F//Rain hour (mm) 2
#define ITEM_RAINDAY 0x10//Rain Day (mm) 2
#define ITEM_RAINWEEK 0x11//Rain Week (mm) 2
#define ITEM_RAINMONTH 0x12//Rain Month (mm) 4
#define ITEM_RAINYEAR 0x13//Rain Year (mm) 4
#define ITEM_RAINTOTALS 0x14//Rain Totals (mm) 4
#define ITEM_LIGHT 0x15//Light (lux) 4
#define ITEM_UV 0x16//UV (uW/m2) 2
#define ITEM_UVI 0x17//UVI (0-15 index) 1
#define ITEM_TIME 0x18//Date and time 6
#define ITEM_DAYLWINDMAX 0X19//Day max wind(m/s) 2
#define ITEM_TEMP1 0x1A//Temperature 1(℃) 2
#define ITEM_TEMP2 0x1B//Temperature 2(℃) 2
#define ITEM_TEMP3 0x1C//Temperature 3(℃) 2
#define ITEM_TEMP4 0x1D//Temperature 4(℃) 2
#define ITEM_TEMP5 0x1E//Temperature 5(℃) 2
#define ITEM_TEMP6 0x1F//Temperature 6(℃) 2
#define ITEM_TEMP7 0x20//Temperature 7(℃) 2
#define ITEM_TEMP8 0x21//Temperature 8(℃) 2
#define ITEM_HUMI1 0x22//Humidity 1, 0-100% 1
#define ITEM_HUMI2 0x23//Humidity 2, 0-100% 1
#define ITEM_HUMI3 0x24//Humidity 3, 0-100% 1
#define ITEM_HUMI4 0x25//Humidity 4, 0-100% 1
#define ITEM_HUMI5 0x26//Humidity 5, 0-100% 1
#define ITEM_HUMI6 0x27//Humidity 6, 0-100% 1
#define ITEM_HUMI7 0x28//Humidity 7, 0-100% 1
#define ITEM_HUMI8 0x29//Humidity 8, 0-100% 1
#define ITEM_PM25_CH1 0x2A//PM2.5 Air Quality Sensor(μg/m3) 2
#define ITEM_SOILTEMP1 0x2B//Soil Temperature(℃) 2
#define ITEM_SOILMOISTURE1 0x2C//Soil Moisture(%) 1
#define ITEM_SOILTEMP2 0x2D//Soil Temperature(℃) 2
#define ITEM_SOILMOISTURE2 0x2E//Soil Moisture(%) 1
#define ITEM_SOILTEMP3 0x2F//Soil Temperature(℃) 2
#define ITEM_SOILMOISTURE3 0x30//Soil Moisture(%) 1
#define ITEM_SOILTEMP4 0x31//Soil Temperature(℃) 2
#define ITEM_SOILMOISTURE4 0x32//Soil Moisture(%) 1
#define ITEM_SOILTEMP5 0x33//Soil Temperature(℃) 2
#define ITEM_SOILMOISTURE5 0x34//Soil Moisture(%) 1
#define ITEM_SOILTEMP6 0x35//Soil Temperature(℃) 2
#define ITEM_SOILMOISTURE6 0x36//Soil Moisture(%) 1
#define ITEM_SOILTEMP7 0x37//Soil Temperature(℃) 2
#define ITEM_SOILMOISTURE7 0x38//Soil Moisture(%) 1
#define ITEM_SOILTEMP8 0x39//Soil Temperature(℃) 2
#define ITEM_SOILMOISTURE8 0x3A//Soil Moisture(%) 1
#define ITEM_SOILTEMP9 0x3B//Soil Temperature(℃) 2
#define ITEM_SOILMOISTURE9 0x3C//Soil Moisture(%) 1
#define ITEM_SOILTEMP10 0x3D//Soil Temperature(℃) 2
#define ITEM_SOILMOISTURE10 0x3E//Soil Moisture(%) 1
#define ITEM_SOILTEMP11 0x3F//Soil Temperature(℃) 2
#define ITEM_SOILMOISTURE11 0x40//Soil Moisture(%) 1
#define ITEM_SOILTEMP12 0x41//Soil Temperature(℃) 2
#define ITEM_SOILMOISTURE12 0x42//Soil Moisture(%) 1
#define ITEM_SOILTEMP13 0x43//Soil Temperature(℃) 2
#define ITEM_SOILMOISTURE13 0x44//Soil Moisture(%) 1
#define ITEM_SOILTEMP14 0x45//Soil Temperature(℃) 2
#define ITEM_SOILMOISTURE14 0x46//Soil Moisture(%) 1
#define ITEM_SOILTEMP15 0x47//Soil Temperature(℃) &... Permalink
The lightning bolt icon signifies the Dew Point is greater than 70 degF, which is conducive for lightning in the area. It is just a prediction and the weather station does not sense lightning directly.

The North Marker is molded into the top of the sensor array body. Point the rain gauge in the direction of North.

- Replace the batteries.We recommend Energizer Lithium Ultimate batteries like the following:https://www.amazon.com/Energizer-Ultimate-Lithium-Batteries-Each/dp/B00003IEMEhave a wide temperature operating range. They operate between -40 degF and 140 degF. Alkaline batteries only operate to about +10 degF. Rechargeable batteries often have a limited life and mean constant replacing, as well as a narrow temperature range.
- If the problem persists, the sensor array needs replacing. We have a one year warranty.Please visit: www.AmbientWeather.com/rma.htmlIf out of warranty, the sensor array can be replacedhttps://www.ambientweather.com/amws1002array.html
To edit the label name on the console, select the Settings button ![]() , and then the down arrow
, and then the down arrow  9 times until Multi Channel Sensor Setup is highlighted and press plus
 ![]() to view the channel settings.
to view the channel settings.


To edit the channel name, Press or key to select the channel name. The name field will turn green.
Press the ![]() key to view the keyboard, and enter the sensor name. Press
key to view the keyboard, and enter the sensor name. Press ![]()


 to scroll to the character and press
  to select the character. Press ‘OK’ to save your newly labeled Sensor. Press
  to return to the setup page.


Console : Input 5V DC; 6.5′ 110-240V 50-60 Hz wall charger included.
Power Consumption: 0.5 Watts (1.25 Watts during WiFi configuration mode)
DC barrel connector dimensions: 7.5mm ( L ) x 3.5mm ( OUT D) x 1.35mm ( Inner D)

A computer is not required to connect our weather stations to the Internet. They are WiFi enabled weather stations that connect directly to your router and the Internet. They communicate via Port 80, which is standard for most web browser (https) operations.
... PermalinkThe console may be less subject to interference (RF or EMI) than the ObserverIP Module.
- Move the IP Module as far away from radiating sources, such as the router itself, other electronic equipment and it’s own AC adapter.
- Try reorienting the IP Module 90 degrees.
- If the problem persists, the IP Module may need replacing.
We have a one year warranty. To replace under warranty, please visit:
www.AmbientWeather.com/rma.html - For out of warranty replacement, visit:
https://www.ambientweather.com/amobserverip.html
If there is an exclamation point ! or mark next to the WiFi icon on the WS-2000 display, it means the display is connected to WiFi but the WiFi is not connected to the Internet.
Make sure the 2.4 GHz band on your router is connected to the Internet.
If the problem persists, try rebooting your router.
... PermalinkTo retrieve the SD Card:


Note: The SD Card is very small and easy to lose when it falls out. Perform over a surface and not the ground.
You can adjust the month in which the yearly rain resets to zero. The default is January.
To change this to a different month, select the Setup Page.
Tap the Settings button ![]() to view the Setup page.
to view the Setup page.
Select up  to highlight Rainfall Season and press up or down
 to change the month.
Heat Index is not valid or calculated below 80 degF, according to the National Weather Service:

- Replace the batteries if it has been a while. We recommend Energizer Ultimate Lithium.
- If the problem persists, the sensor array must be replaced. We have a one year warranty. To replace under warranty, please visit: www.AmbientWeather.com/rma.html
- If out of warranty, a replacement array can be purchased here: https://www.ambientweather.com/amws2902array.html
No, the data will still be stored in the console and can be accessed with the Micro SD Card option.
However, it will not write this data to the Internet while the Internet is down, and it does not make up the data when the Internet comes back.
... PermalinkThe AC Adapter Size Requirements and Specifications For The WS-2000 Series Console are as follows:
- Console : Input 5V DC; 6.5′ 110-240V 50-60 Hz wall charger included, Power Consumption: 7.5 Watts, 1.0A output power rate.
- DC barrel connector dimensions: 7.5mm ( L ) x 3.5mm ( OUT D) x 1.35mm ( Inner D)
- UL Rated.

Although the WH31,WH31B, WH31E, WH31P, WH31PF, WH31L, WH31SM, WH31L, PM25, PM25IN and AQIN sensor data from Channel 1-8 cannot be viewed on the user interface, it can be downloaded via the SD Card to your computer.
To collect this data, the SD Card must be inserted into the SD card slot.
The sensor data is not saved to on-board flash due to memory constraints, it is only saved to the SD card.
Thus, the SD card must be inserted into the tablet all the time. Whenever there is a new data set recorded, it will added to this file.
The file Backup-A.csv is the history file copied from console flash memory. It is generated when you manually. This file does not include channel sensor data.
2019CH1A.csv i s the channel sensor data and is only generated when the SD Card is inserted into the tablet.
Product Manual
https://ambientweather.com/mwdownloads/download/link/id/1113
Product Page
https://www.ambientweather.com/amws2000.html
The indoor thermo-hygrometer-barometer measures absolute pressure. The display console displays relative pressure.
Here is a guide on the difference between absolute and relative pressure:
What Is The Difference Between Absolute And Relative Pressure?
... Permalink- If the wind vane or cups is not completely seated, fully remove the set screw from unit. Re-install the wind vane or cups.
- If that does not work, inspect the plastic sleeve where the shaft goes in for debris and manufacturing burs. If there is debris, push it out with a sharp tool or open ended paper clip.
- If that does not work, use a 5/64″ drill bit if necessary to remove debris. Be careful not to drill through the top plastic of the wind vane or cups.


Replace the batteries. We recommend the following batteries:
My Rechargeable Batteries No Longer Work. Which Batteries Are Recommended For My Weather Station?
- Clean any corrosion around and on the battery terminals.
- If the problem persists, the sensor array must be replaced. We have a one year warranty. To replace under warranty, please visit: www.AmbientWeather.com/rma.html
- If out of warranty, a replacement array can be purchased here: https://www.ambientweather.com/amws2902array.html
Product Manual
https://ambientweather.com/mwdownloads/download/link/id/1113
Product Page
https://www.ambientweather.com/amws2000.html
The solar panel charges a super capacitor. This is a much more efficient design.
If the super capacitor voltage drops too low due to night or extended cloud cover, the non-rechargeable batteries take over for the solar collector.
... PermalinkTo prevent battery corrosion, we recommend a small packet of dieletric grease. They are sold in most auto supply stores.
Here is an example on Amazon:
https://www.amazon.com/dp/B000AL8VD2
... PermalinkYes, you can, but you will need to change the following Gain Factors on the console:
Wind Gain: 2.17
Rain Gain: 1.18
Here is how you change the gain factors on the WS-1000 series console:
- Press the Settings button
 three times to display the calibration panel:
- Press the down button
 until the temperature field is highlighted, and press plus
  or minus
  to adjust. Press the left
  or right
  button to change each multiple value.
 - Press the return button
 to return to the main screen.
Note that you will lose resolution on wind speed and wind direction due to the gain exceeding 1.0.
Example:
The wind gust has a resolution of about 1.1 mph.
How Is The Wind Speed And Wind Gust Calculated In The WS-2902 Weather Station?
If you changed the gain from 1.0 to 1.2 for example, the new resolution is:
1.1 x 1.2 = 1.32 mph.
... PermalinkThe wind speed is 2.24 revolutions per m/s or 5.01 revolutions per 1 mph.
... Permalink
The SD Card must be inserted into the console and remain inserted to record channel 1-8 sensor data.
The sensor data is not saved to on-board flash due to memory constraints, it is only saved to the SD card.
Thus, the SD card must be inserted into the tablet all the time. Whenever there is a new data set recorded, it will added to this file.
The file Backup-A.csv is the history file copied from console flash memory. It is generated when you manually. This file does not include channel sensor data.
2019CH1A.csv i s the channel sensor data and is only generated when the SD Card is inserted into the tablet.
| No (data point number) |
| Time |
| CH1 Temperature(°) |
| CH1 Dewpoint(°) |
| CH1 HeatIndex(°) |
| CH1 Humidity(%) |
| CH2 Temperature(°) |
| CH2 Dewpoint(°) |
| CH2 HeatIndex(°) |
| CH2 Humidity(%) |
| CH3 Temperature(°) |
| CH3 Dewpoint(°) |
| CH3 HeatIndex(°) |
| CH3 Humidity(%) |
| CH4 Temperature(°) |
| CH4 Dewpoint(°) |
| CH4 HeatIndex(°) |
| CH4 Humidity(%) |
| CH5 Temperature(°) |
| CH5 Dewpoint(°) |
| CH5 HeatIndex(°) |
| CH5 Humidity(%) |
| CH6 Temperature(°) |
| CH6 Dewpoint(°) |
| CH6 HeatIndex(°) |
| CH6 Humidity(%) |
| CH7 Temperature(°) |
| CH7 Dewpoint(°) |
| CH7 HeatIndex(°) |
| CH7 Humidity(%) |
| CH8 Temperature(°) |
| CH8 Dewpoint(°) |
| CH8 HeatIndex(°) |
| CH8 Humidity(%) |
| WH31L count |
| WH31L distance |
| AQIN Temperature(°) |
| AQIN Humidity(%) |
| AQIN CO2(ppm) |
| AQIN Pm2.5(ug/m3) |
| AQIN Pm10(ug/m3) |
| WH31SMCH1(%) |
| WH31SMCH2(%) |
| WH31SMCH3(%) |
| WH31SMCH4(%) |
| WH31SMCH5(%) |
| WH31SMCH6(%) |
| WH31SMCH7(%) |
| WH31SMCH8(%) |
| Leak1 |
| Leak2 |
| Leak3 |
| Leak4 |
| PM2.5 OUT(ug/m3) |
| PM2.5 IN(ug/m3) |
Product Manual
https://ambientweather.com/mwdownloads/download/link/id/1113
Product Page
https://www.ambientweather.com/amws2000.html
Upgrading your OBSERVERIP IP Module from WS-1002-ARRAY (WH24, WH24B) to WS-2902-ARRAY (WH65, WH65B)
If you are upgrading your OBSERVER array WS-1002-ARRAY to the OSPREY WS-2902-ARRAY, here are the simple steps to follow after your new array arrives:
- Download the up to date observer IP firmware here
- Open IPTools

- Select your device
- click the upgrade button in the upper right corner of the window.
- Select Upgrade firmware after selecting the proper file using the Select File button
- Power up your new array by installing new AA batteries. (we recommend Energizer Lithium batteries)
- Open IP tools again.
- Select your device click open
Refer to the table below for your unqiue setup
IP Module
Sensor Array Model #
Indoor Baro/Thermo/Hygrometer Model #
Wireless Transmitter Setting in IPTools for OBSERVERIP
OBSERVERIP
WS-1002-ARRAY (WH24, WH24B)
WS-1000-BTH
WS-1600-IP
OBSERVERIP
WS-2902-ARRAY (WH65, WH65B)
WH32B
WS-1550-IP
OBSERVERIP
WS-1002-ARRAY (WH24, WH24B)
None
WS-1500-IP
- Select the proper Weather Station Model Number based on your unique setup
- Press Apply.
WS-8478/WS-8478A/WS-8480

WS-1900/WS-2902/WS-2902A/WS-2902B

WS-2000/WS-2002/WS-5000

WS-1000/WS-1001/WS-1002

To view archived data from the WS-2000 and WS-5000 display consoles, select History button twice from the main console screen. 

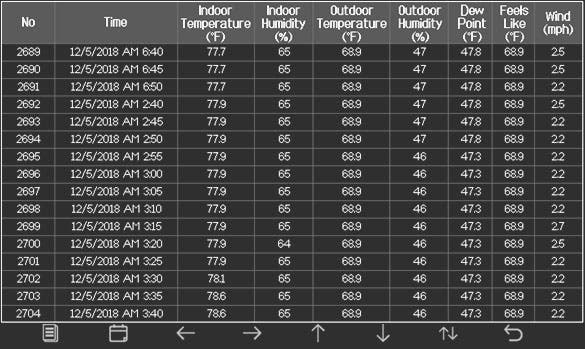
History_YYYYDD.csv: The history data file as shown in Figure 59.
YYYYDD.csv: The remaining data during the download. For example, if it takes three minutes to download, it the last three minutes of data.

The format of the data is csv (comma separated value) and can be opened in a spreadsheet program such as Microsoft Excel for advanced data analysis, with the following headers:
| Column | Parameter |
| 1 | No (data point number) |
| 2 | Time |
| 3 | Indoor Temperature (°F) |
| 4 | Indoor Humidity (%) |
| 5 | Outdoor Temperature (°F) |
| 6 | Outdoor Humidity (%) |
| 7 | Dew Point (°F) |
| 8 | Feels Like (°F) |
| 9 | Wind (mph) |
| 10 | Gust (mph) |
| 11 | Wind Direction (°) |
| 12 | ABS Barometer (inHg) |
| 13 | REL Barometer (inHg) |
| 14 | Solar Rad. (lux) |
| 15 | UV Index |
| 16 | Rain Rate (in/h) |
| 17 | Event Rain (in) |
| 18 | Daily Rain (in) |
| 19 | Weekly Rain (in) |
| 20 | Monthly Rain (in) |
| 21 | Yearly Rain (in) |
The SD Card must be inserted into the console and remain inserted to record channel 1-8 sensor data. Whenever there is a new data set recorded, it will be added to this file." to "The SD Card must be inserted into the console and remain inserted to record channel 1-8 sensor data (WH31,WH31B, WH31E, WH31P, WH31PF, WH31L, WH31SM, WH31L, PM25, PM25IN and AQIN). Whenever there is a new data set recorded, it will be added to this file.
The sensor data is not saved to on-board flash due to memory constraints; it is only saved to the SD card.
YYYYCH1A.csv is the channel sensor data and is only generated when the SD Card is inserted into the tablet.
| Column | Parameter |
| 1 | No (data point number) |
| 2 | Time |
| 3 | CH1 Temperature(°) |
| 4 | CH1 Dewpoint(°) |
| 5 | CH1 HeatIndex(°) |
| 6 | CH1 Humidity(%) |
| 7 | CH2 Temperature(°) |
| 8 | CH2 Dewpoint(°) |
| 9 | CH2 HeatIndex(°) |
| 10 | CH2 Humidity(%) |
| 11 | CH3 Temperature(°) |
| 12 | CH3 Dewpoint(°) |
| 13 | CH3 HeatIndex(°) |
| 14 | CH3 Humidity(%) |
| 15 | CH4 Temperature(°) |
| 16 | CH4 Dewpoint(°) |
| 17 | CH4 HeatIndex(°) |
| 18 | CH4 Humidity(%) |
| 19 | CH5 Temperature(°) |
| 20 | CH5 Dewpoint(°) |
| 21 | CH5 HeatIndex(°) |
| 22 | CH5 Humidity(%) |
| 23 | CH6 Temperature(°) |
| 24 | CH6 Dewpoint(°) |
| 25 | CH6 HeatIndex(°) |
| 26 | CH6 Humidity(%) |
| 27 | CH7 Temperature(°) |
| 28 | CH7 Dewpoint(°) |
| 29 | CH7 HeatIndex(°) |
| 30 | CH7 Humidity(%) |
| 31 | CH8 Temperature(°) |
| 32 | CH8 Dewpoint(°) |
| 33 | CH8 HeatIndex(°) |
| 34 | CH8 Humidity(%) |
| 35 | WH31L count |
| 36 | WH31L distance |
| 37 | AQIN Temperature(°) |
| 38 | AQIN Humidity(%) |
| 39 | AQIN CO2(ppm) |
| 40 | AQIN Pm2.5(ug/m3) |
| 41 | AQIN Pm10(ug/m3) |
| 42 | WH31SMCH1(%) |
| 43 | WH31SMCH2(%) |
| 44 | WH31SMCH3(%) |
| 45 | WH31SMCH4(%) |
| 46 | WH31SMCH5(%) |
| 47 | WH31SMCH6(%) |
| 48 | WH31SMCH7(%) |
| 49 | WH31SMCH8(%) |
| 50 | Leak1 |
| 51 | Leak2 |
| 52 | Leak3 |
| 53 | Leak4 |
| 54 | PM2.5 OUT(ug/m3) |
| 55 | PM2.5 IN(ug/m3) |
It will not. The device will only connect to a wifi routers main 2.4GHz signal. It will not connect to a guest account or a Mesh networks secondary nodes. To get around having to use a wifi router you can use our Observerip module which will connect directly to a router via an ethernet cable and remove the need for wifi.
... PermalinkIf the lightning sensor has a weak signal, please check the following:
- Make sure both the console firmware: How Do I Update The WiFi Firmware, WS-2000 And WS-5000? are up to date.
- Make sure all the dip switches in the Lightning sensor are in the down position. Power down and up the sensor after changing the dip switch positions for changes to take effect.
- Power down the WS-2000 console then power it back up.
- Re-register the Lightning sensor through the Sensor ID screen.
- Ensure that the sensor is within 300 ft line of sight with your indoor console.
- We recommend the WH31-SRS as an enclosure for the lightning detector. https://ambientweather.com/wh31-srs-solar-radiation-shield


The AC adapter or console has a power issue.
- If you have a volt meter, test the voltage output of the AC adapter.
- The console or AC adapter needs replacing. We have a one year warranty. To replace under warranty, please visit: www.AmbientWeather.com/rma.html
- If out of warranty, a replacement console is available here:
WS-2000 Console: https://www.ambientweather.com/amws2000c.html
WS-2000 Console AC Adapter: https://www.ambientweather.com/amws1000acadapter.html
To view your back light settings, select the Tools icon ![]() from your display to enter the Setup screen. Press the down arrow button
from your display to enter the Setup screen. Press the down arrow button  until Backlight Setup is selected, and press Plus
 ![]() to view the settings.
to view the settings. 
and check the Automatic control backlight to turn on and off the backlight at a specific time. To turn this feature off, uncheck this checkbox.
... Permalink
The smaller of the two wind speed markers is the instantaneous wind direction. The larger of the two markers is the 10 minute average wind speed.

Product Manual
https://ambientweather.com/mwdownloads/download/link/id/1113
Product Page
https://www.ambientweather.com/amws2000.html
Lightning sensors detect a specific radio frequency wave form generated by lightning strikes.
However, electronic devices like motors starting (HVAC units, lawn equipment), and fluorescent lighting can emit noisy electromagnetic field (EMF) signature that can generate a false positive lightning strike.
To avoid false lightning strikes, move the detector away from any electrical noise-generating devices.
Although electrical noise can be random in nature, another way to determine installation location is by using a portable AM radio set in between stations where you can hear white noise only, and hold the radio close to the installation location. Any crackling heard on the radio may be detected by the WH31L lightning detector.
The following is a guide on how to properly mount the PM2.5/PM25 sensor, and perform preventative maintenance:
Mounting Guidelines:
Place the sensor in a shaded, well ventilated, non-moisture condensing area. Although the sensor is designed for outdoor use, it is best to mount in a well protected area, such as under a patio or carport.
The solar panel is sensitive to low light, but will still require monthly charging from the USB power port.
With PM2.5 sensors, fog reflects the light, and can result in a higher reading. This is characteristic to the inherent sensor design. The condition occurs during rainy or foggy weather.
Mounting orientation is not important. It can be mounted vertically or horizontally, as long as the vents are not blocked.
Preventive Maintenance:
Periodic cleaning of the PM2.5 sensors fan may need to be done if readings do not seem to change. To clean the fan you would remove the battery compartment of the sensor. Then carefully remove the sensor body from the protective shell. There are 2 small gauge wires connecting the solar cell to the sensor body. Please be careful to not pull on the wires and cause them to break. You would then use a can of compressed air to gently blow out any debris from the sensor fan(Warning: Do not use an air compressor)
Carefully separate the sensor body from the protective shell
ADVANCED CLEANING PROCEDURE:
(Note, if you’re not experienced/comfortable with performing something this complex please do not attempt as the unit may get damaged and void the warranty)
If an issue persists of the readings still being low then usually some pests have gotten into the internal sensor itself. You can carefully remove the screws from the main sensor housing and inspect/clean any pests, spider webs, eggs, etc. It is recommended to use Q-Tips to remove the debris.

To access the internal Detecting Chamber please refer to the images below.
Step 1: Remove the rubber coverings of the 3 screws.

Step 2: Remove the 3 screws.

Step 3: Remove the Protective Top Cover

Step 4: Carefully lift up and flip over the Sensor Board.


Step 5: Carefully clean the sensor board and Detecting Chamber then re-assemble in the reverse order.

... Permalink
Your console Wi-Fi firmware must be updated, which requires the awnet app. Here is a help guide:
How Do I Update The WiFi Firmware, WS-2000 And WS-5000?
... PermalinkIf the display console only displays km, make sure your firmware is up to date. This issue was resolved in Version 1.6.3:
Ambient Weather WS-2000 And WS-5000 Firmware Download Center
To view the Sensors ID panel on the display console, select the Settings button ![]() and then More | Setup.
and then More | Setup.
Currently, at this time, no.
AQI is calculated individually for each pollutant. The overall pollutant with the highest AQI becomes the reported AQI. Since AmbientWeather.net only monitors (at this time) PM2.5, the only AQI value they could calculate would be the PM2.5 AQI. If, by chance, the PM10 AQI is higher than the PM2.5 AQI, then AmbientWeather.net would be reporting the wrong AQI value.
AQI, is a unitless index derived by the EPA.
Reference:
https://www.epa.gov/sites/production/files/2014-05/documents/zell-aqi.pdf
The U.S. EPA PM2.5 AQI model is on Page 11.
... PermalinkQ: What size socket/wrench can I use to tighten the nuts for the u-bolts/u bolts for my outdoor sensor array?
A: 10mm


- Install each M5 nut in the order above. 1, 2, 3 then 4.
- Do not tighten with an impact driver. Hand tighten, then a half turn / 180 degrees. No more.
- If your mounting pole is a soft material (wood, pvc, etc.) you may need to retighten the M5 nuts when you perform your maintenance every 3 months.
If your ObserverIP module slows down or stops working and you also connect it to the WeatherBridge:
- Make sure you are running the latest firmware. For details, please visit:
- If you are reporting to Wunderground.com and AmbientWeather.net, turn off this feature on the ObserverIP and use the WeatherBridge to send the data.
Can the PM25/PM2.5 sensor measure pollen?
No. Pollen doesn’t have much effect on the AQI for particle pollution. Most pollen particles are much larger than the particles we measure for the AQI. The size of PM2.5 is 2.5 micrometers in diameter or smaller while pollen particles are usually well over 10 micrometers. Pollen particles can sometimes rupture and break into smaller airborne particles in the PM2.5 range, but their contribution is too small to make a difference in the AQI.
... Permalink
Place each curved foam insert in between the cutouts where the rain funnel locks into place.
... Permalink
The MAC address is found on the weather station console’s Weather Server panel:
- Press the Set Key button

2. Click Setup under Weather Server


Product Manual
https://ambientweather.com/mwdownloads/download/link/id/1081/
Product Page
https://www.ambientweather.com/amws5000.html

If the temperature and humidity spike and return to normal after a period of time, the console is likely picking up a different outdoor sensor from your system or your neighbors.
To prevent this from occurring, select the Setup button ![]() from the display console, and select More | Setup from the menu.
from the display console, and select More | Setup from the menu.
Next, select Sensors ID | Setup from the More page and disable all of the sensors shown, except:
WH80 (ultrasonic sensor array)
WH40 (rain gauge)
WH32B (indoor thermo-hygrometer-barometer)
Product Manual
https://ambientweather.com/mwdownloads/download/link/id/1081/
Product Page
https://www.ambientweather.com/amws5000.html

If the Ultrasonic wind speed reads 89.9 mph all of the time, or spikes to 89.9 mph when the windspeed is low, there is likely debris inside the wind speed measuring area.
To resolve this issue, blow compressed area in the measurement volume (#1 in the image below), and clean with a damp cloth, to remove all debris, spider webs and other insect debris.
Product Manual
https://ambientweather.com/mwdownloads/download/link/id/1081/
Product Page
https://www.ambientweather.com/amws5000.html

The wind speed and direction will not change if there is debris, such as a spider web, inside the sonic wind sensor area.
Inspect and clean any debris with a damp cloth.
Product Manual
https://ambientweather.com/mwdownloads/download/link/id/1081/
Product Page
https://www.ambientweather.com/amws5000.html

- Install each M5 nut in the order above. 1, 2, 3 then 4.
- Do not tighten with an impact driver. Hand tighten, then a half turn / 180 degrees. No more.
- If your mounting pole is a soft material (wood, pvc, etc.) you may need to retighten the M5 nuts when you perform your maintenance every 3 months.
Absolute pressure is the measured atmospheric pressure.
Absolute pressure is not corrected to sea-level conditions.
To compare pressure conditions from one location to another, meteorologists correct pressure to sea-level conditions (referred to as relative pressure, or pressure relative to sea-level).
Because the air pressure decreases as you rise in altitude, the sea-level corrected pressure (the pressure your location would be at if located at sea-level) is higher than your measured pressure if you live above sea-level and lower than your measured pressure if you live below sea-level.
The following is the absolute pressure lapse rate as a function of altitude for standard day conditions:
Relative pressure is the atmospheric pressure corrected to sea-level conditions.
To compare pressure conditions from one location to another, meteorologists correct the measured pressure (referred to as absolute pressure) to sea-level conditions. Because the air pressure decreases as you rise in altitude, the sea-level corrected pressure (the pressure your location would be at if located at sea-level) is higher than your measured pressure if you live above sea-level and lower than your measured pressure if you live below sea-level.
Relative pressure is larger than absolute pressure unless you live at or below sea-level.
You can check your local airport’s pressure here:
... Permalink
- Look for the WiFi icon
 in the time field of the weather station console. Make sure this WiFi icon is on. If it is on, you already connected to WiFi.
 - If you own a Mesh Network (examples, Orbi, eero or Google), temporarily turn off all of the secondary nodes, leaving only the primary node (the node connected to the Internet) powered up. If you use a Virtual Private Network (VPN), temporarily turn this off.
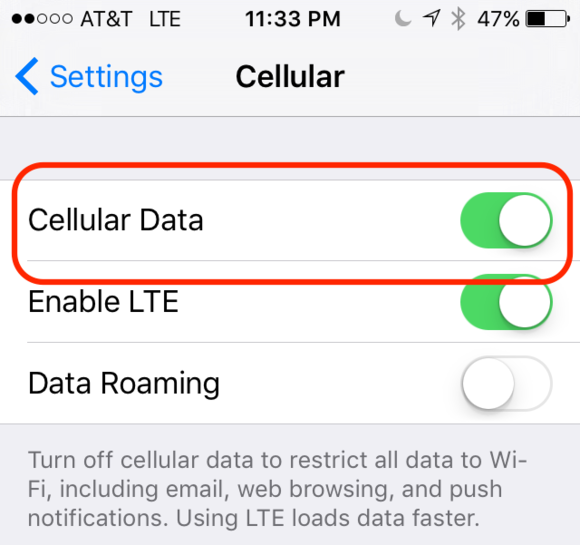
- Wi-Fi Assist is a feature lets you automatically pop over to cellular data if you end up on a Wi-Fi network with a poor connection. This can interfere with the connection process it is recommended to be disabled during setup.
- Go to Settings → Cellular

- Scroll all the way to the bottom of the cellular data settings and turn off Wi-Fi assist. it will be the last option beneath everything else.
- Scroll all the way back up to the top and now disable cellular data completely.
- If the WiFi icon is off, press and Hold the Rain and Alarm buttons at the same time for 5 seconds, and the WiFi icon will begin to flash.
- If you have not done so already, download the AmbientTool console configuration application for your Android or Apple mobile device:App Store: https://itunes.apple.com/us/app/ambienttool/id1166897468
Google Play Store: https://play.google.com/store/apps/details?id=com.dtston.ambienttool - Launch the AmbientTool app on your mobile device or tablet, and make sure your phone is connected to your router. If you own a dual band router, make sure the phone is temporarily connected to the 2.4 GHz band on your router.
- The AmbientTool includes a wizard. This wizard is also shown Step by Step in the User Manual.
- Select Add Device to add a device.
- Enter your WiFi password. If configured properly, the WiFi icon will now be on.
Product Manual
https://ambientweather.com/mwdownloads/download/link/id/567/
Product Page
https://www.ambientweather.com/amws2902.html
To compare pressure conditions from one location to another, meteorologists correct pressure to sea-level conditions. Because the air pressure decreases as you rise in altitude, the sea-level corrected pressure (the pressure your location would be at if located at sea-level) is generally higher than your measured pressure.
Thus, your absolute pressure may read 28.62 inHg (969 mb) at an altitude of 1000 feet (305 m), but the relative pressure is 30.00 inHg (1016 mb).
The standard sea-level pressure is 29.92 inHg (1013 mb). This is the average sea-level pressure around the world. Relative pressure measurements greater than 29.92 inHg (1013 mb) are considered high pressure and relative pressure measurements less than 29.92 inHg are considered low pressure.
To determine the relative pressure for your location, locate an official reporting station near you by accessing https://ambientweather.net/baro, and set your weather station to match the official reporting station.
To enter the calibrated relative pressure into the console, you must enter the SET mode. To enter the SET mode, press and hold the SET button for two seconds, and press SET eleven more times until the pressure flashes. This setting allows you to change the units of measure from inHg to mm to hPa.
Press SET one more time, and Relative Pressure will flash.
Press [WIND +] or [PRESSURE -] to adjust relative pressure up or down.
Reference Section 6.4.4 of the User Manual below for details on calibration of relative pressure:
https://p10.secure.hostingprod.com/@site.ambientweatherstore.com/ssl/Manuals/WS-2902A.pdf
The settings are summarized below.

If AmbientWeather.net is working fine, but Wunderground.com is not updating, this is usually a typo.
Make sure that you did not enter a space on the end of your station ID or station key. It is easy to do, especially if you Copy and Paste from the Wunderground.com website.
It is easy to confuse the lower case letter l, upper case I and the number 1, as well as the number 0 and the letter O.
- Launch the AmbientTool on your mobile device, select your device from the list, and select Next to view your Wunderground.com settings.


- Make sure your station ID and password match exactly.
- If you continue to have issues, email the following to support@ambientweather.com
1. Your Wunderground sign in email address.
2. Your Wunderground sign is password.
3. Your Wunderground Station ID.
4. Your Wunderground Station Key.
5. The type of weather station.and will check for any typos. - It is possible Wunderground.com is temporarily down.
In June 2018, Wunderground.com relaunched the back end of their website (the previous version was old and not maintained), and many of the stations went offline. They are less forgiving now with the Station ID and Station Key. Check again for any typos or spaces at the end. You can contact Wunderground.com here:
- Make sure your weather station console is connected to WiFi. Look for the WiFi icon in the time field on your display console.
- Make sure there is not a typo in your MAC address. Launch the AmbientTool on your mobile device or tablet, and click on the device in the device list. Make sure the auto upload is on, and the MAC address matches what you entered on the AmbientWeather.net device panel: https://ambientweather.net/devices
The example below shows three different connected devices. Click on the Device Field:
- Make sure the schedule is turned on and the uploads are active. Also, confirm the MAC address matches the MAC you registered online:

To restore the console to factory default or perform a factory reset, perform the following steps:
- Remove the power from the console by removing the batteries and disconnecting the AC adapter.
- Apply power by connecting the AC adapter.
- Wait for all of the segments to appear on the screen, as shown below:

- Press and hold the WIND/+ and PRESSURE/- buttons at the same time until the console power up sequence is complete (about 5 seconds).
- Replace the batteries.
- If AmbientWeather.net stops reporting but WeatherUnderground.com continues to update, power down and up your console by removing batteries and AC power. There may have been a DNS server change that was not updated on the console.
- If the problem persists, power down and up your wireless router.
- Power down and up the console by removing batteries and AC power. If the problem persists,
- Reboot your router. If the problem persists,
- Perform a factory reset:
- Remove the power from the console by removing the batteries and disconnecting the AC adapter.
- Apply power by connecting the AC adapter.
- Wait for all of the segments to appear on the screen:
- Press and hold the WIND/+ and PRESSURE/- buttons at the same time until the console power up sequence is complete (about 5 seconds).
- Replace the batteries.
- You are now starting over. Reference the section in the manual for connecting the console to WiFi and the Internet.
- Connect directly to your wireless router and not a repeater or range extender.
The saturated salt solution test is an easy method for testing the accuracy of your humidity sensor. Most electronic sensors are accurate from +/- 3 to 5% humidity, and some weather stations or weather centers can be calibrated from the display console by applying a bias.
- Mix common table salt with tap water until you have a completely saturated solution with no standing water.
- Place about 1 inch of the saturated salt solution in an open container or bowl that is approximately 4 inches high. The 3 inches above the solution will contain air with a predictable humidity value. You can use a cut away container as shown in the figure below. One edge of the container is cut slightly lower to rest the sensor on the lip.
- Place this container and the sensors in a waterproof zip lock plastic bag, as shown in the figure below. Leave one of the corners open and remove all of the remaining air with a straw. Close the air tight bag.
- Leave the sensor in the bag for four days or 96 hours to completely stabilize.
- The sensor should read 75% plus or minus the sensors rated margin of error. For example, if the sensor is rated at +/- 5%, the display should read between 70 and 80% relative humidity.
- If the sensor is adjustable or calibrateable, set the humidity on the display to 75%.
- Repeat this procedure once per year to account for electronic drift (sensor contamination).


The images above show a table salt slurry of 1″ height mixed in a container about 3″ tall. This solution is then placed in a plastic bag with the sensor.
You cannot add a second sensor to your existing weather station listed below, but one of the products below would allow you to add sensors to AmbientWeather.net which are then seamlessly integrated online (you can add as many devices as you wish to AmbientWeather.net).
Here are a few of options:
WS-50-C:
https://www.ambientweather.com/amws50c.html
Amazon: https://www.amazon.com/dp/B07Q248FDK
The WS-50-C supports up to 8 thermo-hygrometers (F007TH), floating pool, spa and lake thermometers (F007PF) or temperature probes for any medium (F007TP).
WS-0265:
https://www.ambientweather.com/amws0265.html
Amazon: https://www.amazon.com/dp/B07L5YQCH6
The WS-0265 supports up to 8 remote thermo-hygrometers (WH31B).
WS-8482:
https://www.ambientweather.com/amws8482.html
Amazon: https://www.amazon.com/dp/B07BMGPJQ2
The WS-8482 supports up to 7 thermo-hygrometers (TX-3110B), pool, spa and pond thermometers (TX-3107) or soil temperature and moisture sensors (TX-3102).
... PermalinkHow-to Video on connecting your WS-2902A, WS-2902B, WS-2902C display console to WiFi and the Internet using an Android device:
... Permalink
- To connect your WS-2902A or WS-2902D to AmbientWeather.net, you must first connect your weather station console to your WiFi Router.
Look for the WiFi icon ![]() in the time field of the weather station console. Make sure this WiFi icon is on. If it is on, you already connected to WiFi.
in the time field of the weather station console. Make sure this WiFi icon is on. If it is on, you already connected to WiFi.
If it is off, please reference:
I Cannot Connect The WS-2902A Console To WiFi.
How Do I Connect My WS-2902, WS-2902A To AmbientWeather.Net?
2. Launch the console configuraton app awnet  on your mobile device or tablet, the weather station MAC address is displayed in the Device List.
The example below is for three devices connected to the same network:

Tap on the device directly to program it and make sure a schedule is set:

3. Visit AmbientWeather.net and select Create your Account. Use the MAC address shown above to register your account.
... PermalinkTo determine the accuracy of a digital rain gauge, you need to know the surface area of the funnel.
If the rain gauge has a rectangular inlet:
Area = length x width
If the rain gauge is circular:
Area = ( π x d2 ) / 4, where d is the diameter of the rain gauge and π = 3.14159
The calculation is as follows:
Total Rain = Water Volume / Area
Example 1:
Rectangular Rain Gauge:
Area = 11 x 5 cm or 55 cm2
If you pour in 100 ml of water (or 100 cm3) SLOWLY (over a 10 minute period), one would expect the rainfall to equal:
Total Rain = 100 cm3/ 55cm2 = 1.81 cm or 18 mm of rain (+/- the accuracy specification of the rain gauge).
Since 1 mm = 0.03937 inches, the total rain (inches) = 18 x 0.03937 inches/mm = 0.71 inches.
Take into account the resolution of the rain gauge.
If the resolution is 0.04 inches for example, the measurement would be 0.04 inches/tip x 17 tips = 0.68 inches.
Example 2:
Circular Rain Gauge (Osprey):
Diameter = 11.28 cm
Area = ( π x 11.282 ) / 4 = 100 cm2
If you pour in 100 ml of water (or 100 cm3) SLOWLY (over a 10 minute period), one would expect the rainfall to equal:
Total Rain = 100 cm3/ 100cm2 = 1 cm or 10 mm of rain (+/- the accuracy specification of the rain gauge).
Since 10 mm = 0.3937 inches, the total rain (inches) = 0.3937 inches.
Take into account the resolution of the rain gauge.
If the resolution is 0.01 inches for example, the measurement would be 0.01 inches/tip x 39 tips = 0.39 inches.
Important Note: Make sure the weather station display is set to total rain and not rain rate.
... PermalinkThis help guide is intended to be used with WS-2902 model of weather station
If you have a WS-2902A, WS-2902B or WS-2902C please go the guide here
To update the firmware, launch AmbientTool  (for model WS-2902) from your mobile device.
On the Device Info panel, the current Firmware Version is listed, as well as the latest upgrade version.

The WS-2902A console adds “MiFi” capability, where it broadcasts a signal where you can connect directly to the console. This makes it easier to set up if you have a dual band router, because you are not required to temporarily turn off the 5.0 GHz band. The WS-2902A still retains the set up method for the WS-2902.
We no longer recommend upgrading your console from a WS-2902 to WS-2902A. We have found that in many cases, it bricks the console.
... PermalinkThe WS-2902 weather station sensor array wirelessly updates wind speed and direction to the console every 16 seconds.
The WS-2902A replaced the WS-2902 in 2018.
The WS-2902A adds direct console Internet connectivity to the WS-2902. This makes it easier to connect to a dual band router.
The WS-2902 uses the mobile app AmbientTool to connect to your router. This app communicates to your console through the router.
The WS-2902 uses the mobile app awnet to connect to your router. This app provides direct connection to the console.
... PermalinkIf the WS-2902 series WiFi is blinking or intermittent, and the console WiFi icon is flashing slowly (about once per second):
- Power down and up your router and wait a few minutes for the console to reconnect. If the problem persists:
- Check for the WiFi chip status light inside the console. Make sure the console is plugged into AC power. In a dark room, look inside the slots in the back of the unit. The status light should be glowing blue. If you see no blue light, there is an issue with the console and must be replaced.
- Move the console away from any RF or EMI devices, like routers and other computer equipment. Do not place the console too close to your router.
- The console cannot be too far away from the router either.
- To avoid complication, connect directly into the router’s WiFi and not a repeater.
- If you have a mesh network, connect directly to the primary router.
- For troubleshooting, turn the orientation of the console 90 degrees and see if this resolves the issue.
- We have a one year warranty. To replace the console under warranty, please visit: www.AmbientWeather.com/rma.html
- For out of warranty replacement, please visit: https://www.ambientweather.com/amws2902aconsole.html
- If the display is on rain rate, and it has not updated in the last 10 minutes, the rain will read 0.00 in. Change the display to read daily, weekly, monthly or yearly rain by pressing the rain key. Does the rain stay at 0.00?
- Visually inspect the rain funnel. Is the funnel missing? To replace the funnel, please visit:https://www.ambientweather.com/amws2902funnel.html
- Check the funnel for any debris. Clean the funnel.
- Remove the funnel and check for any debris that may be affecting the tipping mechanism. Tip the mechanism back and forth. Does the rain update on the console? Check for any bugs or dirt. Clean with a damp, soft cloth.
- If the problem persists, we have a one year warranty. Please visit www.AmbientWeather.com/rma.html
- If out of warranty, the sensor array can be replaced here:https://www.ambientweather.com/amws2902rainassembly.html
If you changed your network configuration or your WiFi password:
- Unplug power to modem, router and console (unplug AC adapter and/or remove batteries).
- Plug power back into the cable Modem and let it sync back up with the network.
- Plug power back into the Router and let it sync up.
- Plug AC adapter back into the console.
- Wait 5 minutes then click corresponding link below and follow the instructions.
Android Device: I Cannot Connect My WS-2902 To WiFi, Apple Or IOS
... PermalinkIf the forecast cloudy icon is flashing rain, this means there was a rapid drop in barometric pressure, indicating a storm is in the forecast 24-48 hours in advance. When the pressure rises again or stabilizes, the forecast icon will stop flashing.
![]()
In general, if the rate of change of pressure increases, the weather is generally improving (sunny to partly cloudy). If the rate of change of pressure decreases, the weather is generally degrading (cloudy, rainy or stormy). If the rate of change is relatively steady, it will read partly cloudy.
The reason the current conditions do not match the forecast icon is because the forecast is a prediction 24-48 hours in advance. In most locations, this prediction is only 70% accurate and it is a good idea to consult the National Weather Service for more accurate weather forecasts. In some locations, this prediction may be less or more accurate. However, it is still an interesting educational tool for learning why the weather changes.
The National Weather Service (and other weather services such as Accuweather and The Weather Channel) have many tools at their disposal to predict weather conditions, including weather radar, weather models, and detailed mapping of ground conditions.
... PermalinkOnce you have obtained your Station ID and Station Key from Weather Underground.com, you must enter these into the display console with the AmbientTool.
- Launch the AmbientTool on your mobile device, select your device from the list, and select Next to view your Wunderground.com settings:
- Make sure your station ID and password match exactly.
- IF Wunderground.com does not update, this is usually a typo.It is easy to confuse the lower case letter l, upper case I and the number 1, as well as the number 0 and the letter O. Also, DO NOT copy and paste your station key into the app, as it will add a lagging space.
Yes, you can purchase as many consoles as you like.
To purchase a second console, visit: https://www.ambientweather.com/amws2902aconsole.html
If your second console does not require connection to the Internet, and is for display purposes only, you can save by ordering the WS-1900 console:
https://www.ambientweather.com/amws1900console.html
The WS-2000 console also supports the Osprey Sensor array:
https://www.ambientweather.com/amws2000c.html
but requires the indoor thermo-hygrometer-barometer, since it is not included inside the console:
https://www.ambientweather.com/amwh32b.html
... PermalinkThe WS-2902 is a newer model and was designed to reduce overall cost, but is equal in accuracy to the WS-1002-WiFi.
- The WS-1002-WiFi has a nicer display console (TFT) vs. the WS-2902 (Color Film LCD), which has a limited viewing angle.
- The WS-1002-WiFi includes on board archive memory, which can be viewed and downloaded via SD Card (csv format).
- The WS-1002-WiFi is easier to set up with WiFi and the Internet, because the settings are entered on the console and not from an app.
- The WS-1002-WiFi can communicate with EasyWeatherIP software for PC and Mac. The WS-2902 cannot communicate with software.
- Both weather stations support WiFi and Internet cloud services, including AmbientWeather.net.
I am able to connect to the ObserverIP admin screen but not able to report to AmbientWeather.net or Weather Undergroud.
Please check your routers outbound logs to make sure AmbientWeather.net http://107.170.198.71/ is not being blocked. Also check that you configure your network settings to use the IP addresses 8.8.8.8(primary) and 8.8.4.4(secondary) as your DNS servers
... PermalinkPress the RAIN button to switch between Rain Rate (in/hr), Rain Event, Rain Day, Rain Week, Rain
Month, and Rain Total.
- Resetting the weekly rain also resets the daily rain.
- Resetting the monthly rain also resets the daily and weekly rain.
- Resetting the total rain also resets the monthly, weekly and daily rain.
Note that the total rain is the accumulated amount since the last reset, and it not yearly rain, so if you wish total rain to display the yearly rain, you will need to reset the total rain to 0.00 on January 1.
To reset the rain totals, press and hold the RAIN button for two seconds.
... PermalinkHow-to Video on connecting your WS-2902A display console to WiFi and the Internet using an ios device(iphone/ipad):
... PermalinkTo turn on on or off alarms, enter the Alarm Mode.
Press and hold the ALARM button for two seconds to enter the ALARM Set Mode. To save and proceed to the next alarm setting, press (do not hold) the SET button.
To exit the alarm mode at any time, press the LIGHT / SNOOZE button.
The figure below summarizes the alarm mode sequence and commands.

Hint – if the alarm goes off at the same time every day, the time alarm is turned on.
... Permalink- Make sure the Station ID and Station Key are entered into the AmbientTool. It can be deleted if the firmware is upgraded.
Please reference the User Manual here:
https://p10.secure.hostingprod.com/@site.ambientweatherstore.com/ssl/Manuals/WS-2902.pdf
Specifically Section 7.1.
If you are already connected to WiFi, please advance to Page 38, Figure 32.Figure 32 (j) is specifically where you enter your Wunderground Station ID and Station Key.

DO NOT copy and paste your station key into the app, as it will add a lagging space. Make sure you type it in. Also, it is easy to confuse the lower case letter l, upper case I and the number 1, as well as the number 0 and the letter O.
- If you entered your station ID and station key properly, the problem is likely with Wunderground.com. Here is their contact information:
Contact Weather Underground
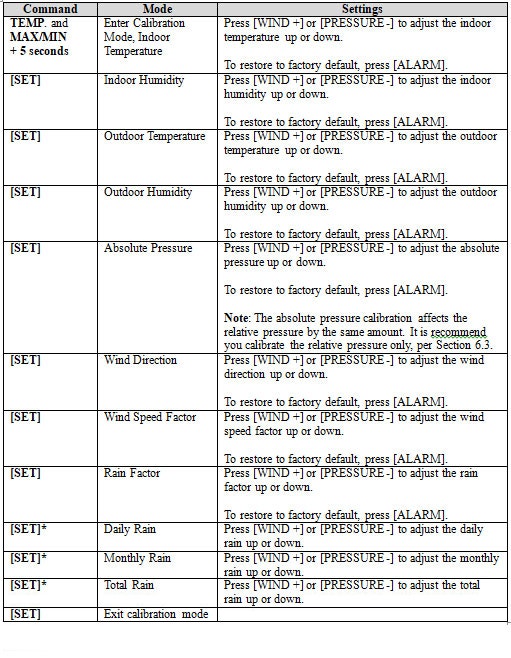
Press and hold the TEMP. and MAX/MIN buttons at the same time for 5 seconds to enter calibration mode. The CAL icon will be displayed:

To proceed to the next calibration setting, press (do not hold) the SET button.
To exit and save the calibration setting, press the LIGHT / SNOOZE button.
The table below summarizes the set mode sequence and commands.
- The WS-8478A has a much nicer display console. The WS-2902A uses a color film LCD which has a small viewing angle. The WS-8478A uses a high contrast PMVA display, and is almost twice as large.
- The WS-8478A supports 7 additional thermo-hygrometer sensors.
- The WS-2902A includes a UV and solar radiation sensor. The WS-8478A includes a UV sensor only.
To clear rain on the console:
- Press the RAIN button to switch between Rain Rate (in/hr), Rain Event, Rain Day, Rain Week, Rain
Month, and Rain Total. Select the rain total you wish to clear. - To reset the rain totals, press and hold the RAIN button for two seconds.
Resetting the weekly rain also resets the daily rain.
Resetting the monthly rain also resets the daily and weekly rain.
Resetting the total rain also resets the monthly, weekly and daily rain.
Your relative pressure likely does not match the official source because you have not calibrated it properly. You will need to reference your User Manual for correcting relative pressure.
You can locate an official source for your area to cailbrate by visiting https://ambientweather.net/baro
Discussion:
To compare pressure conditions from one location to another, meteorologists correct pressure to sea-level conditions. Because the air pressure decreases as you rise in altitude, the sea-level corrected pressure (the pressure your location would be at if located at sea-level) is generally higher than your measured pressure.
Thus, your pressure may read 28.62 inHg (969 mb) at an altitude of 1000 feet (305 m), but the corrected pressure is 30.00 inHg (1016 mb).
The standard sea-level pressure is 29.92 in Hg (1013 mb). Pressure conditions greater than 29.92 inHg (1013 mb) are considered high pressure and less than are considered low pressure.
Most weather stations instruct you to find a reporting station near your location to identify the corrected pressure.
... PermalinkIf you cannot upgrade your firmware, Only Power, Link and ACT lights are on, your ObserverIP module may be “bricked”.
- Note for Windows (Mac users can proceed directly to #2:To update the firmware, you may be required to turn off the firewall settings for the IPTools program (IPSE).Open Windows Firewall by clicking the Start button Picture at the bottom left hand corner of Windows, clicking Control Panel, clicking Security Center, and then clicking Windows Firewall.Click Change Settings and the Exceptions tab, and check all instances of IPSE as an exception to allow the program to communicate through the windows firewall. Press OK to save changes.

- Make sure your PC and OberverIP are connected to the same router prior to upgrading the firmware (avoid WiFi connectivity if you can).
- If you have not done so already, download the latest IP Tools and firmware here:http://www.ambientweather.com/observerip.html
- Run IPtools from your desktop.

- Select Search. Even if the device cannot be found, you can still upgrade the firmware. If the device is found, select the device and choose the Upgrade button.
- Select File and browse to the location on your computer where you downloaded the firmware.
Select the Upgrade Firmware button. The following will be displayed:DHCP server @ 192.168.0.xxx is running on UDP port 67 successfully.
TFTP server @ 192.168.0.xxx is running on UDP port 69 successfully. - The status bar will reach 100% if properly upgraded.

- Press Exit once completed.
- Press the reset button on the back of the IP Module.
- The IP Module will reboot. Press Search until the module is available again on your network.
- Re-enter your Station Type in the Station Settings panel.
- Re-enter your Weather Underground.com Station ID and Station Key in the Weather Network panel.
- If the procedure is unsuccessful, visit: www.AmbientWeather.com/rma.html and we will update the module for you.
- Place the sensor inside next to the indoor console sensor. Wait about 24 hours for stabilization. The sensors should agree within the accuracy specifications. Most digital capacitive hygrometer sensors are accurate within +/- 5%. Thus, the sensors should agree within 10% when considering full tolerance stack up.Note that humidity accuracy, like most other measurement parameters, are a percentage of full scale, and not a percentage of point.
- Sling psychrometers are very accurate. Perform a formal calibration. The humidity should agree within 5% of the rating. You can also make your own calibration kit. For details, visit:
Testing The Accuracy Of A Hygrometer - Saturated Salt Test?
3. Place the sensor in a shaded area on the north side of the structure to avoid direct and radiant heat.
4. Humidity is significantly impacted by external factors like location and water (grass, lakes, rivers, etc). Insure proper installation. You cannot use a source like the National Weather Service. There are several reasons:
- The NWS may update once per hour.
- The NWS has strict installation guidelines (no unnatural structures, bodies of water, or unnatural vegetation nearby).
5. If the problem persists, we have a one year warranty. Visit: www.AmbientWeather.com/rma.html
... Permalink

- Look for the WiFi icon
 in the time field of the weather station console. Make sure this WiFi icon is on. If it is on, you already connected to WiFi.
 - If you own a Mesh Network (examples, Orbi, eero or Google), temporarily turn off all of the secondary nodes, leaving only the primary node (the node connected to the Internet) powered up.If you use a Virtual Private Network (VPN), temporarily turn this off.
- Select your APP PERMISSIONS on your Android Device and make sure Location is turned On for the AmbientTool app:
- The Android phone may not connect to the Ambient Wireless SSID if it cannot resolve the DNS address client3.google.com, and will instead try to use the LTE network.To avoid this, temporarily disable Switch to mobile data on your on your device under Settings -> Connections -> WiFi -> Advanced -> Switch to mobile data. You can re-enable this after you are finished.or:
- Swipe down from the top of the screen, select Settings, press Data usage and then flick the Mobile data switch from On to Off – this will completely turn off your mobile data connection. You can re-enable this after you are finished.
- If the WiFi icon is off, press and Hold the RAIN and ALARM buttons at the same time for 5 seconds, and the WiFi icon will begin to flash.
- If you have not done so already, download the AmbientTool console configuration application for your Android or Apple mobile device:App Store: https://itunes.apple.com/us/app/ambienttool/id1166897468
Google Play Store: https://play.google.com/store/apps/details?id=com.dtston.ambienttool - Launch the AmbientTool app on your mobile device or tablet, and make sure your phone is connected to your router. If you own a dual band router, make sure the phone is temporarily connected to the 2.4 GHz band on your router.
- The AmbientTool includes a wizard. This wizard is also shown Step by Step in the User Manual.
- Select Add Device to add a device.
- Enter your WiFi password. If configured properly, the WiFi icon will now be on.
Product Manual
https://ambientweather.com/mwdownloads/download/link/id/567/
Product Page
https://www.ambientweather.com/amws2902.html
55:55:55:55:55:55 is not a real MAC address and is simply an example used in the manual. Each console has a unique MAC address.
To find the MAC, please reference the following Help Page:
Does Not Update AmbientWeather.Net, WS-2902 Or WS-0262A
... PermalinkIf you can connect to your console and program it through the awnet or AmbientTool app, but it does not show up in the Device List:
 your router may have an advanced security feature call “AP isolation” turned on.
This feature prevents communication between devices on the same network band SSID.
Disable this feature by consulting your wireless router’s operational manual.
... PermalinkIf the weather station is showing the wrong day of the week:
- Make sure the year is correct.
- Make sure the month-day format is MM-DD and DD-MM (day/month vs month/day).
- Make sure the time zone is set correctly if the console time is radio controlled or obtained over the Internet.
- Make sure AM/PM is correct. If the clock is 12 hours ahead or behind, it can show the wrong day half of time.
The WS-1600-IP is a combination of the ObserverIP Module, indoor thermo-hygrometer barometer WS-1000-BTH, and the Osprey sensor array (WS-2902).
It has never been offered for sale but users with the WS-2902 can convert to the WS-1600-IP by purchasing an ObserverIP Module and WS-1000-BTH.
... PermalinkIn general, when following the regular maintenance schedule in the user manual a user can expect a 3 to 10 year life before fully replacing the sensor array. A weather station’s life expectancy is greatly impacted by it’s environment see examples below:
- Coastal, Marsh or Wetland environments. Salt air, salt spray and acidification are the most difficult environments for weather stations to have a long life. The salt air, salt spray and acidification corrode bearings, sensor boards (temperature, humidity, etc.), mounting hardware and other moving parts. Expect a 1-3 year product life span in this type of environment. Ambient Weather's sensors boards are all conformal coated to prevent this corrosion. The nature of digital thermometer and hygrometer sensors relying on electrical resistance of metal changes allows the corrosion to occur more quickly
- Long term high humidity environments. Prolonged exposure to high levels of humidity, whether salt, acidic or not, predisposes metal parts to fail prematurely. In a hot and dry environment weather stations are known to last 7-10 years.
- Hurricanes and tropical storms can also reduce the life of a weather station.
Ambient Weather’s weather stations carry a one year warranty.
... PermalinkIf the RF signal quality antenna is fluctuating, losing bars, or missing completely, this means one or more consecutive RF signal packages were lost.
The sensor array updates once per 16 seconds.
The wireless signal strength displays reception quality. If no signal is lost, the signal strength indicator will display 5 bars. If the signal is lost once, four bars are displayed. If the signal is lost twice, three bars are displayed, and so on.

Loss of signal is normal with wireless signals. The most common issue is RF or EMI interference, followed by distance and attenuation due to barriers. It is considered normal and not a concern, unless the outdoor sensor repeatedly displays dashes (complete loss of signal for 5 minutes).
Here is a general guide on intermittent loss of communication:
Wireless Signal Is Intermittent Or Not Working
... PermalinkTo manually set the date and time, you must enter the Set Mode.
Press and hold the SET button for two seconds to enter the SET Mode. To proceed to the next setting, press (do not hold) the SET button.
To exit the SET mode at any time, press the LIGHT / SNOOZE button.

[SET] + 2 seconds means press and hold the SET button for two seconds.
[SET] means press the SET button.
... PermalinkBecause lightning is so unpredictable, we cannot make important decisions about your individual installation.
If you are installing the weather station on your roof or structure, consult a licensed electrician that specializes in lightning for advice.
Because weather stations are not hardened against EMP damage (it is very expensive), your weather station will likely not survive a direct or indirect lightning strike.
... Permalink
- Launch the IP Tools App and tap on your device, as shown in the figure below.
- AmbientWeather.net console settings are displayed. Tap Next.
- Wunderground console settings are displayed. Tap Next.
- Weatherclould console settings are displayed.
- Enter your WeatherCloud ID and Key.
- Tap Save.

For more information, please visit: https://weathercloud.net/info/awnet
Product Manual
https://ambientweather.com/mwdownloads/download/link/id/567/
Product Page
https://www.ambientweather.com/amws2902.html
The sensor array may need to be reset, or the batteries may need replacing.
- Cover the solar collector to shut of the solar energy source.
- Cover remove the batteries.
- Press the reset button for a full minute. There should be no LED flashing
- Reinsert the batteries
- Uncover the solar collector.
- LED should flash once per 14 seconds.
- Power down and up the console to resync
- If the outdoor temperature and humidity are still showing dashes (–) after several minutes, the sensor array must be replaced.
- We have a one year warranty. To replace the sensor array, please visit: www.AmbientWeather.com/rma.html
To restore the ObserverIP module to factory default, press the Reset pinhole button on the back of the module (#9, figure below).

The 2.4 GHz band transmits farther than the 5 GHz band.
A general rule of thumb in home networking says that WiFi routers operating on the traditional 2.4 GHz band reach up to 150 feet (46 m) indoors and 300 feet (92 m) outdoors. Routers that ran on 5 GHz bands reached approximately one-third of these distances.
- Make sure the WiFi icon is flashing on the display console.
- With your phone, walk as far away from your router while still being connected to the WiFi router.
- Turn off and on the WiFi from your phone, and you are likely now connected to the 2.4 GHz band.
- Proceed with the AmbientTool to configure the WiFi settings in the console by adding a Device.
You will need the MAC Address from the Kestrel Met 6000 (above in yellow ).
After creating an account on AmbientWeather.net, go to the device tab.

Click on connect a new device.

Next add the MAC Address and click next.
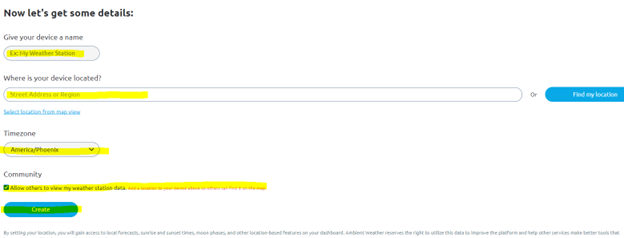
Enter in a device name, we recommend naming it anything other than my weatherstation.
Enter the address of your station in where is your device located.
Select your time zone.
Then select if you want it private or public under community.
Click create.
Then, go to the AWN Dashboard and “within” several minutes your readings from the KMet 6000 will show up.
... Permalink
The sensor array LED normally flashes once per 16 seconds. If the LED is flashing rapidly, there is an issue with the sensor array.
- Replace the batteries. We recommend Energizer Ultimate Lithium.
- Clean the terminals of any corrosion.
- Press and hold the reset button on the bottom of the sensor array for 30 seconds.
- If the problem persists, the sensor array must be replaced. We have a one year warranty. To replace under warranty, please visit: www.AmbientWeather.com/rma.html
- If out of warranty, a replacement array can be purchased here: https://www.ambientweather.com/amws2902array.html
None of the Ambient Weather Stations support repeaters or boosters at this point in time.
... PermalinkReplacement parts are available for the WS-2902 and WS-2902A here:
https://ambientweather.com/weather-station-parts-accessories?ambient_compatible_with=6373
... PermalinkIf you receive error ‘Unable to join “AMBWeather-wifixxxx”:
If you receive error ‘Unable to join “AMBWeather-wifixxxx” when trying to set up the WS-2902A console with the awnet app on an ios device (iphone/ipad) please follow the steps below.
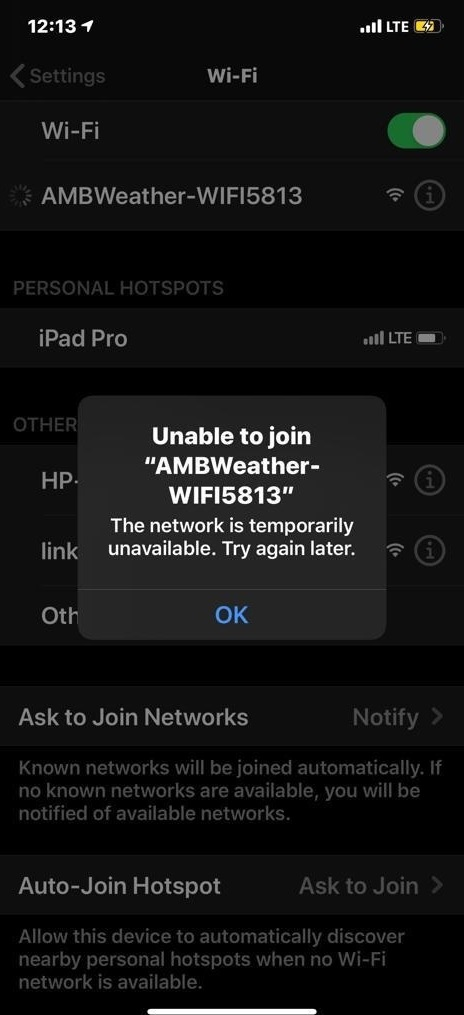
- Uninstall awnet app
- Restart iphone/ipad
- Resinstall awnet app
- Make sure you Select ‘Allow While Using App’

5. Follow set up instructions in app
... Permalink- Replace the batteries.
- If the problem persists, the sensor array must be replaced. We have a one year warranty. To replace under warranty, please visit:
www.AmbientWeather.com/rma.html - If out of warranty, a replacement sensor module can be purchased here:https://www.ambientweather.com/amws2902thermohyfroassembly.html
If your weather station only updates briefly on the Internet and then stops:
- Plug the ObserverIP module directly into your router and not a switch.
- Power down and up your router and the ObserverIP Module.
Weather Underground only provides indoor data in their iPad application Wunderstation.
However, AmbientWeather.net fully supports indoor and multiple channel sensors.
Here is a complete list of weather stations that work with AmbientWeather.net:
https://www.ambientweather.com/ambientnet.html
... PermalinkLaunch IPTools, go the IP address of your module:

Select Search and Open.
Tap the Live Data tab to view your real time data.

It is possible the sensor array was not powered up properly. Please reset the sensor array:
- Cover the solar collector to shut of the solar energy source.
- Remove the batteries.
- Press the reset button for a full minute. There should be no LED flashing
- Reinsert the batteries. Make sure they are fresh alkaline or lithium Energizer non-rechargeable batteries.
- Uncover the solar collector.
- LED should flash once per 14 seconds. If it is not flashing, the sensor array must be replaced.
- Power down and up the console to resync
- If the outdoor temperature and humidity are still showing dashes (–) after several minutes, the sensor array must be replaced.
- We have a one year warranty. To replace the sensor array, please visit: www.AmbientWeather.com/rma.html
Also, review this basic guide on wireless communication and range:
Wireless Signal Is Intermittent Or Not Working
... PermalinkWind Chill is the lowering of body temperature due to the passing-flow of lower-temperature air.
The wind chill calculation is based on wind speed and outdoor temperature, as shown in the table below.

Wind Chill temperature is defined only for temperatures at or below 10 °C (50 °F) and wind speeds above 4.8 kilometres per hour (3.0 mph).
Thus, for consistency, our weather stations and software display outdoor temperature when Wind Chill when invalid.
For more information regarding Wind Chill, please reference: https://en.wikipedia.org/wiki/Wind_chill
... PermalinkIf the firmware does not update when you tap the Upgrade Firmware button, delete the awnet  app from your mobile device and download it and try again.
If you are using the discontinued AmbientTool app, delete that app from your mobile device.

If you are resynchronizing a new sensor array because it needed replacement:
- Power down your old sensor array. Remove the batteries. Press and hold the reset button (#10 in the figure below) on the bottom of the sensor array for one minute. The array LED (#11) should stop flashing. Continue to press and hold the reset button until the LED stops flashing. This drains the super capacitor.

- Power up the new sensor array per the instruction manual (insert batteries and remove solar panel sticker cover. The LED will flash about once per 16 seconds. Place about 10 feet from the console.
- Power down and up the console by disconnecting AC power and batteries.
- Make sure the console is showing the outdoor temperature in the outdoor field, and not Dew Point, Heat Index or Wind Chill. Look for the icon above outdoor temperature.Press the [TEMP] button to switch between Outdoor Temperature, Wind Chill (CHILL), Dew Point (DEW) and Heat Index (HEAT).
- Replace the batteries. We recommend the following batteries:
My Rechargeable Batteries No Longer Work. Which Batteries Are Recommended For My Weather Station? - Clean any corrosion around and on the battery terminals.
- If the problem persists, the sensor array must be replaced. We have a one year warranty. To replace under warranty, please visit: www.AmbientWeather.com/rma.html
- If out of warranty, a replacement array can be purchased here: https://www.ambientweather.com/amws2902array.html
The WS-1900 and WS-2902 can be reset manually or automatically at midnight (daily reset).
To reset the minimum and maximum daily, enter the SET mode (press and hold the SET button for 2 seconds) and then press the SET button again to display the clear max/min mode. Turn ON to reset daily, OFF to reset manually:
To view the max value, press (do not hold) the MAX/MIN button, and the max values will be displayed, as shown in (a). To clear the max values, press and hold the MAX/MIN button while the max values are displayed.
To view the low alarm settings, press the MAX/MIN button again, and the min values will be displayed, as shown in (b). To clear the min values, press and hold the MAX/MIN button while the min values are displayed.
To return to normal mode, press the MAX/MIN button again.
Unable to connect to AmbientWeather.net or with the awnet app with AT&T UVERSE/ARRIS modem/router
1.From a browser on the same LAN as your Uverse modem/router, browse to the administrator address. By default this is 192.168.1.254.
2.On the Status tab, locate the Restart button for the 2.4 ghz radio, highlighted in pink on the attached image. Click this button. You will need to provide the Uverse device’s access code, shown on the bottom of the Uverse modem/router, unless it has been changed by the user. The radio restart takes 5 to 10 seconds.

3.When the restart is complete, the Device List tab will show all the nodes connected (wired or WiFi). If the Ambient Weather controller isn’t shown in the device list, or the WiFi icon on the controller panel is not on solid, then go through the WiFi setup as detailed in the awnet app.
4. Click the corresponding link below and follow the awnet app setup instructions.
Android Device: I Cannot Connect My WS-2902A, WS-2902B, WS-2902C To WiFi, Android.
iOS Device: I Cannot Connect My WS-2902A, WS-2902B, WS-2902C To WiFi, Apple Or IOS.
If the display is blank:
- Make sure the console is plugged into AC power and the power is switched on. If the console operates on battery power, the LED backlight is temporary when LIGHT SNOOZE button is pushed.
- Press the LIGHT SNOOZE button on the front of the console. The backlight may have been inadvertently turned off.
- If the console also stops reporting to online services, the console or AC adapter need replacing.
- Measure the output voltage of the AC adapter, and it should be about 5 Volts.If the AC adapter is not registering a voltage, we have a one year warranty here: www.AmbientWeather.com/rma.htmlIf out of warranty. the AC adapter is available here for purchase: https://www.ambientweather.com/amws1000acadapter.html
- If out of warranty, the console is available here for purchase:WS-2902: https://www.ambientweather.com/amws2902console.htmlWS-2902A: https://www.ambientweather.com/amws2902aconsole.html
If the time is incorrect by multiples of an hour, you likely set the incorrect time zone. The most common issue for users in the USA is to set a positive time zone instead of a negative time zone (example, +5 instead of -5).
The following table summarizes time zones around the world.
| Hours from GMT | Time Zone | Cities |
| -12 | IDLW: International Date Line West | — |
| -11 | NT: Nome | Nome, AK |
| -10 | AHST: Alaska-Hawaii Standard CAT: Central Alaska HST: Hawaii Standard |
Honolulu, HI |
| -9 | YST: Yukon Standard | Yukon Territory |
| -8 | PST: Pacific Standard | Los Angeles, CA, USA |
| -7 | MST: Mountain Standard | Denver, CO, USA |
| -6 | CST: Central Standard | Chicago, IL, USA |
| -5 | EST: Eastern Standard | New York, NY, USA |
| -4 | AST: Atlantic Standard | Caracas |
| -3 | — | São Paulo, Brazil |
| -2 | AT: Azores | Azores, Cape Verde Islands |
| -1 | WAT: West Africa | — |
| 0 | GMT: Greenwich Mean WET: Western European |
London, England |
| 1 | CET: Central European | Paris, France |
| 2 | EET: Eastern European | Athens, Greece |
| 3 | BT: Baghdad | Moscow, Russia |
| 4 | — | Abu Dhabi, UAE |
| 5 | — | Tashkent |
| 6 | — | Astana |
| 7 | — | Bangkok |
| 8 | CCT: China Coast | Bejing |
| 9 | JST: Japan Standard | Tokyo |
| 10 | GST: Guam Standard | Sydney |
| 11 | — | Magadan |
| 12 | IDLE: International Date Line East NZST: New Zealand Standard |
Wellington, New Zealand |
Make sure your time zone agrees with the time zone programmed into the console SET MODE:

This station does not store archived data, so when the Internet goes down, the data is lost.
The WS-1002-WiFi does internally store archived data:
https://www.ambientweather.com/amws1000wifi.html
Our recommendation for this model is connect your console and router to a computer uninerruptable power supply (UPS), available at Amazon:
https://www.amazon.com/gp/bestsellers/electronics/
... PermalinkIf the temperature sensor is reading -40 or 140 degF, it is possible the sensor array requires fresh batteries or needs resetting.
- Cover the solar collector to shut of the solar energy source.
- Cover remove the batteries.
- Press the reset button for a full minute. There should be no LED flashing
- Reinsert fresh batteries
- Uncover the solar collector.
- LED should flash once per 14 seconds. If it is not flashing, the sensor array must be replaced.
- Power down and up the console to resync
- If the outdoor temperature is still showing -40 or 140 degF after several minutes, the sensor array must be replaced.
- We have a one year warranty. To replace the sensor array, please visit: www.AmbientWeather.com/rma.html
- For out of warranty replacement, please visit: https://www.ambientweather.com/amws2902array.html
No, it does not. Virtual Weather Station (VWS) has been discontinued. Most of our weather stations are direct to Internet and communicate with our hosting service at AmbientWeather.net.
Please visit or Community Page to find a list of applications that work with AmbientWeather.net:
... PermalinkIf the wind vane is moving, but the wind direction is not changing on the console:
- Make sure the wind vane is firmly attached to the shaft with the set screw. Move the shaft manually with your hand.
- If the problem persists, the sensor array must be replaced. We have a one year warranty. To replace under warranty, please visit: www.ambientweather.com/rma.html
- If out of warranty, a replacement array can be purchased here: https://www.ambientweather.com/amws2902array.html
Press and hold the WIND + and PRESSURE – buttons at the same time on the display console at the same time for about 5 seconds and the WiFi icon will flash along with M-B in the time field if you own the WS-2902A.
If nothing flashes after holding the buttons, you own a WS-2902 console.
You can also tell by looking at the outer box and the first page of the paper manual included in the box.
... PermalinkIf you are experiencing condensation in the solar collector or solar panel, this is not preventable, and will not damage the solar panel or sensor array.
... PermalinkIf you live in the Southern Hemisphere, you point your solar panel to the North and calibrate your wind vane on the console 180 degrees out of phase.
Reference the User Manual here:
https://p10.secure.hostingprod.com/@site.ambientweatherstore.com/ssl/Manuals/WS-2902A.pdf
and search for the section labeled Calibration. Adjust the wind direction offset to 180.
... PermalinkTo prevent the rain gauge funnel from blowing off, make sure the tabs are aligned between the wind cups base and funnel, and rotate clockwise to close. Make sure the funnel is locked firmly in place:

If the WiFi icon is flashing on the display ![]() , the console is connected to WiFi but your router’s 2.4 GHz band is not connected to the Internet.
, the console is connected to WiFi but your router’s 2.4 GHz band is not connected to the Internet.
Make sure the 2.4 GHz band on your router is connected to the Internet.
If the problem persists, try rebooting your router and display console by removing AC power and batteries and reconnecting power.
... PermalinkIf the pressure is different between your console reading and Internet sites such as AmbientWeather.net and Wunderground.com, you have likely switched your console from Relative (REL) Barometric Pressure to Absolute (ABS) Barometric pressure. Look for the REL or ABS icon in the pressure field.
AmbientWeather.net and Wunderground.com report Relative Barometric Pressure.
To switch between ABS and REL, press the PRESSURE button on the front of your display console.
... PermalinkIf the ObserverIP Module does not power up (no lights):
The issue may be with the AC adapter. Measure the output voltage of the AC adapter, and it should be about 5 Volts.
If the AC adapter is not registering a voltage, we have a one year warranty here: www.AmbientWeather.com/rma.html
If out of warranty. the AC adapter is available here for purchase: https://www.ambientweather.com/amobserveripac.html
If the voltage is fine, the console needs replacing, we have a one year warranty here: www.AmbientWeather.com/rma.html
If out of warranty, the console is available here for purchase:
https://www.ambientweather.com/amobserverip.html
... PermalinkSorry but the weather station console requires a smart phone to connect it to WiFi and the Internet.
From our sales literature on the website:
Important Note: Requires an iPhone, iPad, or Android device to program through the AmbientTool application (available in the Apple App Store or Google Play).
Ambient Weather Setup Tool:


This is very typical of Internet of Things (IoT) devices, such as Nest Thermostat, hue Lightning, WiFi switches and more.
You only need the smart device once. Once you set it up, you can view the data on any platform by going to your AmbientWeather.net dashboard. Therefore, we recommend borrowing a smart phone or tablet from a friend or family member.
... PermalinkTo change the rain totals in the ObserverIP Module, select the Live Data panel, and enter the rain totals for daily, weekly, monthly, and yearly totals.
![]()
If you live outside of the USA and cannot download the awnet file from the Google Play Store, it is available for download here:
... PermalinkTo turn the Time Alarm Off in the WS-1900 and WS-2902A series, press and hold the ALARM button for two seconds. The Alarm Time will flash. Press (do not hold) The ALARM button again to toggle the alarm on and off. The alarm bell will appear  and disappear in the time field.

Product Manual
https://ambientweather.com/mwdownloads/download/link/id/567/
Product Page
https://www.ambientweather.com/amws2902.html
If the time zone is off by increments of an hour, the time zone or daylight saving time is set incorrectly.
They are the third and fourth settings (from the User Manual):

The following table provides times zones throughout the world. Locations in the eastern hemisphere are positive, and locations in the western hemisphere are negative.
| Hours from GMT | Time Zone | Cities |
| -12 | IDLW: International Date Line West | — |
| -11 | NT: Nome | Nome, AK |
| -10 | AHST: Alaska-Hawaii Standard CAT: Central Alaska HST: Hawaii Standard |
Honolulu, HI |
| -9 | YST: Yukon Standard | Yukon Territory |
| -8 | PST: Pacific Standard | Los Angeles, CA, USA |
| -7 | MST: Mountain Standard | Denver, CO, USA |
| -6 | CST: Central Standard | Chicago, IL, USA |
| -5 | EST: Eastern Standard | New York, NY, USA |
| -4 | AST: Atlantic Standard | Caracas |
| -3 | — | São Paulo, Brazil |
| -2 | AT: Azores | Azores, Cape Verde Islands |
| -1 | WAT: West Africa | — |
| 0 | GMT: Greenwich Mean WET: Western European |
London, England |
| 1 | CET: Central European | Paris, France |
| 2 | EET: Eastern European | Athens, Greece |
| 3 | BT: Baghdad | Moscow, Russia |
| 4 | — | Abu Dhabi, UAE |
| 5 | — | Tashkent |
| 6 | — | Astana |
| 7 | — | Bangkok |
| 8 | CCT: China Coast | Bejing |
| 9 | JST: Japan Standard | Tokyo |
| 10 | GST: Guam Standard | Sydney |
| 11 | — | Magadan |
| 12 | IDLE: International Date Line East NZST: New Zealand Standard |
Wellington, New Zealand |
You can find Sunrise, Sunset, Solar Noon and Solar Position for Any Place on Earth.
Using the NOAA Solar Calculator
Click on the Image below and then enter your Longitude / Latitude, Date and get the Sunrise / Sunset

To silence the WS-2902 console from beeping, you must enter the SET mode.
To enter the SET Mode, press and hold the SET button for two seconds and the Beep on or off setting will flash. Press the WIND + key to turn it off.

Notes:
- To determine your firmware version, press the gear icon/button until you get to the Factory page then select Factory | About | Display from the console.
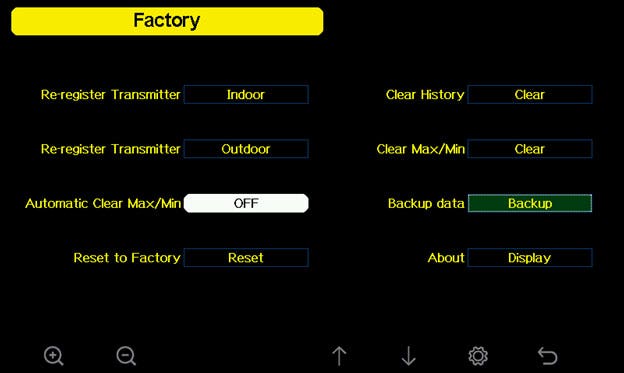
- The firmware revision number is what you need to verify on the about screen.
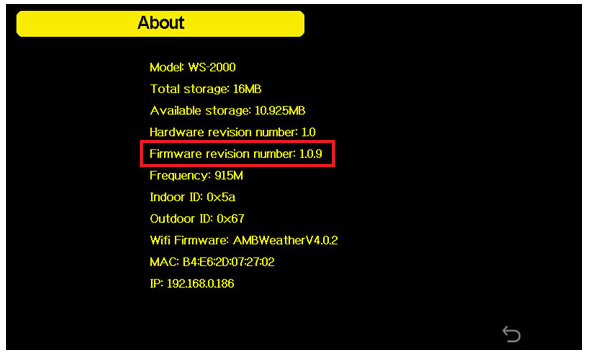
Instructions:
Download the latest hardware firmware file (under firmware update downloads and history below) to your your computer and save as Factory.bin. Make a note of where you saved this file.
Note: File may download as another file name rename to Factory.bin.
- Copy the Factory.bin to your Micro-SD Card (the SD card must be empty and format FAT32).
- Example of how it should appear after the file is copied.
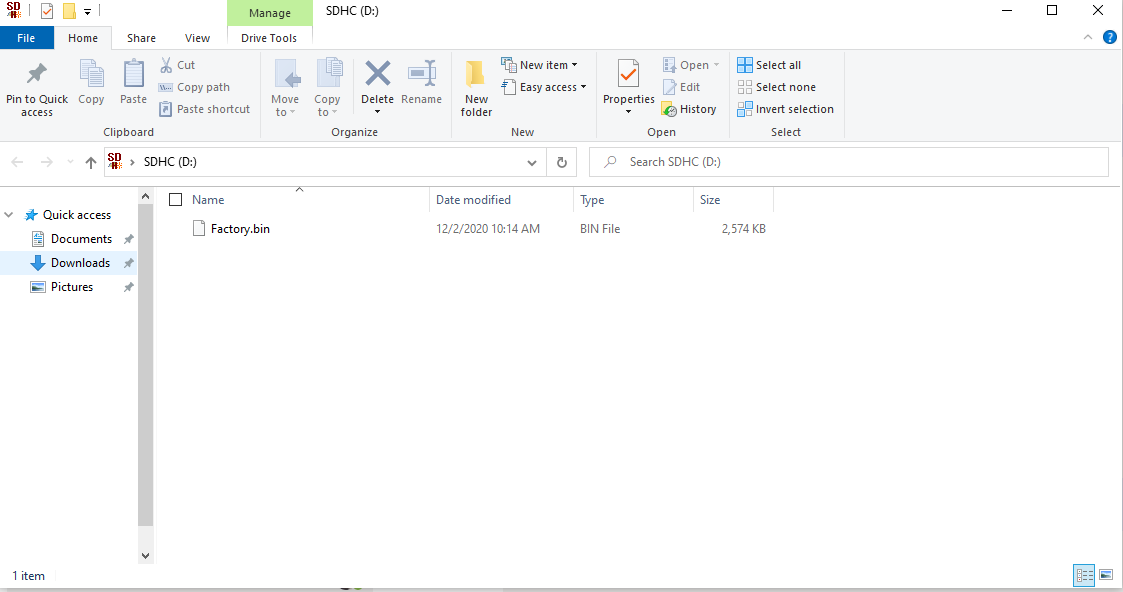
- Power down your display console by removing AC power.
- Insert the SD Card into the display console.
- Power up the display console.
- The console will verify the firmware was updated.
- Power down the console after complete. Remove the SD Card when the console is powered down.
Where to purchase a MicroSD Card:
You can purchase one from AmbientWeather.com, here (4, 8, 16 or 32 GB will work):
In order to stay up to date with the latest Ambient Weather firmware or app updates, sign up for email notifications below. This way, you'll always be notified when a new update is available for your station or app.
Firmware Update Downloads And History:
March 29, 2023 | Version 1.9.0
Changes:
- When you enter the network password, it will be changed to " * " after 1 second.
- Fixed a bug with PM2.5 data display when using indoor and outdoor PM2.5 sensors.
- In the About screen, when there is no newer Wi-Fi firmware version available, the message is changed from "The new version is not checked." to "The new version is not available."
- Removed limits from Feelslike display.
Septermber 8, 2021 | Version 1.7.6
Changes:
- Removed Barometer Display from setup screen and replaces with Reset Weekly Rain at.
- Removed Background from setup screen and replaces with Reset Daily Rain at.
Changes:
- Can now rename indoor sensor to custom name.
November 17, 2020 | Version 1.6.9
Changes:
- Add path for custom server setup. Wifi firmware will need to be upgraded to 4.2.8 or later.
- Revise PM2.5、AQI, PM10、CO2 average buffer to be reset when newly registered again.
June 12, 2020 | Version 1.6.4
Changes:
- Fixes issue with PM2.5 IN not displaying on the console, introduced in Version 1.6.3.
- Leak detector icon turns orange on the display console if the sensor loses communication for 10 minutes.
June 8, 2020 | Version 1.6.3
Changes:
- Supports leak detectors
- Fixes issue where lightning distance only displayed km (not miles).
April 30, 2020 | Version 1.6.2
Changes:
- Fixed update issue with WS-5000 and AmbientWeather.net. It would not always update on the minute.
- When no rain sensor is detected with the WS-5000, then rain data area is switched to hide rain data and display the weather forecast.
April 14, 2020 | Version 1.6.1
Changes:
- Finalized leak detection reporting to AmbientWeather.net
- Supports Low Battery for WS-5000 sensor array
- Lightning detection units of measure tied to wind speed units of measure (if wind units of measure is m/s, km/h, or bft, lightning is km; if wind units of measure is mph, ft / second, lightning is miles; if wind units of measure is knots, lighting is nautical miles (nmi).
March 27, 2020 | Version 1.6.0
Changes:
- Added soil moisture sensor reporting to AmbientWeather.net
- Added lighting detection reporting to AmbientWeather.net
- Added leak detection reporting to AmbientWeather.net
December 25, 2019 | Version 1.5.8
Changes:
- Fixed wind gust reporting issue.
December 8 2019 | Version 1.5.7
Changes:
- Sensor low battery status displayed on sensor info page.
- Current and 24H AQI data display supported.
- Supports indoor PM2.5 display
- Wifi password can be up to 64 characters, previously 32.
November 18 2019 | Version 1.5.3
Changes:
- Sensors can be managed and disabled on the setup page.
- Supports 8 channel soil moisture and temperature sensors.
- Supports calibration for soil moisture and temperature sensors.
- Supports indoor PM2.5 sensor.
- Corrected spelling errors.
- German language supported.
- Sensor handling optimization.
June 10 2019 | Version 1.4.8
Changes:
- Minor bug fixes
June 6 2019 | Version 1.4.6
Changes:
- Fixed issue with back light button not responding.
- Fixed issue with Wunderground.com 16 second updates introduced in Version 1.4.5.
June 6 2019 | Version 1.4.5
Changes:
- Improvements to RF Chip Sensitivity
- More intuitive WiFi and User Interface Set up
- Improvements to Keyboard User Interface
- UART0 communication bug fix
- Improvements to AmbientWeather.net data stream
- Fixed false Low battery alert PM2.5 sensor
- RAM optimized
- Rain calculation algorithm optimized Backlight on/off control algorithm improved
May 16 2019 | Version 1.4.4
Changes:
Finalized firmware for PM2.5 Sensor.
April 29 2019 | Version 1.4.2
Changes:
- Memory stack optimized.
Checksum prevents corrupted updates.
April 15 2019 | Version 1.4.1
Changes:
Fixed history time format exported to SD Card.
March 28 2019 | Version 1.4.0
Changes:
- Fixes time bug between 12:00am and 1:00am
- Sensor signal quality and battery status are now displayed
- Rain rate value is now displayed
- Sensor ID is displayed on About Display page for advanced customer troubleshooting
History file saved on SD card are now optimized based on units of measure
January 24 2019 | Version 1.3.8
Changes:
- Optimized RF receiver response.
- Corrected several bugs, including barometer scaling error.
- WeatherUnderground.com update rate changed from 30 to 16 seconds.
- Correct spelling error on upgrade page.
- Changed time/date format per customer suggestions.
- Integration of Ambient Weather PM2.5 Particulate Monitor sensor.
Optimized SD Card Storage.
January 16 2019 | Version 1.3.7
Changes:
- Optimized RF receiver setting and can follow sensor reception quickly.
- Background is now black instead of dark gray.
Removed top gray bar to make extra room for date and time.
January 6 2019 | Version 1.3.5
Changes:
- Fixes a number of issues with stray characters.
- Fixes issue with Channel 1 not showing on AmbientWeather.net
- Fixes issue with date and time.
Screen makes room for new Air Quality Sensor (coming soon, no details yet). Moved date and time to top bar to make room (similar to a phone layout).
December 27 2018 | Version 1.2.7
Changes:
- Fixes formatting issue introduced in 1.2.5
- Fixes issue introduced in 1.2.5 where sunset does not set on home display screen.
December 22 2018 | Version 1.2.6
Changes:
- Fixes formatting issue introduced in 1.2.5
- Fixes bug with barometric pressure calibration for high altitude (above 7,000′).
December 13 2018 | Version 1.2.5
Changes:
Improved readability of screen. The temperature and wind circles were slightly elongated, and improved resolution of some of the characters.
November 14 2018 | Version 1.2.1
Changes:
The console could not connect to a non-secure network. This issue was resolved.
September 21 2018 | Version 1.2.0
Changes:
February was incorrectly spelled “Febuary”.
July 11 2018 | Version 1.1.0
Changes:
Critical update. Console is bricked when archived data reaches 740th flash block address.
July 3 2018 | Version 1.0.9
Changes:
Added max daily wind gust to dashboard.
June 30 2018 | Version 1.0.7
Changes:
- 10 minute average wind speed was not updating properly. ... Permalink
The only option for this model is to clear or reset the rain totals to 0.00. You cannot adjust the rain totals individually.
... Permalink
Pressing RAIN And ALARM at the same time for 5 seconds does not do anything. The buttons work when pressed individually.
- Make sure the console is plugged into wall power. If it is not plugged in, the console will not connect to WiFi or the Internet.
- Make sure you own a WS-2902 and not a WS-1900. This command does not work on previous versions.
- If you own a WS-2902, turn the lights off in the room and turn the console around. Make sure the AC adapter is plugged in.
If you do not see a blue light, the console WiFi chip is no longer working properly and the console needs replacing. - If the blue light is present, try performing a factory reset on the console:
How Do I Restore Console To Factory Default Or Factory Reset, Osprey Series?
To replace the console under warranty, please visit: www.AmbientWeather.com/rma.html
For out of warranty replacements, please visit: https://www.ambientweather.com/amws2902aconsole.html
Product Manual
https://ambientweather.com/mwdownloads/download/link/id/567/
Product Page
https://www.ambientweather.com/amws2902.html
The Osprey uses a super capacitor as the energy storage device, and back up non-rechageable Lithium batteries. It is a better design because of the limited life of rechargeable batteries.
We recommend non-rechargeable Energizer Lithium Ultimate batteries over rechargeable batteries:
https://www.amazon.com/Energizer-Ultimate-Lithium-Batteries-Each/dp/B00003IEME
They operate between -40 °F and 140 °F (-40 to 60 °C). They will not damage the weather station or the batteries because of the low charging current.
... PermalinkQ. What is this coil spring that came with my rain gauge?
It is a stainless steel filter which is included in the package. It’s aimed to stop leaves or bird droppings to avoid the obstruction of the cone hole.
The installation is simple: press the filter until the hook is inside the outlet hole and self -locked. The spring tension will keep the filter sit tight on the funnel.
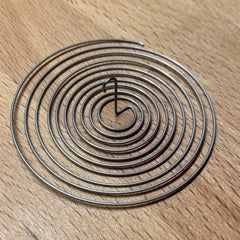
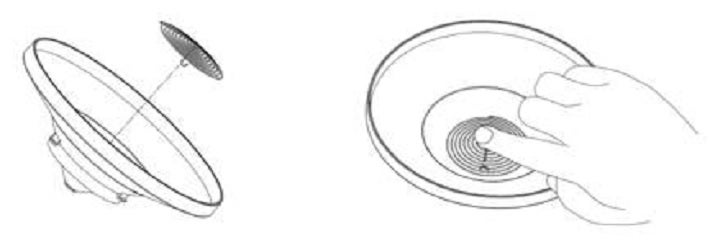
... Permalink
The wireless signal strength displays reception quality. If no signal is lost, the signal strength indicator will display 5 bars. If the signal is lost once in 16 seconds, four bars are displayed. If the signal is lost twice in 16 seconds, three bars are displayed.
![]()
The most common reason for the signal quality changing is wireless interference, followed by overall distance and then obstructions such as metal and concrete.
... Permalink- Make sure you are using the prescribed Energizer Ultimate batteries. They have a wide temperature range of -40 degF to 140 degF. Replace the batteries. Do not use rechargeable batteries. Do not use alkaline batteries in cold climates.
- The sensor array may be having an issue. We a one year warranty. To replace under warranty, please visit: www.AmbientWeather.com/rma.html
- If out of warranty, the array can be purchased here:
https://www.ambientweather.com/amws2902array.html
It is possible the sensor array was not powered up properly. Please reset the sensor array:
- Cover the solar collector to shut of the solar energy source.
- Remove the batteries.
- Press the reset button for a full minute. There should be no LED flashing
- Reinsert fresh batteries. Make sure they are fresh alkaline or lithium Energizer non-rechargeable batteries.
- Uncover the solar collector.
- LED should flash once per 14 seconds.
- Power down and up the console to resync.
If the problem persists, we have a one year warranty. To replace under warranty, please visit:
www.AmbientWeather.com/rma.html
For out of warranty replacement, please visit:
https://www.ambientweather.com/amws2902array.html
... PermalinkWhy is my iphone unable to connect using the awnet app?
When you first open up the awnet app please make sure you select ‘Allow While Using App‘. If you DO NOT select ‘Allow While Using App‘ then your iphone will not connect and you will need to uninstall then reinstall the awnet app

Two things can cause the display to dim:
- AC power is not connected. Make sure the console is plugged into AC power at all times. If it is on a switched outlet, make sure the switch is turned on.
- The LIGHT/SNOOZE button was accidentally pressed. Press the LIGHT/SNOOZE button to toggle between 100%, 50% and 0% brightness.
We contacted Netgear support and it turns out that getting the DNS from my router automatically was the problem.
Enter 8.8.8.8 as the DNS setting for the primary note.
Enter 8.8.8.4 as the DNS setting for the secondary node.
We recommend you contact Netgear directly.
... PermalinkThe blue light is integral to the WiFi chip and cannot be turned off. The back includes cooling slots, so your temperature sensor reads more accurately.
... Permalink- Visually inspect the rain funnel. Is the funnel missing? To replace the funnel, please visit:https://www.ambientweather.com/amws2902funnel.html
- Check the funnel for any debris. Clean the funnel.
- Remove the funnel and check for any debris that may be affecting the tipping mechanism. Tip the mechanism back and forth. Does the rain update on the console? Check for any bugs or dirt. Clean with a damp, soft cloth.

- If the problem persists, we have a one year warranty. Please visit www.AmbientWeather.com/rma.html
- If out of warranty, the sensor array can be replaced here:https://www.ambientweather.com/amws2902rainassembly.html
If the sensor array is reading unrealistically high solar radiation values, the solar radiation sensor needs replacing.
We have a one year warranty. To replace under warranty, please visit: www.AmbientWeather.com/rma.html
If out of warranty, a new sensor array can be purchased here:
https://www.ambientweather.com/amws1002array.html
... PermalinkWireless Multi Media (WMM) Extensions can interfere with this and other Internet of Things (iOT) devices. Turn off the the WMM feature on your router.
Here is a help guide from Linksys:
https://www.linksys.com/us/support-article?articleNum=137084
... PermalinkTo calibrate the relative pressure, select the Calibration panel from your IP Module:

The following is an example of calibrating the relative pressure. Your results will vary.
- The local relative pressure from TV, the newspaper or the internet for the official station in your area is 30.12 inHg.
- From the Live Data panel, your absolute pressure (measured, and not corrected to sea-level) reads 28.90 inHg.
- Reference Figure 35. Enter the following offset in the Calibration panel for Relative Pressure Offset:
Relative Pressure Offset = 30.12 – 28.90 = 1.22
... PermalinkIf your wind cups need replacing, please visit:
https://www.ambientweather.com/amws2902wc.html
... PermalinkHow to Refresh Your Browsers Cache
Clearing Cache Memory
To ensure you see the latest version of a site you need to clear the cache memory. This is done by doing a force refresh by pressing both control and F5 buttons simultaneously on your keyboard (depending on your browser). Most times a simple force cache refresh won’t work and you need to clear the cache by hand. On this site you can find step by step guides for Chrome, Firefox 3, Firefox 2, Internet Explorer 8, Internet Explorer 7, Internet Explorer 6, Safari and more on how to refresh your cache.

Force Refresh
Someone just told you to “force reload” your browser to fix something. Depending on your operating system all you need to do is the following key combination:
Windows: ctrl + F5
Mac/Apple: Apple + R or command + R
Linux: F5
Cache And Privacy
Internet cache can be a threat to your privacy as everyone who has access to your computer can see some personal information by simply opening the cache folder.
Also when the cache fills up, performance can slow down and your hard drive may run out of space.
Internet Service Provider Cache
In the same way that your web browser has a cache of recent web pages, your Internet Service Provider (ISP) may be doing some caching on your behalf.
In some (rare) cases, even though you are using shift-refresh to get new data from a webpage, the pages still seem to be old. This may be because your Internet Service Provider also has a cache and their cache may not be set up quite right, and they are not downloading the latest web pages.
When you encounter this problem you will have to communicatie with your ISP to fix this problem
Command Prompt: Ipconfig /Flushdns

If the temperature sensor reads -40 degF or 140 degF, there is a problem with the sensor and the array must be replaced.
We do have a one year warranty. To replace under warranty, please visit: www.AmbientWeather.com/rma.html
For out of warranty replacement, please visit: https://www.ambientweather.com/amws2902array.html
... PermalinkSimply moving your display console (or receiver) to a different location may easily fix the communication issue.
We recommend the following best practices for trouble free wireless communication.
- Fresh Batteries. If applicable, make sure there are fresh batteries in both the console and remote. Remember to power up the console last when changing batteries. Do not use rechargeable batteries. They have a lower voltage and lower range than non-rechargeable batteries.
- Electro-Magnetic Interference (EMI). Keep the console several feet away from computers, TVs and electronic cables.
- Radio Frequency Interference (RFI). If you have other 433/915 MHz devices and communication is intermittent, try turning off these other devices for troubleshooting purposes. You may need to relocate the transmitters or receivers to avoid intermittent communication.
- Cold Weather. If the temperature is below < 10 degF, use e2 energizer batteries (Lithium), available in most stores batteries are sold (blue in color). Alkaline and NMH (nickel metal hydride) batteries do not operate below 10 degF.
- Sensor orientation. To insure proper communication, mount the remote sensor on a vertical surface, such as a wall. Do not lay the sensor flat if this is a small remote sensor.
- Line of Sight Rating. This device is rated at 300 feet line of sight (no interference, barriers or walls) but typically you will get 100 feet maximum under most real-world installations, which include passing through barriers or walls.
- Metal Barriers. Radio frequency will not pass through metal barriers such as aluminum siding. If you have metal siding, align the remote and console through a window to get a clear line of sight.
- Defective Sensor. It is possible the remote sensor is defective. If you have not done so already, to replace under one year warranty, please visit AmbientWeather.com/rma.html
The following is a table of reception loss vs. the transmission medium. Each “wall” or obstruction decreases the transmission range by the factor shown below.
| Medium | RF Signal Strength Reduction |
| Glass (untreated) | 5-15% |
| Plastics | 10-15% |
| Wood | 10-40% |
| Brick | 10-40% |
| Concrete | 40-80% |
| Metal | 90-100% |
If the display is Dim:
- Make sure the console is plugged into AC power and the power is switched on. If the console operates on battery power, the LED backlight is temporary when LIGHT SNOOZE button is pushed.
- Press the LIGHT SNOOZE button on the front of the console. The backlight may have been inadvertently turned off. There is a high, medium, low and off setting. Press LIGHT SNOOZE until the backlight returns to the high setting.
- If the console also stops reporting to online services, the console or AC adapter need replacing.
- Make sure the backlight is turned on. Press the LIGHT/SNOOZE button on the front of the console to adjust the brightness.
- Make sure the console is plugged into an AC adapter, and if on a switched outlet, make sure the outlet switch is turned on.
- Check the connector in the back of the console, and make sure it is firmly inserted into the connector.
- If the problem persists, the console needs replacing. We have a one year warranty. To replace under warranty, please visit: www.AmbientWeather.com/rma.html
- If out of warranty, a replacement console is available here:
WS-2902 Console: https://www.ambientweather.com/amws2902console.html
WS-2902A Console: https://www.ambientweather.com/amws2902aconsole.html
If you own two consoles, the time must be exactly synchronized. This is done automatically if you are connected to the Internet.
However, if you are manually setting the time, the most common issue is setting one console’s clock to AM and the other time to PM. For example, 10:00 AM vs. 10 PM.
If the clocks match and you recently reset your console, then all of the rain increments will not match: daily, monthly, and total.
... PermalinkPlease reset the sensor array:
- Cover the solar collector to shut of the solar energy source.
- Cover remove the batteries.
- Press the reset button for a full minute. There should be no LED flashing
- Reinsert the batteries. Install fresh batteries if old.
- Uncover the solar collector.
- LED should flash once per 14 seconds.
- Power down and up the console to resync
- If the outdoor temperature still reads -40 degF or 140 degF after several minutes, the sensor array must be replaced.
- To replace under warranty, please visit: www.AmbientWeather.com/rma.html
- If out of warranty, a replacement is available here:
https://www.ambientweather.com/amws2902array.html
There is a problem with the sensor inside the console.
The console must be replaced.
- We have a one year warranty. To replace under warranty, please visit: www.AmbienetWeather.com/rma.html
- If out of warranty, a replacement console can be purchased here:WS-2902: https://www.ambientweather.com/amws2902console.html
WS-2902A: https://www.ambientweather.com/amws2902aconsole.html
To change the display between degrees and and mph, press (do not hold) the WIND/+ key on the front of the display.
... PermalinkThere is a problem with the sensor inside the console. A similar issue is the sensor works fine when running on batteries, but reads 14 degF when plugged into AC power.
The console must be replaced.
- We have a one year warranty. To replace under warranty, please visit: www.AmbienetWeather.com/rma.html
- If out of warranty, a replacement console can be purchased here:WS-2902: https://www.ambientweather.com/amws2902console.html
WS-2902A: https://www.ambientweather.com/amws2902aconsole.html
Look for the icon above outdoor temperature.Press the [TEMP] button to switch between Outdoor Temperature, Wind Chill (CHILL), Dew Point (DEW) and Heat Index (HEAT).
... PermalinkTo display Max Gust from the Display Console:
- Press the MAX/MIN button to view the Max display.
- Press the WIND + button to toggle between wind speed and wind gust.
If your total rain keeps resetting to zero, ff you press and hold the RAIN button for two seconds, it will clear the total rain.
Thus, you want to press but do not hold the RAIN button to view the different increments of rain.
... Permalink- This usually means the phone or device is not connected to WiFi.
- Also, make sure the router’s 2.4 GHz band is operating and plugged in.
- If you have repeaters or a mesh network, unplug these repeaters or secondary nodes so only the primary router is powered up.
- Try another mobile device (android phone, iphone, ipad, tablet)

If the console flashes when connected to AC power:
- Unplug the console and run on batteries only. If the issue stops, the console needs replacing.
- We have a one year warranty. To replace under warranty, please visit:
- Out of warranty replacement is available here:
Product Manual
https://ambientweather.com/mwdownloads/download/link/id/567/
Product Page
https://www.ambientweather.com/amws2902.html
Yes, you can, since they both use the same sensor array.
However, the WS-2902 series includes a thermo-hygrometer-barometer sensor inside the console. The WS-2000 console (WS-2000-C) does not include this sensor, because it would heat up too much due to the TFT screen technology.
With the WS-2000-C, the thermo-hygrometer-barometer is sold separately (WH32B):
https://www.ambientweather.com/amwh32b.html
... PermalinkIf your barometric pressure reads a very large number, such as 1000, it means that you accidentally changed the barometer units of measure from inHg (default) to hpa or mmHg.
To enter the calibrated relative pressure into the console, you must enter the SET mode. To enter the SET mode, press and hold the SET button for two seconds, and press SET eleven more times until the pressure flashes. This setting allows you to change the units of measure from inHg from hpa, mmHg to inHg.
Press [WIND +] or [PRESSURE -] to change the units of measure.
Reference Section 6.4.4 of the User Manual below for details on calibration of relative pressure:
The settings are summarized below.

... Permalink
To update the WiFi Firmware please go to the following link for a guide : How Do I Update The WiFi Firmware, WS-2000 And WS-5000
In order to stay up to date with the latest Ambient Weather firmware or app updates, sign up for email notifications below. This way, you'll always be notified when a new update is available for your station or app.
Version 4.3.3:
- Adjust piezio gain for weather station.
Version 4.3.2:
- Optimized domain name resoloution.
- Optimized stability of uploading to custom servers.
- Fixed exception caused by user customization.
Version 4.3.1:
- Optimized WU server dns parsing.
- Fixed bug that effected third party custom mode.
Version 4.3.0:
- Improved domain name resoloution
- Improved stability of uploading to custom servers.
Version 4.2.8:
- Adds path for custom server setup.
- Able to upload Co2 sensor data
Version 4.2.6:
- Fixes issues with connecting to Arris, Asus and several other routers.
Version 4.2.4:
- Supports alert if leak detector is offline for 10 minutes.
Version 4.2.2:
- WS-5000: Supports low battery indicator push to AmbientWeather.net server.
Version 4.2.1:
- Supports leak detector, soil moisture sensor data push to AmbientWeather.net server.
Version 4.2.0:
- Supports lightning detection data to AmbientWeather.net (Model WS-2000 and WS-5000 only).
- Supports leak detection data to AmbientWeather.net (Model WS-2000 and WS-5000 only).
Version 4.1.9:
- Supports soil moisture data to AmbientWeather.net (Model WS-2000 and WS-5000 only).
Version 4.1.8:
- Supports PM2.5 indoor sensor data to AmbientWeather.net (Model WS-2000 and WS-5000 only).
Version 4.1.7:
- Improves pairing with Android 9 OS phone.
Version 4.1.6:
- Fixes low battery bug for PM2.5 (Model WS-2000 and WS-5000 only). It would falsely alarm the low battery alert.
Version 4.1.5:
- Firmware improves RF sensitivity.
- WiFi setup user interface improved.
- Console setup user interface improved (WS-2000 only).
- Bug fixed with UART0 communication (WS-2000 only).
- Improved data stream to AmbientWeather.net
- Corrected low battery bug for PM2.5. It would falsely alarm the low battery alert (WS-2000 only).
- RAM optimized (WS-2000 only).
- Rain calculation algorithm optimized (WS-2000 only).
- Backlight on/off control algorithm improved (WS-2000 only).
Version 4.1.4:
- Model WS-2000 only. Fixes low battery bug introduced in 4.1.2 for PM2.5 sensor.
Version 4.1.3:
- Model WS-2000 only. PM2.5, PM2.5_24h and its low battery, soil moisture sensor data push supported.
Version 4.1.2:
- Model WS-2000 only. Adds support for PM2.5 sensor to AmbientWeather.net
Version 4.1.1:
- Fixes rounding and sign error when temperature is between -10 and 0 degF.
Version 4.0.10:
- One customer reported their weather station would go offline every day at Midnight, so we rolled back the SDK but kept all of the other fixes in 4.0.9 until we can further evaluate the SDK.
Version 4.0.9:
- SDK is updated to official release 3.3.1. The WiFi connection is much faster and more stable.
- Time sync ping changed from Wunderground to AWS. The AWS time server is much more reliable.
- Weathercloud ID and password are verified for exactly 16 and 32 bytes, otherwise, no connection is attempted.
- Some customers reported WiFi disconnecting at Midnight. We were resetting the WiFi module every night to force a reconnect once per day, but we removed this logic.
Version 4.0.8:
- Fixed bug where temperature was set to 0.0 and Midnight.
Version 4.0.7:
- WiFi SDK update.
Version 4.0.6:
- After DNS lookup is verified, it will ping once per minute.
Version 4.0.3:
- Previous to Firmware Version 4.0.3, DNS queries were performed every 5 seconds, which was excessive.
- With Version 4.0.3, DNS queries are now performed once every 15 minutes.
If the console flashes and does not boot up:
- Check the electrical connection at the console and the wall.
- If the problem persists, the console requires replacing. We have a one year warranty. To replace under warranty, please visit:
- For out of warranty replacement, visit:
Personal Weather Station Comparison Chart: https://ambientweather.com/weather-station-comparison-chart
The following is a comparison of specifications and features for the Ambient Weather station brands.
- Falcon Series
WS-8480

- Observer Series
WS-1201-IP

- Osprey Series
WS-2902C
WS-1900A
WS-1550-IP


- WS-100 Series:
WS-100

- ColorView Series:
WS-50

Each brand shares the same sensor array (Falcon, Osprey, Observer, ColorView), but have different console and Internet features.
... Permalink- Replace the batteries if it has been a while. We recommend Energizer Ultimate Lithium.
- If the problem persists, the sensor array must be replaced. We have a one year warranty. To replace under warranty, please visit: www.AmbienetWeather.com/rma.html
- If out of warranty, a replacement array can be purchased here: https://www.ambientweather.com/amws2902array.html
It may be as simple as placing the remote(s) (powered up with fresh batteries) about 10-20 feet away from the console, power down and up the console by removing one or more batteries, disconnecting from AC power (if applicable), wait 30 seconds, and put the batteries back in, then wait several minutes to synchronize.
DO NOT TOUCH ANY BUTTONS and look for the search icon. Wait until the search icon turns off before pressing any buttons.
If you have more than one sensor, make sure they are programmed to transmit on different channels.
If the problem persists, we have a one year warranty. Please visit: www.AmbientWeather.com/rma.html
... PermalinkThe plug in is located on the back of the console.
Connect the display console power jack to AC power adapter with the included power adapter (see 1 below):
To adjust the rain increments or rain totals, reference the Live Data Panel:

and enter the new rain totals for Daily, Weekly, Monthly and Yearly Rain.
... Permalink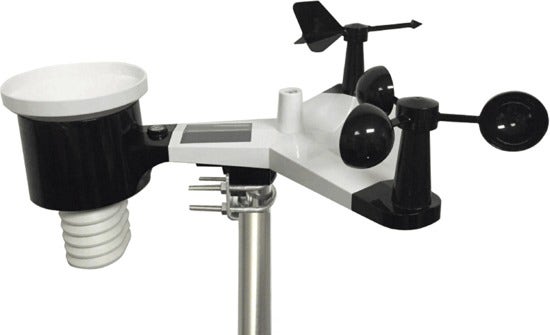
Preventive Maintenance and Reset of the Outdoor Sensor Array. (Printed Part: WH65B)
To ensure that the outdoor weather station array stays in proper working condition please follow the steps below:
1.Replace the batteries. We recommend fresh Lithium Energizer and here is why:Why Are Lithium Ultimate Batteries Recommended And Not Alkaline Or Rechargeable Batteries?
2. Make certain the rain gauge is level. If not perfectly level, the tipping mechanism will not work properly and under report rain.
3. Visually inspect the rain funnel. Is the funnel missing? To replace the funnel, please visit: https://www.ambientweather.com/amws2902funnel.html
4. Check the funnel for any debris. Clean the funnel.
5. Remove the funnel and check for any debris that may be affecting the tipping mechanism. Tip the mechanism back and forth. Does the rain update on the console? Check for any bugs or dirt. Clean with a damp, soft cloth.

6. In heavy downpours or sideways wind, the rain droplets can “bounce” out of the rain gauge. Use Teflon spray: https://www.amazon.com/DuPont-Silicone-Lubricant-Aerosol-14-Ounce/dp/B00D3ZKVAS to prevent accumulation of the droplets on the walls of the rain gauge.
How to Reset the Outdoor Sensor Array:
- Cover the solar collector to shut of the solar energy source.
- Remove the batteries.
- Let sit for up to 24 hours to drain the solar capacitor.
- Reinsert fresh batteries.
- Press the reset button (#10, below) for a full minute with a pointed object, such as a pen tip:

6. Uncover the solar collector.
7. LED(#11) should flash once per 16 seconds. If it is not flashing, the sensor array must be replaced.
8. Power down and up the console to resync(Remove batteries and AC Adapter then reinsert)
9. May take a few minutes for the outside array information to display on the console
*If the weather station array is not communicating properly with the indoor console AFTER performing ALL of the steps above then the outdoor sensor array OR individual sensor/sensors will need to be replaced.
**Why Preventive/Routine Maintenance needs to be done:

The AC adapter or console has a power issue.
- If you have a volt meter, test the voltage output of the AC adapter.
- The console or AC adapter needs replacing. We have a one year warranty. To replace under warranty, please visit: www.AmbientWeather.com/rma.html
- If out of warranty, a replacement console is available here:
WS-2902 Console: https://www.ambientweather.com/amws2902console.html
WS-2902A Console: https://www.ambientweather.com/amws2902aconsole.html
How Do I calibrate the RH/Humidity for my WM-5?
First, locate the calibration sticker that was supplied with your WM-5. It will have two numbers displayed. You will need to calibrate your unit to these numbers. With the unit on, press and hold the on/off button for 10 seconds. The display will turn off and then back on, displaying the number 700.

Enter the first voltage input number into this screen by pressing the mode button to scroll up (omitting the decimal). Note: When in humidity calibration mode, the mode button only scrolls up, not down, so it is important that you do not miss the number you are entering. When finished, press the on/off button again, you will see the number 3000

Enter the second voltage input number using the same procedure as before. To store the changes, press the on/off button. The unit will then shut off with the new values stored internally. NOTE: Each unit has unique voltage input numbers. It is crucial that you do not lose your instrument’s numbers.
If you lose the voltage input number you can enter these values.
0%=0.780
75.3%=3.041
... PermalinkTo update the firmware on your display tablet:
- Download the latest bin file (below) to your your computer. Make a note of where you saved this file:
Ambient Weather WS-2000 and WS-5000 Firmware Download Center
- Copy the factory.bin (ensure filename is just factory.bin) to your MicroSD Card (the SD card must be empty).
- Power down your display console by removing AC power.
- Insert the SD Card into the display console.
- Power up the display console.
- The console will verify the firmware was updated.
- Power down the console after complete. Remove the SD Card when the console is powered down.

If you are using an ios device(iphone/ipad) and Ambient Tool shows ‘WiFi’ and gives no option to select your Routers SSID then follow the steps below:
- Uninstall Ambient Tool, restart your iphone/ipad, then re-install Ambient Tool. When first opening Ambient Tool and it asks for location services, please select either ‘always allow’ or ‘allow while using’.
- If Ambient Tool still only shows ‘Wifi’ and no option to select your SSID then the only options available are to use an android device, purchase an Observerip module, or upgrade your console.
Product Manual
https://ambientweather.com/mwdownloads/download/link/id/567/
Product Page
https://www.ambientweather.com/amws2902.html
Yes, you can pull real time data from the ObserverIP over a local area network.
This is done from the LiveData panel on your IP Module:

If you are a programmer, the html can also be “scraped” and parsed. Here is an example of the html code:
<!DOCTYPE html PUBLIC “-//W3C//DTD XHTML 1.0 Transitional//EN” “http://www.w3.org/TR/xhtml1/DTD/xhtml1-transitional.dtd”>
<html xmlns=”http://www.w3.org/1999/xhtml”>
<head>
<meta http-equiv=”Content-Type” content=”text/html; charset=utf-8″ />
<title>LiveData</title>
<link href=”axcss0.css” rel=”stylesheet” type=”text/css” />
</head>
<body>
<table width=”800″ border=”0″ align=”center” cellpadding=”0″ cellspacing=”0″>
<tr>
<td colspan=”2″ align=”right” bgcolor=”#0088F7″> </td>
</tr>
<tr>
<td colspan=”2″ bgcolor=”#FFFFFF”><table border=”0″ cellpadding=”0″ cellspacing=”0″>
<tr>
<td width=”20″ height = “80”> </td>
<td ><img src=”img/1.jpg” width=”74″ height=”80″ ></td>
<td width=”10″> </td>
<td class=”txtstyle_1″ >AmbientWeather 4.4 </td>
</tr>
</table></td>
</tr>
<tr>
<td colspan=”2″ align=”right” bgcolor=”#60B7FF”><table border=”0″ cellpadding=”0″ cellspacing=”0″>
<tr>
<td width=”120″ align=”center”><font color=”#FFFFFF” face=”Arial, Helvetica, sans-serif”><em>AmbientWeather 4.4.2</em></font></td>
</tr>
</table></td>
</tr>
<tr>
<td colspan=”2″ align=”left” bgcolor=”#C0C0C0″>
<table width=”20″ border=”0″ cellpadding=”0″ cellspacing=”0″>
<tr>
<td bgcolor=”#C0C0C0″><div class=”menuitem_1″><a href=”bscsetting.htm”>Local Network</a></div></td>
<td bgcolor=”#C0C0C0″><div class=”menuitem_1″><a href=”weather.htm”>Weather Network</a></div></td>
<td bgcolor=”#C0C0C0″><div class=”menuitem_1″><a href=”station.htm”>Station Settings</a></div></td>
<td bgcolor=”#EDEFEF”><div class=”menuitem_1″><a href=”livedata.htm”>Live Data</a></div></td>
<td bgcolor=”#C0C0C0″><div class=”menuitem_1″><a href=”correction.htm”>Calibration</a></div></td>
</tr>
</table>
</td>
</tr>
<form name=”livedata” method=”POST” onsubmit=”return chkForm(0);”>
<tr>
<td colspan=”2″ bgcolor=”#EDEFEF”> </td>
</tr>
<tr>
<td colspan=”2″ bgcolor=”#EDEFEF”><div class=”subitem_1″>Live Data</div></td>
</tr>
<tr>
<td width=”448″ bgcolor=”#EDEFEF”><div class=”item_1″>Receiver Time:</div></td>
<td width=”352″ bgcolor=”#EDEFEF”>
<input name=”CurrTime” disabled=”disabled” type=”text” class=”item_2″ style=”WIDTH: 120px” value=”14:59 5/15/2018″ maxlength=”16″/></td>
</tr>
<tr>
<td width=”448″ bgcolor=”#EDEFEF”><div class=”item_1″>Indoor Sensor ID and Battery </div></td>
<td width=”352″ bgcolor=”#EDEFEF”>
<input name=”IndoorID” disabled=”disabled” type=”text” class=”item_2″ style=”WIDTH: 80px” value=”0x1f” maxlength=”5″ />
<input name=”inBattSta” disabled=”disabled” type=”text” class=”item_2″ style=”WIDTH: 100px” value=”Normal” maxlength=”12″ />
</td>
</tr>
<tr>
<td bgcolor=”#EDEFEF”><div class=”item_1″>Outdoor Sensor ID and Battery</div></td>
<td bgcolor=”#EDEFEF”>
<input name=”Outdoor1ID” disabled=”disabled” type=”text” class=”item_2″ style=”WIDTH: 80px” value=”0x0d” maxlength=”5″ />
<input name=”outBattSta1″ disabled=”disabled” type=”text” class=”item_2″ style=”WIDTH: 100px” value=”Normal” maxlength=”12″ />
</td>
</tr>
<tr>
<td bgcolor=”#EDEFEF”><div class=”item_1″>Outdoor2 Sensor ID and Battery</div></td>
<td bgcolor=”#EDEFEF”>
<input name=”Outdoor2ID” disabled=”disabled” type=”text” class=”item_2″ style=”WIDTH: 80px” value=”0x–” maxlength=”5″ />
<input name=”outBattSta2″ disabled=”disabled” type=”text” class=”item_2″ style=”WIDTH: 100px” value=”- -” maxlength=”12″ />
</td>
</tr>
<tr>
<td bgcolor=”#EDEFEF”><div class=”item_1″>Indoor Temperature</div></td>
<td bgcolor=”#EDEFEF”><input name=”inTemp” disabled=”disabled” type=”text” class=”item_2″ style=”WIDTH: 80px” value=”78.1″ maxlength=”5″ /></td>
</tr>
<tr>
<td bgcolor=”#EDEFEF”><div class=”item_1″>Indoor Humidity</div></td>
<td bgcolor=”#EDEFEF”><input name=”inHumi” disabled=”disabled” type=”text” class=”item_2″ style=”WIDTH: 80px” value=”24″ maxlength=”3″ /></td>
</tr>
<tr>
<td bgcolor=”#EDEFEF”><div class=”item_1″>Absolute Pressure </div></td>
<td bgcolor=”#EDEFEF”><input name=”AbsPress” disabled=”disabled” type=”text” class=”item_2″ style=”WIDTH: 80px” value=”28.65″ maxlength=”6″ /></td>
</tr>
<tr>
<td bgcolor=”#EDEFEF”><div class=”item_1″>Relative Pressure </div></td>
<td bgcolor=”#EDEFEF”><input name=”RelPress” disabled=”disabled” type=”text” class=”item_2″ style=”WIDTH: 80px” value=”30.06″ maxlength=”6″ /></td>
</tr>
<tr>
<td bgcolor=”#EDEFEF”><div class=”item_1″>Outdoor Temperature</div></td>
<td bgcolor=”#EDEFEF”><input name=”outTemp” disabled=”disabled” type=”text” class=”item_2″ style=”WIDTH: 80px” value=”86.7″ maxlength=”5″ /></td>
</tr>
<tr>
<td bgcolor=”#EDEFEF”><div class=”item_1″>Outdoor Humidity </div></td>
<td bgcolor=”#EDEFEF”><input name=”outHumi” disabled=”disabled” type=”text” class=”item_2″ style=”WIDTH: 80px” value=”16″ maxlength=”3″ /></td>
</tr>
<tr>
<td bgcolor=”#EDEFEF”><div class=”item_1″>Wind Direction </div></td>
<td bgcolor=”#EDEFEF”><input name=”windir” disabled=”disabled” type=”text” class=”item_2″ style=”WIDTH: 80px” value=”25″ maxlength=”5″ /></td>
</tr>
<tr>
<td bgcolor=”#EDEFEF”><div class=”item_1″>Wind Speed </div></td>
<td bgcolor=”#EDEFEF”><input name=”avgwind” disabled=”disabled” type=”text” class=”item_2″ style=”WIDTH: 80px” value=”1.8″ maxlength=”5″ /></td>
</tr>
<tr>
<td bgcolor=”#EDEFEF”><div class=”item_1″>Wind Gust </div></td>
<td bgcolor=”#EDEFEF”><input name=”gustspeed” disabled=”disabled” type=”text” class=”item_2″ style=”WIDTH: 80px” value=”4.9″ maxlength=”5″ /></td>
</tr>
<tr>
<td bgcolor=”#EDEFEF”><div class=”item_1″>Max Daily Gust </div></td>
<td bgcolor=”#EDEFEF”><input name=”dailygust” disabled=”disabled” type=”text” class=”item_2″ style=”WIDTH: 80px” value=”15.0″ maxlength=”5″ /></td>
</tr>
<tr>
<td bgcolor=”#EDEFEF”><div class=”item_1″>Solar Radiation </div></td>
<td bgcolor=”#EDEFEF”><input name=”solarrad” disabled=”disabled” type=”text” class=”item_2″ style=”WIDTH: 80px” value=”766.43″ maxlength=”12″ /></td>
</tr>
<tr>
<td bgcolor=”#EDEFEF”><div class=”item_1″>UV </div></td>
<td bgcolor=”#EDEFEF”><input name=”uv” disabled=”disabled” type=”text” class=”item_2″ style=”WIDTH: 80px” value=”2734″ maxlength=”12″></td>
</tr>
<tr>
<td bgcolor=”#EDEFEF”><div class=”item_1″>UVI </div></td>
<td bgcolor=”#EDEFEF”><input name=”uvi” disabled=”disabled” type=”text” class=”item_2″ style=”WIDTH: 80px” value=”7″ maxlength=”3″></td>
</tr>
<tr>
<td bgcolor=”#EDEFEF”><div class=”item_1″>Hourly Rain Rate</div></td>
<td bgcolor=”#EDEFEF”><input name=”rainofhourly” disabled=”disabled” type=”text” class=”item_2″ style=”WIDTH: 80px” value=”0.00″ maxlength=”8″ /></td>
</tr>
<form name=”Rain_1″ method=”POST” onsubmit=”return chkForm(0);”>
<tr>
<td bgcolor=”#EDEFEF”><div class=”item_1″>Daily Rain</div></td>
<td bgcolor=”#EDEFEF”><input name=”rainofdaily” type=”text” class=”item_2″ style=”WIDTH: 80px” value=”0.00″ maxlength=”8″ />
<span id=”rainofdaily_msg” class=”errMsg0″></span></td>
</tr>
<tr>
<td bgcolor=”#EDEFEF”><div class=”item_1″>Weekly Rain</div></td>
<td bgcolor=”#EDEFEF”><input name=”rainofweekly” type=”text” class=”item_2″ style=”WIDTH: 80px” value=”0.00″ maxlength=”8″ />
<span id=”rainofweekly_msg” class=”errMsg0″></span></td>
</tr>
<tr>
<td bgcolor=”#EDEFEF”><div class=”item_1″>Monthly Rain</div></td>
<td bgcolor=”#EDEFEF”><input name=”rainofmonthly” type=”text” class=”item_2″ style=”WIDTH: 80px” value=”0.00″ maxlength=”8″ />
<span id=”rainofmonthly_msg” class=”errMsg0″></span></td>
</tr>
<tr>
<td bgcolor=”#EDEFEF”><div class=”item_1″>Yearly Rain</div></td>
<td bgcolor=”#EDEFEF”><input name=”rainofyearly” type=”text” class=”item_2″ style=”WIDTH: 80px” value=”0.00″ maxlength=”8″ />
<span id=”rainofyearly_msg” class=”errMsg0″></span></td>
</tr>
<tr>
<td colspan=”2″ bgcolor=”#EDEFEF”> </td>
</tr>
<tr align=”center”>
<td colspan=”2″ bgcolor=”#EDEFEF”><input name=”Apply” type=”submit” class=”item_2″ style=”WIDTH: 60px; HEIGHT: 24px;” onclick=”setSubmitType(1)” value=”Apply” />
<input name=”Cancel” type=”reset” class=”item_2″ style=”WIDTH: 60px; HEIGHT: 24px;” value=”Cancel” /></td>
</tr>
</form>
<tr>
<td colspan=”2″ bgcolor=”#EDEFEF”> </td>
</tr>
<tr>
<td colspan=”2″ align=”center” bgcolor=”#EDEFEF”>
<input name=”rain_Default” type=”button” class=”item_2″ style=”WIDTH: 110px; HEIGHT: 24px;” onclick=”raindef()” value=”Rain Reset”>
<input id=”refresh_st” type=”button” class=”item_4″ style=”WIDTH: 110px; HEIGHT: 24px;” onclick=”uiCtrl(this.value);” value=”Refresh” />
<input id=”refresh_sp” type=”button” class=”item_2″ style=”WIDTH: 110px; HEIGHT: 24px;” onclick=”uiCtrl(this.value);” value=”Stop Refresh” />
</td>
</tr>
</form>
<tr>
<td colspan=”2″ bgcolor=”#EDEFEF”> </td>
</tr>
<tr>
<td colspan=”2″ bgcolor=”#C0C0C0″> </td>
</tr>
</table>
<script src=”axjs0.js” type=”text/javascript”></script>
<script language=”JavaScript” type=”text/javascript”>
<!–
var rfTaskRuningFlag = 0, rfTimeId;
uiCtrl(‘Refresh’);
function uiCtrl(uiCmd)
{
if (uiCmd==’Refresh’){
document.getElementById(‘refresh_st’).disabled = true;
document.getElementById(‘refresh_sp’).disabled = false;
rfTaskRuningFlag = 1;
rfTaskState = 0;
rfTimeId = setInterval(“ss()”, 16000);
}else if (uiCmd==’Stop Refresh’){
document.getElementById(‘refresh_st’).disabled = false;
document.getElementById(‘refresh_sp’).disabled = true;
rfTaskRuningFlag = 0;
clearInterval(rfTimeId);
}
}
function ss()
{
if (rfTaskRuningFlag)
{
window.location.reload();
}
}
–>
</script>
</body>
</html>
To update the WiFi firmware, you must first download the awnet app for mobile devices from the Apple Store or Google Play Store:
Android Devices: https://play.google.com/store/apps/details?id=com.dtston.ambienttoolplus
iOS Devices: https://itunes.apple.com/us/app/awnet/id1341994564
WiFi Firmware version history: https://ambientweather.com/faqs/question/view/id/1444/
To update the WiFi firmware on the WS-2000/WS-5000 console , launch awnet  from your mobile device.
From the Device Info panel, tap on your device (in the example below, three devices are connected to the WiFi network):
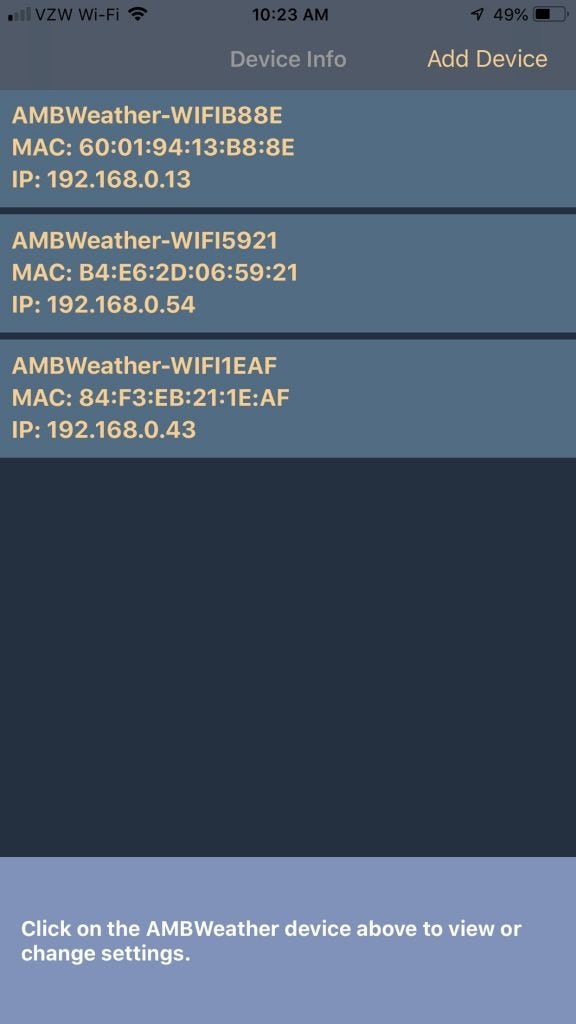
On the bottom right is the current WiFi firmware version of your console. If there is an upgrade available, tap on the upgrade link:
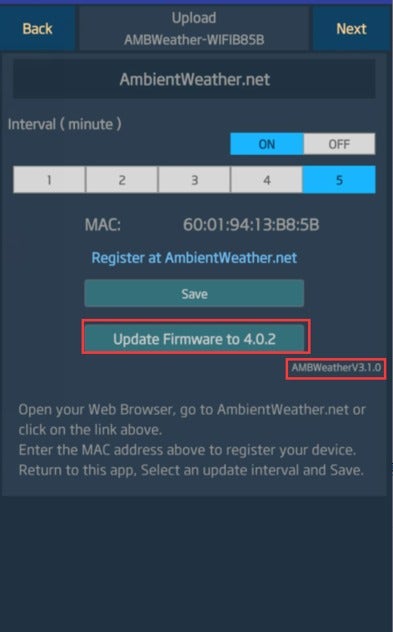
If the humidity changes rapidly and unrealistically, with errors that exceed the accuracy specification,
it is possible the sensor array requires fresh batteries or needs resetting.
- Cover the solar collector to shut of the solar energy source.
- Cover remove the batteries.
- Press the reset button for a full minute. There should be no LED flashing
- Reinsert fresh batteries
- Uncover the solar collector.
- LED should flash once per 14 seconds. If it is not flashing, the sensor array must be replaced.
- Power down and up the console to resync
- If the outdoor humidity is still showing 99% after several minutes, the sensor array must be replaced.
- We have a one year warranty. To replace the sensor array, please visit: www.AmbientWeather.com/rma.html
- For out of warranty replacement, please visit: https://www.ambientweather.com/amws2902array.html
To reset the rain totals you will need to access the Web GUI. To acccess the Web GUI you first press and hold the Temp and Rain buttons together on the console for 5-10 seconds.
The console will then flash the wifi icon by time and date.
Then on your phone, tablet or computer go to settings, and then the wifi networks. Select the consoles access point. It will start with WN1965B-WIFI
It will say connected without wifi or no internet or sometimes it will checkmark. After that you open a web browser and type into the web address bar 192.168.4.1. If it pops up a screen that say login, use Admin for the username, make sure the password is blank, then click the login button.
It will then let you access the user interface. On the left click on rain totals.

It will then pop up the rain total screen. Here is will let you adjust to rain totals. If you are going to clear all the rain totals, at the bottom click reset.

Then the console will reset the rain totals.
... PermalinkTo report to AmbientWeather.net, you must:
1. own an Ambient Weather branded weather station that directly connects to the Internet (models listed below).
2. own a third party weather station that connects to the WeatherBridge:
more info…
3. own a Davis Instruments weather station and nano Wi-Fi data logger:
more info…
| Model | Image | MAC Label |
|---|---|---|
| ObserverIP (IP series) |
 |
 printed on the bottom of the IP module more info… |
| WS-50 |  |
 printed on the back of the console more info… |
| WS-2902 WS-2902A WS-2902B WS-2902C |
 |
 printed on the back of the console more info… |
| WS-2000 |  |
Displayed in the ‘Weather Server’ section of the console more info… |
| WS-5000 |  |
Displayed in the ‘Weather Server’ section of the console more info… |
| WS-8478A WS-8480 |
 |
 printed on the back of the console more info… |
| WS-8482 |  |
 printed on the back of the console more info… |
WS-1001-WiFi WS-1002-WiFi |
 |
Displayed in the ‘Weather Server’ section of the console more info… |
| nano |  |
Accessed from the User Interface panel: more info… |
| Weather Bridge |  |
Accessed from the User Interface panel: more info… |
| KestrelMet 6000 Weather Station |  |
|
| WS-1965 |  |
Accessed from the User Interface panel and console: more info... |
If the updates have slowed on AmbientWeather.net, WeatherUnderground.com or both, restore your console to factory default:
How Do I Restore Console To Factory Default Or Factory Reset, Osprey Series?
... PermalinkTo Calibrate the sensors you will need to access the Web GUI. To acccess the Web GUI you first press and hold the Temp and Rain buttons together on the console for 5-10 seconds.
The console will then flash the wifi icon by time and date.
Then on your phone, tablet or computer go to settings, and then the wifi networks. Select the consoles access point. It will start with WN1965B-WIFI
It will say connected without wifi or no internet or sometimes it will checkmark. After that you open a web browser and type into the web address bar 192.168.4.1. If it pops up a screen that say login, use Admin for the username, make sure the password is blank, then click the login button.
It will then let you access the Web GUI. On the left click on Calibration.

It will then pop up the Calibration screen. Here is will let you adjust the sensors. In this example we highlighted UV gain. Just click on it and type in the adjustment. Then at the bottom click save

Then the console will calibrate to the new entry.
... Permalink- The WS-2000 is a newer model but shares the same sensor array as the WS-2902A.
- The WS-2000 supports up to 8 additional thermo-hygrometers:
https://www.ambientweather.com/amwh32b.html - The WS-2000 has a separate indoor thermo-hygrometer-barometer. The WS-2902A contains these sensors inside the console.
- The WS-2000 has a nicer display console (TFT) vs. the WS-2902 (Color Film LCD), which has a limited viewing angle.
- The WS-2000 is easier to set up with WiFi and the Internet, because the settings are entered on the console and not from an app.
- Both weather stations support WiFi and Internet cloud services, including AmbientWeather.net.
How to resync the WS-2902 series console to the outdoor sensor array:
- Bring the outdoor sensor array within 10 feet of the console.
- Unplug the power and remove batteries from the console
- Insert power cable back into the console
- Press the Light/Snooze button for 30 seconds.
- Give it 5 minutes for the outdoor sensor data to appear on the console
The peak of the luminosity function is at 555 nm (green); the eye’s visual system is more sensitive to light of this wavelength than any other. For monochromatic light of this wavelength, the irradiance needed to make one lux is minimum, at 1.464 mW/m2.
That is, one obtains 683.002 lux per W/m2 (or lumens per watt) at this wavelength. Other wavelengths of visible light produce fewer lumens per watt.
Solar Radiation is a shorter wave length and different color spectrum, so it has a different factor of Lux to W/m2:
Bright sunlight is approximately 136000 lux = 1075 W/m2 = 126.7
The factor changes slightly depending on time of day, conditions such as cloud cover, moisture in the air etc. and most sources agree on the 126.7 as a reasonable factor to use.
The conversion in the green visible light spectrum spectrum at 555nm is 1W/m2 = 683 lux, and is used of human eyes.
Some of our weather stations allow to calibrate the gain to whatever light spectrum you wish to base solar radiation on.
... PermalinkIf the awnet application shows “Wi-Fi” instead of the actual SSID on your Android device, you must turn on Location Services for the awnet.
You are prompted to allow location services when you launch the app. To enable location services for awnet:
Open your phone’s Settings app.
Tap Location and then App permission.
If you don’t see “Location,” tap Security & location and then Location.
If you have a work profile, tap Advanced and then Location.
Under ”Allowed all the time” and “Allowed only while in use,” view the apps that can use your phone’s location.
To change the awnet permissions, tap it, then choose the location access for the app.
If the temperature and / or humidity are showing dashes (–), and all of the other sensors are updating, it is possible the sensor array requires fresh batteries or needs resetting.
Replace the batteries. We recommend fresh Lithium Energizer and here is why:
Why Are Lithium Ultimate Batteries Recommended And Not Alkaline Or Rechargeable Batteries?
- Cover the solar collector to shut of the solar energy source.
- Remove the batteries.
- Let sit for an hour to drain the solar capacitor
- Press the reset button (#10, below) for a full minute with a pointed object, such as a pen tip:

- Reinsert fresh batteries
- Uncover the solar collector.
- LED should flash once per 14 seconds. If it is not flashing, the sensor array must be replaced.
- Power down and up the console to resync
- If the outdoor temperature is still showing -40 or 140 degF or dashes (–) after several minutes, the sensor array must be replaced.
- We have a one year warranty. To replace the sensor array, please visit: www.AmbientWeather.com/rma.html
- For out of warranty replacement, please visit: https://www.ambientweather.com/amws2902array.html
The rubber strips or footing stick to the bottom of the console fold out legs, #2 in the image below. It makes the skid resistant.
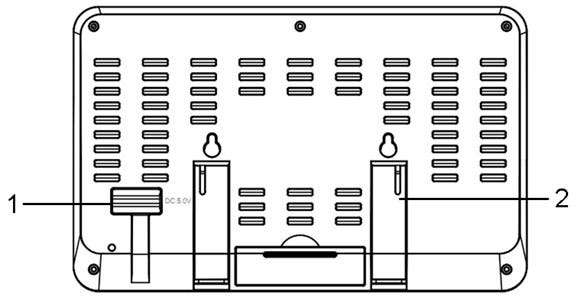
Your weather station may only display some of the following increments of rain. Please refer to your User Manual for details. Here are how increments of rain are defined:
- Rain Rate is defined as the rainfall in the last 10 minutes, multiplied by 6 (10 minutes x 6 = 1 hour). This is also referred to as instantaneous rain per hour.
- Hourly Rain is defined as the rainfall in the last hour.
- Rain event is defined as continuous rain, and resets to zero if accumulated rainfall is less than 1 mm (0.039 in) in a 24 hour period. Some weather stations may calculate this slightly differently and the customer should reference the User Manual.
- Daily Rain is defined as the rainfall since midnight (00:00).
- 24 Hour Rain is defined as the rainfall in the last 24 hours. For example, if it is currently 5:00 pm, 24 hour rain would be the amount of rain that has fallen since 5:00 pm yesterday.
- Weekly Rain is defined as the calendar week total, and resets on Sunday morning at midnight (Sunday thru Saturday).
- Monthly Rain is defined as the calendar month total, and resets on the first day of the Month.
- Yearly Rain is defined as the calendar year total, and resets on the first day of the Year. The WS-1000 series weather stations allow you to change the month rain is reset to 0.00 (referred to as Rainfall Season).
- Total Rain is defined as the running total since station was powered up.
If the peak wind gust is incorrectly reported as 110.7 mph and the problem repeats every day, there is an issue with the sensor array and must be replaced.
We have a one year warranty. To replace under warranty, please visit:
www.AmbientWeather.com/rma.html
For out of replacement warranty, please visit:
https://www.ambientweather.com/amws2902array.html
... PermalinkIf the hygrometer or humidity sensor reads 99% all of the time, it is possible the sensor array requires fresh batteries or needs resetting.
- Cover the solar collector to shut of the solar energy source.
- Cover remove the batteries.
- Press the reset button for a full minute. There should be no LED flashing
- Reinsert fresh batteries
- Uncover the solar collector.
- LED should flash once per 14 seconds. If it is not flashing, the sensor array must be replaced.
- Power down and up the console to resync
- If the outdoor humidity is still showing 99% after several minutes, the sensor array must be replaced.
- We have a one year warranty. To replace the sensor array, please visit: www.AmbientWeather.com/rma.html
- For out of warranty replacement, please visit: https://www.ambientweather.com/amws2902array.html
If you loaded Merlin[1] third party firmware from your router, it may prevent the WS-2902A console from communicating to the app through your router.
We recommend loading the default Arris / Asus router firmware.
[1] Asuswrt-Merlin is a third party firmware for select Asus wireless routers. Based on the Asuswrt firmware developed by Asus, it brings tweaks, new features and other improvements to the original firmware, while retaining its performance and ease of use.
... PermalinkThere are four basic issues that will limit the wireless range of the weather station:
- Is the weather station console near other electronic devices? If so, move the weather station console to a new location.
- Are you using the prescribed lithium batteries in the sensor array? Alkaline and other battery chemistry will only operate to + 10 degF. Lithium Energizer Ultimate Batteries operate to -40 degF.
- How far is the sensor array from the console? The line of sight RF range is 300′, 100′ under most conditions. Reference the More Help Guide below for a discussion on line of sight, and the effect of walls or barriers.
- Is the wireless signal transmitting through metal or thick walled concrete? How many walls or obstructions is it transmitting through? Metal or thick wall concrete can block a wireless signal.
If you continue to have issue, please read the More Help Guide below:
More Help:
If the sensor array is intermittent, or stops communicating at night or at dark, read this guide first:
The guide recommends changing batteries and moving the sensor array or console around, or paying attention to barriers, to overcome interference and distance.
it is important to note what LED light is doing on the bottom of the sensor array:
- LED on all of the time
- LED off all of the time
- LED flashing rapidy
- LED flashing normally (16 seconds)
If the LED is on all of the time, please reference:
If the LED is flashing rapidly, please reference:
If the LED is flashing normally every 16 seconds, please reference:
If the LED is not flashing at all:
Please reset the sensor array:
- Cover the solar collector to shut of the solar energy source.
- Cover remove the batteries.
- Press the reset button for a full minute. There should be no LED flashing
- Reinsert the batteries
- Uncover the solar collector.
- LED should flash once per 16 seconds. If it is not flashing, the sensor array must be replaced.
- Power down and up the console to resync.
- If the outdoor temperature and humidity are still showing dashes (–) after several minutes, the sensor array must be replaced.
- We have a one year warranty. To replace the sensor array, please visit: www.AmbientWeather.com/rma.html
- If out of warranty, the sensor array can be purchased here: https://www.ambientweather.com/amws2902array.html
If it is very cold outside, please reference:
... PermalinkIt is an M5 size stainless nut.
... PermalinkTo Perform a Network Reset:
Please follow the steps below to perform a Network Reset:
- Unplug power to modem, router and weather console (unplug AC adapter and/or remove batteries).
- Plug power back into the cable Modem and let it sync back up with the network.
- Plug power back into the Router and let it sync up.
- Plug AC adapter back into the console.
- Proceed to step 6 if using a WS-2902C, WS-2902B, WS-2902A, WS-2902, WS-2000, WS-2002, WS-5000, WS-8482, WS-0262A, WS-50, WS-8478, WS-8480, WS-1000, WS-1001, WS-1002
- Wait 5 minutes then click the corresponding link below and follow the setup instructions to connect your console to wifi
I Cannot Connect My WS-2902A, WS-2902B, WS-2902C To WiFi, Android.
I Cannot Connect My WS-2902A, WS-2902B, WS-2902C To WiFi, Apple Or IOS.
How Do I Connect The WS-8482 To WiFi And The Internet?
How Do I Connect The WS-2000/WS-5000 To WiFi And The Internet
How Do I Connect My The WS-50 To WiFi?
WS-0262A: Cannot Connect WS-0262A To WiFi And The Internet With Android Device.
How Do I Access The User Interface Panel, Falcon Series.
I Cannot Connect To My Wireless Router., WS-1000-WiFi, WS-1001-WiFi, WS-1002-WiFi
**NOTE** MAKE SURE YOU ARE USING THE AC POWER ADAPTER THAT CAME WITH YOUR CONSOLE. THE CONSOLE WILL NOT CONNECT TO WIFI WITHOUT THE POWER ADAPTER BEING USED.
... PermalinkAbout 1.3 Volts. The console backlight and WiFi connectivity only works when connected to AC power.
... PermalinkYes, the ObserverIP communicates to the same sensors as models WS-1001-WiFi, WS-1002-WiFi, WS-1200 and WS-1201 weather stations.
The ObserverIP connects directly into your router and you communicate over your Local Area Network with a PC to set it up.
Some reasons why you may want to upgrade:
- You are having issues with the WiFi (WS-1001-WiFi, WS-1002-WiFi),
- You want to add Internet connectivity to your existing station (WS-1200, WS-1201).
- You want to connect to a WeatherBridge, which supports all of the major cloud services. For details, visit:
Can I Use My Observer Or Osprey Sensor Array To Communicate With A WeatherBridge? I Want To Report To CWOP, PWSWeather And More.
Available here: https://www.ambientweather.com/amobserverip.html
... PermalinkCan I Use My Observer (WS-1000-WiFi) Series Console With The Osprey Sensor Array?
The WS-2002 console is compatible.
The console will just need to be calibrated to the array. You would just need to adjust the wind gain and rain gain on the calibration screen.
To enter the calibration screen on the console press the gear (setup button) icon 3 times.


Wind Gain =2.17

Rain Gain = 1.18

The MAC address is found on the weather station console’s Weather Server panel:
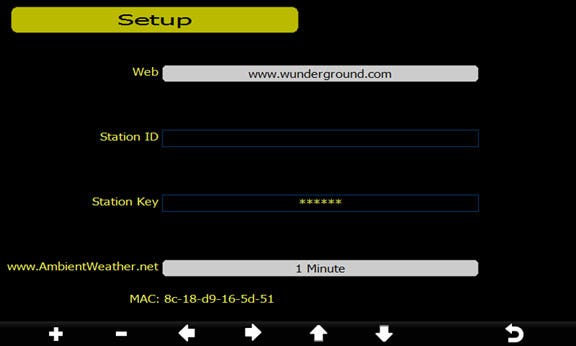
Product Manual
https://ambientweather.com/mwdownloads/download/link/id/1113
Product Page
https://www.ambientweather.com/amws2000.html
Q: How can I disable the wifi from broadcasting on my console?
A: You cannot. The console is constantly broadcasting data and also inputting data from the NIST time server, as well as pinging(AmbientWeather.net) to make sure the connection is still alive in the event it loses an Internet connection.
... Permalink- If the display is showing rain rate, change to daily rain to track the rain accumulation better.
- Make certain the rain gauge is level. If not perfectly level, the tipping mechanism will not work properly and under report rain.
- Make certain there are no obstructions in the funnel and tipping mechanism.
- In heavy downpours or sideways wind, the rain droplets can “bounce” out of the rain gauge. Use Teflon spray:https://www.amazon.com/DuPont-Silicone-Lubricant-Aerosol-14-Ounce/dp/B00D3ZKVASto prevent accumulation of the droplets on the walls of the rain gauge.
We have contacted the router manufacturer to identify what causes this issue. We cannot replicate it.
However, we believe it is related to a bug in the Asus firmware.
To resolve this issue, set the wireless mode to Legacy:


Yes and No…..
Not directly, not at the moment. We have developed an API:
which allow programmers to create apps, including uploading to CWOP.
The API documentation is available here:
https://ambientweather.docs.apiary.io
As you and others create apps, they are posted at our community listing:
We have also created a website to assist in uploading data to CWOP via our API, which is
https://www.ambientcwop.com
You will need to create an account first.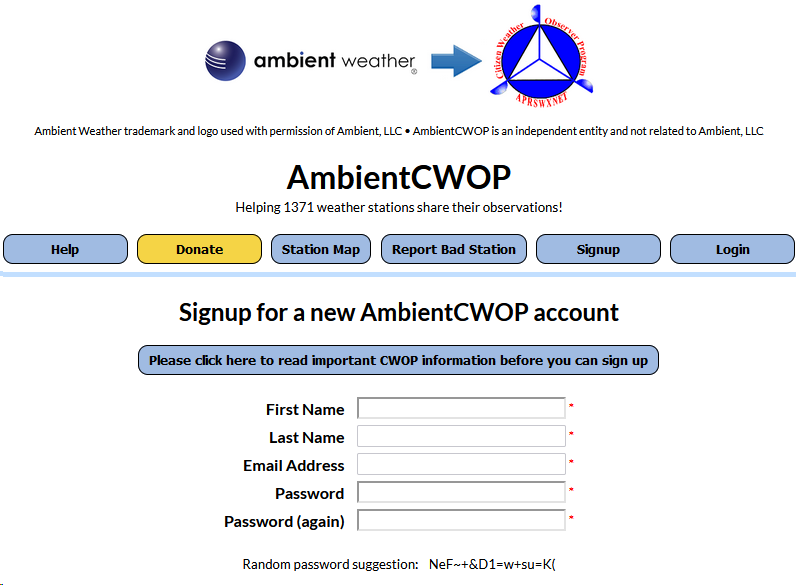
You will need to create an API key first using the guide below.
How Do I Generate An API Key For Third Party Applications?
Then you can add your API Key to send data from The Ambient Weather Network to CWOP.
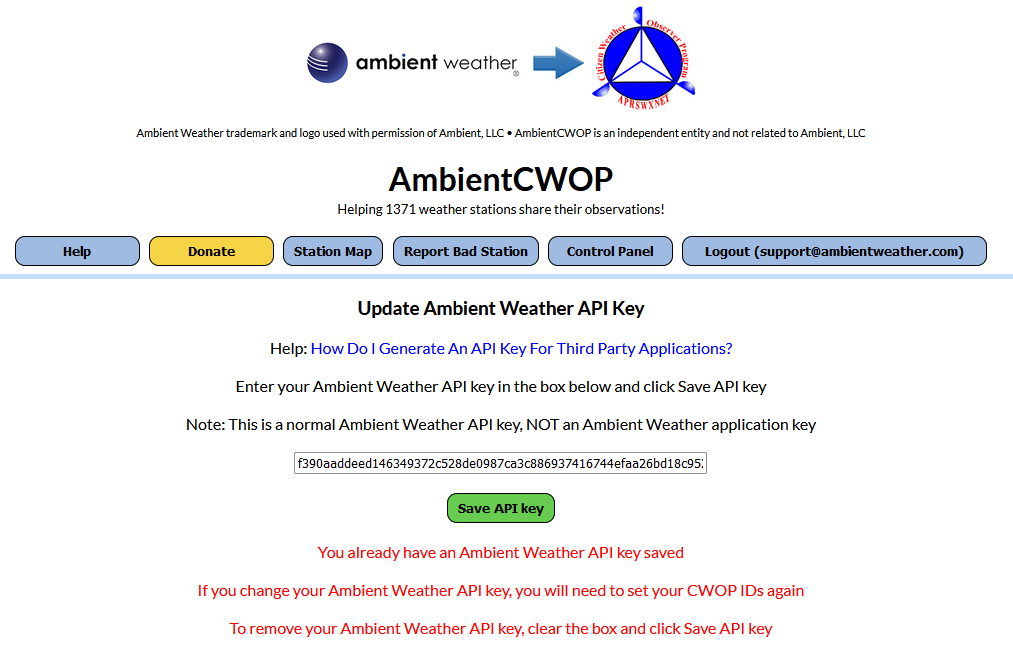
Also, you can purchase our Weatherbridge (https://www.ambientweather.com/amweatherbridge.html) and OBSERVERIP (https://www.ambientweather.com/amobserverip.html ) which together will report to CWOP, APRS and 30 other Weather Networks.
Including:
- Ambient Weather Network
- Weather Underground
- Weather Underground Weather Camera
- Meteobridge Weather Camera
- AWEKAS
- WeatherForYou (also known as PWSweather)
- UK MetOffice WOW
- Windfinder
- Windguru
- Citizen Weather Observer Program (CWOP)
- APRS
- Open Weather Map
- Previmeteo
- Idokep
- Weatherflow
- Wetter.com
- Weather Cloud
- Agroclima
- Meteonews
- Terre-net
- AnythingWeather
- Wetterring
- Meteoagro Net
- Meteoplug Cloud Graphing
- Meteotemplate
- Home Weather Station
- Meteoclimatic
- Cabure
- Windy
- Local Dashboard
- WSWIN Data Feed
- MeteoMap Cloud
... Permalink
What are Tendency Arrows?
6.14 Tendency Arrows
Tendency arrows allow you to quickly determine of temperature or pressure are rising and falling in a three hour update period, updated every 30 minutes.
Figure 27 defines the conditions for rising and falling pressure every 3 hours.


There are two versions of firmware:
- Console Firmware
- WiFi Firmware
The WS-2000 firmware must be updated to the following revisions in order to support the PM25, PM25IN, and AQIN Sensor:
- Firmware Revision Number (console): 1.4.4
- WiFi Firmware: AMBWeatherV4.1.4
To check the firmware version:
How do I Check my Firmware Versions
You must upgrade both versions of firmware for proper PM25 sensor operation:
Console Firmware:
How do I update firmware, WS-2000?
WiFi Firmware:
How do I update WiFi firmware, WS-2000/WS-5000
... PermalinkQ: What is the WIFI component power consumption for the WS-2902 series consoles?
A: The instant peak current of the wifi module can be up to 500mA, and its average current is about 200mA.
So it is safer to have an adapter that is capable of supplying 1.0mA ( at least 500mA ) for stable operation.
1000 Milliampere (mA) = 1 Watt/Volt (W/V)
... PermalinkThe Feels Like temperature is a combination of Heat Index when it is hot outside, and Wind Chill when it is cold outside.
Wind Chill temperature is defined by the National Weather Service for temperatures at or below 40 °F and wind speeds above 5.0 mph.
Heat Index is not valid or calculated below 80 degF.
Thus, when the outdoor temperature is between 40 degF and 80 degF, the feels like temperature is the same as the outdoor temperature.
If the temperature is below 40 degF, the feels like temperature is the same as the outdoor temperature when the wind speed is less than 5 mph.


Note: The WS-0900-IP was discontinued and firmware updates are no longer supported. ONLY use 4.5.8 for a WS-0900-IP
Download Latest Version: 4.6.2
History:
Version 4.6.2
- Fixes PM25IN "0" reading when no sensor registered
Version 4.6.1:
- Added support for the PM2.5 Indoor Sensor
Version 4.5.8:
- Default station changed to WS-1550-IP
- RF Configuration process optimized
- Server LED turns on when reporting to AmbientWeather.net or Wunderground.com. Before, it only turned on with Wunderground.com.
Version 4.5.7:
- Adds support for PM2.5 sensor.
Version 4.5.6:
- Fixes lock up issue introduced in Version 4.5.5.
Version 4.5.5:
- Fixes issue with Relative Pressure Correction that was introduced in Version 4.5.2.
- Adds support of PM2.5 particulate air quality sensor (coming Q2 2019).
- Fixes Rain Event bug.
Version 4.5.2:
- Fixes UV Scaling Error.
- Fixes issue with Daily Rain sometimes not resetting to 0.
Version 4.5.1:
- Added normal / low battery tile.
- Added Event Rain.
- Reduced the number of DNS look ups to once ervery 15 minutes.
Version 4.4.9:
- Fixed issue with rain calibration gain. This update is only required if you set your rain gain to any value other than 1.00.
Version 4.4.7:
- Fixed issue with both outdoor sensor and Channel 1 sensor reporting as outdoor temperature and humidity for WS-0900-IP Weather Stations.
Version 4.4.6:
- Fixed issue with barometer not reporting to WeatherUnderground for WS-0900-IP Weather Stations.
Version 4.4.5:
- You can now add up to 8 additional wireless indoor-outdoor thermo-hygrometers (the model number of the 8-channel sensors is WH31B).
Version 4.4.4:
- Fixes Wunderground.com reboot loop introduced in 4.4.2.
Version 4.4.2:
- Fixes Wunderground.com bug introduced in 4.4.1.
Version 4.4.1:
- There was a wind scaling issue introduced in Version 4.1.4. The wind speed is 0.46 actual wind speed. The work around is to choose the WS-1400-IP weather station instead of the WS-1200-IP.
- The released version was pulled. There was a Wunderground.com reporting bug in the new release.
Version 4.4.0:
- Fixes time stamp issue introduced in Version 4.3.8.
Version 4.3.8:
- Some users have reported conditions where their ObserverIP has become totally, or partially unresponsive (or very slow) to requests for web pages by either a browser, or secondary device (such as WeatherBridge or MeteoBridge, or computer running software that “interrogates” the ObserverIP web pages). In all cases the problem would occur somewhat unpredictably, and was seen as frequent as once a week, but most often less frequently. The problem manifests as web page timeouts, seen by a browser user or by a secondary device or software. Sometimes the problem is transient, sometimes it is (semi) permanent. To recover, the only solution is a “cold restart” which can be affected by removing power from the ObserverIP for 5 seconds, or by pressing the reset button located on the rear of the ObserverIP.
The latest ObserverIP firmware, version 4.3.8, has resolved several issues that related to this problem. In the process of these fixes, we have determined, however that due to fundamental limitations in hardware and firmware, the ObserverIP is not capable of handling more than 4 simultaneous, or overlapping, web page requests without there being a possibility of the stated problem occurring.
This is not a limitation when the ObserverIP is used as advertised, either used stand alone and occasionally observed through a browser (never more than 1 overlapping request), or even if also connected to a single secondary device, provided that such a device is properly programmed to not make more than one simultaneous request. WeatherBridge and MeteoBridge, in recent firmware versions, are known to not do this and are supported secondary devices. When such secondary devices are in use, combined with a browser making requests (automatically or manually) in rapid succession, there is a small possibility of temporarily reaching over the safe limit and slow responses may occur. In such cases a cold restart may be needed.
Users that use the ObserverIP, in particular those that use secondary devices, are encouraged to upgrade to the latest firmware (version 4.3.8 or later), available on the Ambient Weather web site and to not use more than one secondary device.
Version 4.3.6:
- Improves overall stability of uploads to Wunderground.
Version 4.3.1:
- Removes Telnet capability.
Version 4.2.1:
- Resolves bug introduced in 4.2.0.
Version 4.2.0:
- Resolves bug introduced in 4.1.9.
Version 4.1.9:
- Fixed calibration issue with WS-0800-IP only. Would always return invalid. Note that 4.1.9 had a significant bug and will be updated to 4.2.0 shortly.
Version 4.1.8:
- In Version 4.1.0, the update timer for Wunderground.com was mistakenly changed to 60 seconds. The timer has been returned to 14 seconds for wind speed and direction.
Version 4.1.7:
- Fixes small Wunderground formatting error. Does not impact users unless you are attempting to read the string from application you wrote.
Version 4.1.4:
- Now supports WS-1600-IP weather station.
Version 4.1.3:
- Minor cosmetic changes to the user interface.
Version 4.1.2:
- Fixed bug introduced in 4.1.1 where it would not upload to AmbientWeather.net if Wunderground.com was not entered correctly.
Version 4.1.1:
- Removed unnecessary time delay when closing connection to Wunderground.com
- Fixed rain total initial condition issue after power cycle or firmware upgrade.
Version 4.0.8:
- Improved stability and timing issues with Wunderground.com.
Version 4.0.7:
- Fixed minor issue when Wunderground settings are left blank.
Version 4.0.6:
- Fixed issue when Wunderground settings are left blank. The module was still trying to write to Wunderground.com when the fields were blank.
Version 4.0.5:
- Fixed jittery temperature graph with WS-1200-IP and WS-1400-IP introduced in Version 4.0.0.
- Fixed problem with outdoor LED flashing when WS-1200-IP is selected.
- Fixed lost outdoor sensor reception issue introduced in Version 4.0.0.
- Incorrectly displaying “invalid” for MAC address when no Wunderground.com settings are defined on the network panel.
Version 4.0.3:
- Fixes bugs related with WS-0800-IP and WS-0900-IP when reporting to AmbientWeather.net.
Version 4.0.1:
- Adds support new hosting service, AmbientWeather.net. To register, visit: AmbientWeather.net
- AmbientWeather.net supports indoor and outdoor parameters with a mobile friendly interface.
- Send email and text message alerts.
- Features robust graphing features and data analysis.
- Fixes issue when static IP address option is selected.
- Cleaned up code to run faster.
Version 4.0.0 (beta):
- Supports new hosting service, AmbientWeather.net. To register, visit: AmbientWeather.net
- AmbientWeather.net supports indoor and outdoor parameters with a mobile friendly interface.
- Send email and text message alerts.
- Features robust graphing features and data analysis.
Version 3.1.8:
- Reduced bandwidth usage with Wunderground.com, removing some duplicate transmissions
- Reduced network socket resource consumption by closing socket immediately after response from Wunderground.com. Wunderground.com is no longer contacted if the Station ID and/or Password is empty.
- Time is now set from Wunderground.com whether or not a correct Station ID and Password is supplied.
- Overall network traffic improvements, also resulting in more timely updates to Wunderground.com where occasionally an update interval could be missed.
Version 3.1.6:
- Final fix for Wundeground March 1 update (see 3.1.3 and 3.1.4).
- Turns off uploads to Wunderground if Station ID is blank.
- Fixes bug when switching between static and DHCP. The DNS was not properly addressed.
Version 3.1.4:
- On March 1, 2017, Amazon Web Services’ servers slowed down to requiring up to 30 seconds to open, read, write and close TCPIP sessions. This causes other tasks to slow down, and manifests itself in the indoor temperature-humidity-barometer to act sporadically, or updates to slow or completely stop. This version changes how the connection is established.
Version 3.1.3:
- On March 1, 2017, Amazon Web Services’ servers slowed down to requiring 5 seconds to open an http session. This causes other tasks to slow down, and manifests itself in the indoor temperature-humidity-barometer to act sporadically. This version did not completely resolve this issue. See Version 3.1.4.
Version 3.1.2:
- On January 31, 2017, Weather Underground.com migrated their data center from their offices in San Francisco to Amazon Web Services in Seattle. The firmware did not work properly if you selected a static IP address for the ObserverIP. We will need to fix this by installing Firmware Version 3.1.2.
Version 3.1.0:
- Humidity calibration range issue was not fixed in 3.0.9. This version fixes it.
Version 3.0.9:
- Increases calibration range for humidity from ±10% to ±50%.
Version 3.0.8:
- Fixes issue with Port 80 being left open after an http write command. This slows down the ObserverIP connection.
Version 3.0.3:
- Allows you to re-enter the daily, weekly, monthly and yearly rain totals, which is useful if you clean the rain gauge or replace the batteries and record false rain in the process.
Version 3.0.2:
- Allows multiple browsers open communicating to the same IP Module (in the event you are reviewing from two different computers).
Version 3.0.0:
- Improved update rates due to efficiency changes.
Version 2.1.0:
- If IP connection lost for 20 minutes, resets ObserverIP.
Version 2.0.0:
- Fixed issue with stopped Wunderground.com updates.
- Fixed issue with not accepting “&” character is password.
Version 1.0.9:
- Increased password length from 15 characters to 50 characters.
Version 1.0.8:
- Added Rain Reset button to bottom of Live Data panel. This reset allows you to clear rain totals that may have occurred due to vibration during installation.
- The sea-level barometer adjustment range was not large enough for altitudes above 1,000 feet.
- If the module was powered down and up again, it would lose the Daylight Savings Time setting.
If you receive the message:
There’s no real-time data yet. Give us a sec…
Waiting for data to load…
and the AmbientWeather.net never updates, it usually means you incorrectly entered the MAC address on AmbientWeather.net.
You can locate the MAC address on your device using this guide: How Do I Find My MAC Address?
Check the MAC address on your device vs. the MAC address you entered on AmbientWeather.net to make sure there is not a typo.
Also, you must own an Ambient Weather weather station or appliance to work with AmbientWeather.net.
... PermalinkOur weather stations base forecast on rate of change of pressure. This does not display what is happening right now, but rather, if the weather will change in the next 24 to 48 hours due to changes in barometric pressure.
In general, if the rate of change of pressure increases, the weather is improving (sunny). If the rate of change of pressure decreases, the weather is degrading (cloudy or rainy). If the rate of change is relatively steady, it will read partly cloudy or partly sunny (depending on the type of weather station).
The reason the current conditions do not match the forecast icon is because it is a prediction 24-48 hours in advance. In most locations, this prediction is only 70% accurate and it is a good idea to consult the National Weather Service for more accurate weather forecasts. In some locations, this prediction may be less or more accurate.
The National Weather Service (and other weather services such as Accuweather and The Weather Channel) have many tools at their disposal to predict weather conditions, including weather radar, weather models, and detailed mapping of ground conditions. Thus, these forecasts are significantly more accurate then forecasts based on rate of change of pressure.
You will need to give the weather station enough time to predict changes in weather. This can take up to 30 days, depending on where you live.
FAQs:
- The icons on my weather station have not changed in the short time I have owned it. You will need to give the weather station enough time to predict changes in weather. This can take up to 30 days, depending on where you live.
- Can I change the set points that trigger changes in the forecast icon? With some Ambient Weather Stations (not most), there is the option “Pressure Threshold Setting”. The pressure threshold (the negative or positive rate of change of pressure signifying a change in the weather) can be adjusted by the user from level 2 to level 4 (default level 2 mbar/hour). Check your User’s Manual for this feature. The lower the level pressure threshold setting, the higher sensitivity for weather forecast changes. Locations that experience frequent changes in air pressure require a higher setting compared to locations where the air pressure is typically stagnant.
To view your current version of firmware, access you IP Module through the IP address. The firmware version is shown in the upper right hand corner of the display. The version shown in the figure below is 4.0.0.

For instructions on updating the firmware, visit the following link:
https://www.ambientweather.com/observerip.html
To access the files as well as a file history, visit:
- Note for Windows (Mac users can proceed directly to #2:To update the firmware, you may be required to turn off the firewall settings for the IPTools program (IPSE).Open Windows Firewall by clicking the Start button Picture at the bottom left hand corner of Windows, clicking Control Panel, clicking Security Center, and then clicking Windows Firewall.Click Change Settings and the Exceptions tab, and check all instances of IPSE as an exception to allow the program to communicate through the windows firewall. Press OK to save changes.

- Make sure your computer and OberverIP are connected to the same router prior to upgrading the firmware (avoid WiFi and switches).
- If you have not done so already, download the latest IP Tools and firmware here:http://www.ambientweather.com/observerip.html
- Run IPtools from your desktop.

- Select Search. Select the device and choose the Upgrade button.
- Select File and browse to the location on your computer where you downloaded the firmware.
Select the Upgrade Firmware button. The following will be displayed:DHCP server @ 192.168.0.xxx is running on UDP port 67 successfully.
TFTP server @ 192.168.0.xxx is running on UDP port 69 successfully. - The status bar will reach 100% if properly upgraded.

- Press Exit once completed.
- Press the reset button on the back of the IP Module.
- The IP Module will reboot. Press Search until the module is available again on your network.
- Re-enter your Station Type in the Station Settings panel.
- Re-enter your Weather Underground.com Station ID and Station Key in the Weather Network panel.
- If the procedure is unsuccessful, visit: www.AmbientWeather.com/rma.html and we will update the module for you.
To Calibrate the Multi CH T& H sensors you will need to access the Web GUI. To access the Web GUI you first press and hold the Temp and Rain buttons together on the console for 5-10 seconds.
The console will then flash the wifi icon by time and date.
Then on your phone, tablet or computer go to settings, and then the wifi networks. Select the consoles access point. It will start with WN1965B-WIFI
It will say connected without wifi or no internet or sometimes it will checkmark. After that you open a web browser and type into the web address bar 192.168.4.1. If it pops up a screen that say login, use Admin for the username, make sure the password is blank, then click the login button.
It will then let you access the Web GUI. On the left click on Calibration.
Once in calibration scroll down and select Multi CH T&H Calibration

On the next screen it will then let you calibrate the Multi CH T&H sensors.
After entering the calibrations click save.

Then the console will calibrate to the new entry.
... Permalink- You must be connected to the same Local Area Network. Make sure both your computer and IP module are connected to the same router. Eliminate any switches. Make sure the computer is not communicating via WiFi and plugged directly into the same router.
- There may be an IP conflict. Press the RESET pinhole on the back of the IP Module (#9, figure below).
NOTE: If you cannot open the connection in a web browser, and the IP address of the device ends in xxx.xxx.xxx.99, this will resolve the issue.
Once reset, wait a couple of minutes, relaunch IP Tools to find the new IP address.
- Reboot your router.
- There may be a firewall setting in Microsoft Windows.Open Windows Firewall by clicking the Start button Picture at the bottom left hand corner of Windows, clicking Control Panel, clicking Security Center, and then clicking Windows Firewall.Click Change Settings and the Exceptions tab, and check all instances of IPSE as an exception to allow the program to communicate through the windows firewall.

- Try a third party scan tool. These tools find all of the devices connected to your Local Area Network (LAN).
Some examples are: Windows IP Scan Tool
 Apple IP Scan Tool for iPhone, iPad, and iPod Touch
 Apple IP Scan Tool
 Linux IP Scan Tool
 Android IP Scan ToolThe example below is for Advanced IP Scanner for Windows. Look for the Manufacturer ASIX ELECTRONICS CORP. with the MAC matching the label on the bottom of the IP Module:
Type this IP address into your web browser. For example, type http://192.168.0.55 into your favorite browser. - Switch ports on the router. Switch the cable out connected to the router. If the problem persists:
- Contact support@ambientweather.com for further assistance.
The ObserverIP range modules require Version 4.5.7 or greater to support PM25, PM25IN and AQIN Sensors
To update your firmware, please visit:
How Do I Update The Firmware For The ObserverIP Module?
How Do I Update The Firmware For The ObserverIP 2.0 Module?
To find the MAC address of your IP Module:
- It is printed on the bottom of the IP Module on a sticker.
Example: 00:0E:C6:D9:02:B4 (yours will be different).
or: - Go to the Weather Network panel on your IP Module:
On September 5, 2018, AmbientWeather.net moved the website to a different hosting service.
This may cause updates to cease if the DNS is cached on your device, network (router) or the Internet.
One symptom is the dashboard stops updating, but the graphs continue to update.
To resolve this issue:
- Reboot your device:
– Remove AC power
– Wait 10 seconds
– Plug AC power back in - Roboot your router (remove and reconnect AC power).
- Give it time for your network to resolve the DNS cache issue.
- If the problem persists, restore your device to factory default per the use manual.
The reasons we updated hosting services:
- We moved to a service that provides for a static IP address. This means no more DNS issues in the future.
- The new hosting service is faster, better supported with tools, and scalable to the rapid growth of users.
User Manual (required):
Download the current User Manual for the IPObserver Module. ObserverIP User Manual
IP Tools (required):
The IP Scan Tool is required to find the IP address of the ObserverIP Module on your network, so you can program the IP Module with your web browser. It also allows you to update the firmware. Windows IP Tool (64 bit) Windows IP Tool (32 bit)
* Most computers since 2004 are 64 bit.
Scan Tools:
Alternately, you can download a scan tool to find the ObserverIP on your network. The MAC address is printed on the bottom of the ObserverIP module and is addressable with a scan tool. Apple IP Scan Tool for iPhone, iPad, and iPod Touch
 Apple IP Scan Tool
 Linux IP Scan Tool
 Android IP Scan Tool
Wunderground.com:

Wunderground.com Weather applications for your computer, phone and tablet
ObserverIP Firmware Updates:
NOTE**: You must own a PC or Mac to update the firmware. Sorry, Linux products are currently not supported. Ambient Weather will update your ObserverIP at no cost (appropriate shipping charges will apply). Please fill out our Warranty Return form and mention you need the Observerip Firmware updated: https://ambientweather.com/reandex.html
In order to stay up to date with the latest Ambient Weather firmware or app updates, sign up for email notifications below. This way, you'll always be notified when a new update is available for your station or app.
... Permalink
The ObserverIP serves up web pages. The Live Data panel updates real time data:

You can reach this panel via the devices IP address. An example would be as follows:
http://192.168.0.99/livedata.htm
where the IP address http://192.168.0.99/ is different for each network.
If you are a programmer and wish to parse the data, an example of the html code that this web page generates is as follows:
<!DOCTYPE html PUBLIC "-//W3C//DTD XHTML 1.0 Transitional//EN" "http://www.w3.org/TR/xhtml1/DTD/xhtml1-transitional.dtd">
<html xmlns="http://www.w3.org/1999/xhtml">
<head>
<meta http-equiv="Content-Type" content="text/html; charset=utf-8" />
<title>LiveData</title>
<link href="axcss0.css" rel="stylesheet" type="text/css" />
</head>
<body>
<table width="800" border="0" align="center" cellpadding="0" cellspacing="0">
<tr>
<td colspan="2" align="right" bgcolor="#0088F7"> </td>
</tr>
<tr>
<td colspan="2" bgcolor="#FFFFFF"><table border="0" cellpadding="0" cellspacing="0">
<tr>
<td width="20" height = "80"> </td>
<td ><img src="img/1.jpg" width="74" height="80" ></td>
<td width="10"> </td>
<td class="txtstyle_1" >ambient weather observerIP 4.3 </td>
</tr>
</table></td>
</tr>
<tr>
<td colspan="2" align="right" bgcolor="#60B7FF"><table border="0" cellpadding="0" cellspacing="0">
<tr>
<td width="120" align="center"><font color="#FFFFFF" face="Arial, Helvetica, sans-serif"><em>Version:4.3.6</em></font></td>
</tr>
</table></td>
</tr>
<tr>
<td colspan="2" align="left" bgcolor="#C0C0C0">
<table width="20" border="0" cellpadding="0" cellspacing="0">
<tr>
<td bgcolor="#C0C0C0"><div class="menuitem_1"><a href="bscsetting.htm">Local Network</a></div></td>
<td bgcolor="#C0C0C0"><div class="menuitem_1"><a href="weather.htm">Weather Network</a></div></td>
<td bgcolor="#C0C0C0"><div class="menuitem_1"><a href="station.htm">Station Settings</a></div></td>
<td bgcolor="#EDEFEF"><div class="menuitem_1"><a href="livedata.htm">Live Data</a></div></td>
<td bgcolor="#C0C0C0"><div class="menuitem_1"><a href="correction.htm">Calibration</a></div></td>
</tr>
</table>
</td>
</tr>
<form name="livedata" method="POST" onsubmit="return chkForm(0);">
<tr>
<td colspan="2" bgcolor="#EDEFEF"> </td>
</tr>
<tr>
<td colspan="2" bgcolor="#EDEFEF"><div class="subitem_1">Live Data</div></td>
</tr>
<tr>
<td width="448" bgcolor="#EDEFEF"><div class="item_1">Receiver Time:</div></td>
<td width="352" bgcolor="#EDEFEF">
<input name="CurrTime" disabled="disabled" type="text" class="item_2" style="WIDTH: 120px" value="16:59 04/09/2018" maxlength="20"/></td>
</tr>
<tr>
<td width="448" bgcolor="#EDEFEF"><div class="item_1">Indoor Sensor ID and Battery </div></td>
<td width="352" bgcolor="#EDEFEF">
<input name="IndoorID" disabled="disabled" type="text" class="item_2" style="WIDTH: 80px" value="0x1f" maxlength="5" />
<input name="inBattSta" disabled="disabled" type="text" class="item_2" style="WIDTH: 100px" value="Normal" maxlength="12" />
</td>
</tr>
<tr>
<td bgcolor="#EDEFEF"><div class="item_1">Outdoor Sensor ID and Battery</div></td>
<td bgcolor="#EDEFEF">
<input name="Outdoor1ID" disabled="disabled" type="text" class="item_2" style="WIDTH: 80px" value="0x0d" maxlength="5" />
<input name="outBattSta1" disabled="disabled" type="text" class="item_2" style="WIDTH: 100px" value="Normal" maxlength="12" />
</td>
</tr>
<tr>
<td bgcolor="#EDEFEF"><div class="item_1">Outdoor2 Sensor ID and Battery</div></td>
<td bgcolor="#EDEFEF">
<input name="Outdoor2ID" disabled="disabled" type="text" class="item_2" style="WIDTH: 80px" value="0x--" maxlength="5" />
<input name="outBattSta2" disabled="disabled" type="text" class="item_2" style="WIDTH: 100px" value="- -" maxlength="12" />
</td>
</tr>
<tr>
<td bgcolor="#EDEFEF"><div class="item_1">Indoor Temperature</div></td>
<td bgcolor="#EDEFEF"><input name="inTemp" disabled="disabled" type="text" class="item_2" style="WIDTH: 80px" value="78.1" maxlength="5" /></td>
</tr>
<tr>
<td bgcolor="#EDEFEF"><div class="item_1">Indoor Humidity</div></td>
<td bgcolor="#EDEFEF"><input name="inHumi" disabled="disabled" type="text" class="item_2" style="WIDTH: 80px" value="26" maxlength="3" /></td>
</tr>
<tr>
<td bgcolor="#EDEFEF"><div class="item_1">Absolute Pressure </div></td>
<td bgcolor="#EDEFEF"><input name="AbsPress" disabled="disabled" type="text" class="item_2" style="WIDTH: 80px" value="28.64" maxlength="6" /></td>
</tr>
<tr>
<td bgcolor="#EDEFEF"><div class="item_1">Relative Pressure </div></td>
<td bgcolor="#EDEFEF"><input name="RelPress" disabled="disabled" type="text" class="item_2" style="WIDTH: 80px" value="30.05" maxlength="6" /></td>
</tr>
<tr>
<td bgcolor="#EDEFEF"><div class="item_1">Outdoor Temperature</div></td>
<td bgcolor="#EDEFEF"><input name="outTemp" disabled="disabled" type="text" class="item_2" style="WIDTH: 80px" value="90.7" maxlength="5" /></td>
</tr>
<tr>
<td bgcolor="#EDEFEF"><div class="item_1">Outdoor Humidity </div></td>
<td bgcolor="#EDEFEF"><input name="outHumi" disabled="disabled" type="text" class="item_2" style="WIDTH: 80px" value="10" maxlength="3" /></td>
</tr>
<tr>
<td bgcolor="#EDEFEF"><div class="item_1">Wind Direction </div></td>
<td bgcolor="#EDEFEF"><input name="windir" disabled="disabled" type="text" class="item_2" style="WIDTH: 80px" value="51" maxlength="5" /></td>
</tr>
<tr>
<td bgcolor="#EDEFEF"><div class="item_1">Wind Speed </div></td>
<td bgcolor="#EDEFEF"><input name="avgwind" disabled="disabled" type="text" class="item_2" style="WIDTH: 80px" value="6.9" maxlength="5" /></td>
</tr>
<tr>
<td bgcolor="#EDEFEF"><div class="item_1">Wind Gust </div></td>
<td bgcolor="#EDEFEF"><input name="gustspeed" disabled="disabled" type="text" class="item_2" style="WIDTH: 80px" value="7.6" maxlength="5" /></td>
</tr>
<tr>
<td bgcolor="#EDEFEF"><div class="item_1">Max Daily Gust </div></td>
<td bgcolor="#EDEFEF"><input name="dailygust" disabled="disabled" type="text" class="item_2" style="WIDTH: 80px" value="15.0" maxlength="5" /></td>
</tr>
<tr>
<td bgcolor="#EDEFEF"><div class="item_1">Solar Radiation </div></td>
<td bgcolor="#EDEFEF"><input name="solarrad" disabled="disabled" type="text" class="item_2" style="WIDTH: 80px" value="681.04" maxlength="12" /></td>
</tr>
<tr>
<td bgcolor="#EDEFEF"><div class="item_1">UV </div></td>
<td bgcolor="#EDEFEF"><input name="uv" disabled="disabled" type="text" class="item_2" style="WIDTH: 80px" value="2292" maxlength="12"></td>
</tr>
<tr>
<td bgcolor="#EDEFEF"><div class="item_1">UVI </div></td>
<td bgcolor="#EDEFEF"><input name="uvi" disabled="disabled" type="text" class="item_2" style="WIDTH: 80px" value="6" maxlength="3"></td>
</tr>
<tr>
<td bgcolor="#EDEFEF"><div class="item_1">Hourly Rain Rate</div></td>
<td bgcolor="#EDEFEF"><input name="rainofhourly" disabled="disabled" type="text" class="item_2" style="WIDTH: 80px" value="0.00" maxlength="8" /></td>
</tr>
<form name="Rain_1" method="POST" onsubmit="return chkForm(0);">
<tr>
<td bgcolor="#EDEFEF"><div class="item_1">Daily Rain</div></td>
<td bgcolor="#EDEFEF"><input name="rainofdaily" type="text" class="item_2" style="WIDTH: 80px" value="0.00" maxlength="8" />
<span id="rainofdaily_msg" class="errMsg0"></span></td>
</tr>
<tr>
<td bgcolor="#EDEFEF"><div class="item_1">Weekly Rain</div></td>
<td bgcolor="#EDEFEF"><input name="rainofweekly" type="text" class="item_2" style="WIDTH: 80px" value="0.00" maxlength="8" />
<span id="rainofweekly_msg" class="errMsg0"></span></td>
</tr>
<tr>
<td bgcolor="#EDEFEF"><div class="item_1">Monthly Rain</div></td>
<td bgcolor="#EDEFEF"><input name="rainofmonthly" type="text" class="item_2" style="WIDTH: 80px" value="0.00" maxlength="8" />
<span id="rainofmonthly_msg" class="errMsg0"></span></td>
</tr>
<tr>
<td bgcolor="#EDEFEF"><div class="item_1">Yearly Rain</div></td>
<td bgcolor="#EDEFEF"><input name="rainofyearly" type="text" class="item_2" style="WIDTH: 80px" value="0.69" maxlength="8" />
<span id="rainofyearly_msg" class="errMsg0"></span></td>
</tr>
<tr>
<td colspan="2" bgcolor="#EDEFEF"> </td>
</tr>
<tr align="center">
<td colspan="2" bgcolor="#EDEFEF"><input name="Apply" type="submit" class="item_2" style="WIDTH: 60px; HEIGHT: 24px;" onclick="setSubmitType(1)" value="Apply" />
<input name="Cancel" type="reset" class="item_2" style="WIDTH: 60px; HEIGHT: 24px;" value="Cancel" /></td>
</tr>
</form>
<tr>
<td colspan="2" bgcolor="#EDEFEF"> </td>
</tr>
<tr>
<td colspan="2" align="center" bgcolor="#EDEFEF">
<input name="rain_Default" type="button" class="item_2" style="WIDTH: 110px; HEIGHT: 24px;" onclick="raindef()" value="Rain Reset">
<input id="refresh_st" type="button" class="item_4" style="WIDTH: 110px; HEIGHT: 24px;" onclick="uiCtrl(this.value);" value="Refresh" />
<input id="refresh_sp" type="button" class="item_2" style="WIDTH: 110px; HEIGHT: 24px;" onclick="uiCtrl(this.value);" value="Stop Refresh" />
</td>
</tr>
</form>
<tr>
<td colspan="2" bgcolor="#EDEFEF"> </td>
</tr>
<tr>
<td colspan="2" bgcolor="#C0C0C0"> </td>
</tr>
</table>
<script src="axjs0.js" type="text/javascript"></script>
<script language="JavaScript" type="text/javascript">
<!--
var rfTaskRuningFlag = 0, rfTimeId;
uiCtrl('Refresh');
function uiCtrl(uiCmd)
{
if (uiCmd=='Refresh'){
document.getElementById('refresh_st').disabled = true;
document.getElementById('refresh_sp').disabled = false;
rfTaskRuningFlag = 1;
rfTaskState = 0;
rfTimeId = setInterval("ss()", 16000);
}else if (uiCmd=='Stop Refresh'){
document.getElementById('refresh_st').disabled = false;
document.getElementById('refresh_sp').disabled = true;
rfTaskRuningFlag = 0;
clearInterval(rfTimeId);
}
}
function ss()
{
if (rfTaskRuningFlag)
{
window.location.reload();
}
}
-->
</script>
</body>
</html>...
Permalink
No, it does not. Virtual Weather Station (VWS) has been discontinued. Most of our weather stations are direct to Internet and communicate with our hosting service at AmbientWeather.net.
Please visit or Community Page to find a list of applications that work with AmbientWeather.net:
... Permalink
If you have not done so already, download IPTools to your PC or Mac:
Ambient Weather ObserverIP Download Center
Launch IPTools, go the IP address of your module:

Select Search and Open.
... PermalinkIf you cannot connect to the ObserverIP module, and the IP address in IPTools reads 192.168.0.99 all of the time, please perform a factory reset of the console.
To restore the ObserverIP module to factory default, press the Reset pinhole button on the back of the module (#9, figure below).

Restart IPTools, and it should find a valid IP address on your network.
... PermalinkThe issue with the ObserverIP Module continuously rebooting appears to be a combination of two things:
- It occurs with Firmware Versions 4.4.1 and 4.4.2. Upgrading to 4.4.4 or greater fixes the problem.
- It is becoming more prevalent around June 2018.
To upgrade your IP Module:
- Download Version 4.4.4 from this link:
https://p10.secure.hostingprod.com/@site.ambientweatherstore.com/ssl/iptools/ambient_v4.4.4.bin
Make a note of where the file went on your computer. You will need this file to upgrade through the IPTools.

The default weather station type is the WS-1400-IP. Select Station Settings from the ObserverIP interface (launch IP Tools to find the IP address), and change the weather station type to WS-1550-IP and select Apply.

This can occur after a firmware update, or the reset button is pressed on the back of the IP Module.
Product Manual
https://ambientweather.com/mwdownloads/download/link/id/549/
Product Page
https://www.ambientweather.com/amws1500.html
- The gust is the maximum wind speed in the 16 second update period (sampled once per second), whereas the wind speed is the 16 sample average. It is difficult to “perceive” an average wind speed.
- We recommend you switch the display console to gust. It will typically read 1.5 to 2.5 x higher, and agrees better with human perception and what you see outside. To switch the display to gust, press the WIND button.
- View the max gust of the day (or since the last reset, based on your reset settings). Press the MAX/MIN button once and the max values will be displayed. Next, press the WIND button to see the max gust of the day (or since the last reset):

- Does this value agree with your perception or other stations in the area?
- What is displayed on AmbientWeather.net is only sampled once every minute and saved to graphs and data once every 4-5 minutes. The gust will likely be missed at this sample rate.
-
AmbientWeather.net does record the maximum gust of the day in the Wind Speed Tile. The example below shows a peak daily wind gust of 15.0 mph:

- Unless your cups stop abruptly and do not coast down, there is likely nothing wrong with your weather station.
- You can send us an email support@ambientweather.com with installation images, or post them on our Ambient Weather Network User Group on Facebook: https://www.facebook.com/groups/ambientweathernetwork/ and get a second opinion from thousands of users.
- If it is extremely cold (below freezing), it is possible that the wind gauge has frozen up. This is common to all weather stations with moving parts.You can spray the top of the unit with teflon snow and ice repellent like this:https://www.amazon.com/DuPont-Teflon-Snow-Repellant-10-Ounce/dp/B0031T82NObut this is not 100% effective.
- We have a detailed discussion here:
... Permalink
If the thermo-hygrometer-barometer is not communicating to the ObserverIP module:
If you added the indoor thermo-hygrometer-barometer to the WS-1500-IP, there was a bug in the firmware that is easily fixed. From the Station Settings panel on your IP Module, change the weather station type from WS-1500-IP to WS-1550-IP and select Apply.
The ObserverIP will now recognize the indoor sensor:
- Power down and up the ObserverIP Module and wait a few minutes. If the problem persists:
- Reference the Weather Network panel on the ObserverIP module:

- Make certain you entered the correct MAC on the AmbientWeather.net Devices panel:https://ambientweather.net/devices
- You must be running Firmware Version 4.0 or greater. To upgrade the firmware, please reference:How Do I Update The Firmware For The ObserverIP Module?
If the problem persists, email a snapshot of the above panel to support@ambientweather.com
... PermalinkIf the time is incorrect on the ObserverIP Live Data panel, the Time Zone is set incorrecty.
To change the Time Zone, from your OberverIP Module User Interface, change the Time Zone on the Station Settings page.
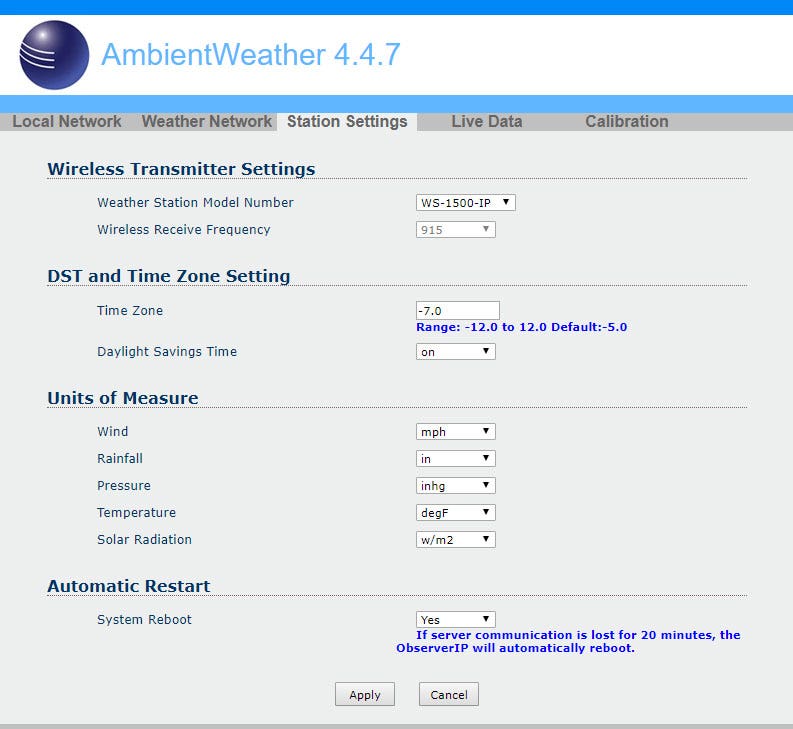
The following table provides times zones throughout the world. Locations in the eastern hemisphere are positive, and locations in the western hemisphere are negative.
| Hours from GMT | Time Zone | Cities |
| -12 | IDLW: International Date Line West | — |
| -11 | NT: Nome | Nome, AK |
| -10 | AHST: Alaska-Hawaii Standard CAT: Central Alaska HST: Hawaii Standard |
Honolulu, HI |
| -9 | YST: Yukon Standard | Yukon Territory |
| -8 | PST: Pacific Standard | Los Angeles, CA, USA |
| -7 | MST: Mountain Standard | Denver, CO, USA |
| -6 | CST: Central Standard | Chicago, IL, USA |
| -5 | EST: Eastern Standard | New York, NY, USA |
| -4 | AST: Atlantic Standard | Caracas |
| -3 | — | São Paulo, Brazil |
| -2 | AT: Azores | Azores, Cape Verde Islands |
| -1 | WAT: West Africa | — |
| 0 | GMT: Greenwich Mean WET: Western European |
London, England |
| 1 | CET: Central European | Paris, France |
| 2 | EET: Eastern European | Athens, Greece |
| 3 | BT: Baghdad | Moscow, Russia |
| 4 | — | Abu Dhabi, UAE |
| 5 | — | Tashkent |
| 6 | — | Astana |
| 7 | — | Bangkok |
| 8 | CCT: China Coast | Bejing |
| 9 | JST: Japan Standard | Tokyo |
| 10 | GST: Guam Standard | Sydney |
| 11 | — | Magadan |
| 12 | IDLE: International Date Line East NZST: New Zealand Standard |
Wellington, New Zealand |
Lithium ultimate batteries are recommended based on these operating principles.
- Lasts 5 times longer than any alkaline battery
- Higher energy density than NiMh and NiCd batteries
- Longer run time than NiMh or NiCd batteries
- Cost less than NiMH rechargeable batteries Low self-discharge rate (about 10% per month)
- Lightweight Use for high-drain devices
- Operates between -40 deg. F and 140 deg F
AA lithium batteries on Ambient Weather
Alkaline batteries operate around above 10 deg F. Rechargable batteries often have a limited life and mean constant replacing, as well as a narrow temperature range.
... PermalinkIf the ObserverIP Module web interface slows down, power down and up the device by removing the AC power, wait about 5 seconds, and connect AC power.
If you also own a WeatherBridge, or scrape the live data panel for another application, please read:
... PermalinkObserverIP Module slows down or stops working when connected to a WeatherBridge (MeteoBridge).
Most weather stations use self-emptying rain gauges, which do not count snow and will not operate when frozen.
It requires the snow melt before the precipitation is “counted”.
... PermalinkTo view or change the weather station model or type, Select Station Settings from the ObserverIP interface (launch IP Tools to find the IP address).
o find the IP address).
... PermalinkSnow build up is difficult to prevent, especially “wet snow”. You can spray the top of the unit with teflon snow and ice repellent like this:
https://www.amazon.com/DuPont-Teflon-Snow-Repellant-10-Ounce/dp/B0031T82NO
but this is not 100% effective.
Snow is considered normal maintenance, and accumulated snow can be brushed off gently with a broom.
No, it is not possible to access the ObserverIP module outside of your local network.
It reads and writes (https://) Port 80, and does not use Telnet (Port 23) for example.
It is not possible to access the rest of your network(s) from the ObserverIP module.
... PermalinkTo connect to Wi-Fi and the Internet, select the Settings icon ![]() and then the down arrow
and then the down arrow  until the Wi-Fi Scan Setup field is highlighted. Select the plus button
 ![]() to perform a Wi-Fi scan.
to perform a Wi-Fi scan.
Scroll down  to select your Wi-Fi network (2.4 GHz) and press the Enter key
  and enter the Wi-Fi password.
Press up or down 
 , left or right
 to scroll to the character, and press to select the enter
  character. Press OK when complete. Press
  to return to the WiFi Network setup page. Leave the password blank if the WiFi network is not encrypted.

The Wi-Fi signal strength icon is displayed on the home page. If wireless connectivity is successful, the Wi-Fi icon ![]() on the top left-hand side of the display tablet.
on the top left-hand side of the display tablet.
The WS-1401-IP has a different sensor array than the WS-1550-IP.
The Osprey sensor array (WS-1550-IP) is newer and more modular for easy parts replacement.
The WS-1550-IP also does not include the indoor thermo-hygrometer-barometer (WH2B):
https://www.ambientweather.com/amwh32b.html
... Permalink
You can locate an official source for your area to cailbrate by visiting https://ambientweather.net/baro
To calibrate the relative pressure, select the Calibration Panel on your display console by pressing the Settings icon three times:
![]()
![]()
![]()
From the calibration panel, adjust the relative pressure to the reference pressure in your area:
Press  to highlight the REL Barometer field.
Press  to highlight the significant digit you wish to change. Press
 ![]() or
or  to adjust the digit up or down.
For details on relative pressure calibration, please visit:
Relative Barometric Pressure Does Not Match Official Source.
The WH32B thermo-hygrometer-barometer sensor will always display the measured pressure. The relative pressure is calibrated on the console.
... PermalinkIf both AmbientWeather.net and WeatherUnderground.com stopped updating:
- Power down and up the router.
- Power down and up the ObserverIP Module.
- If the problem persists, make sure the ObserverIP module is plugged directly into your router, and not through a switch.
- The WS-2000 will not connect to a guest account.
- The WS-2000 series connects to the 2.4 GHz band on your router. Make sure the 2.4 GHz band is operating and connected to the Internet.
- If you own a Mesh Network or multiple repeaters, power off all of the secondary nodes, and leave the primary node (connected to the Internet) on.
- Reboot the router.
- Use the Hidden SSID feature to enter your SSID (whether it is hidden or not).
Be careful, the SSID and password are both case sensitive.
- Perform a factory reset on the console.
- Contact support@ambientweather.com for assistance and include your router type.
- One option is to add the ObserverIP Module (see below).https://www.ambientweather.com/amobserverip.html
Observer IP Module : Input 5V DC; 6.5′ 110-240V 50-60 Hz wall charger included.
DC barrel connector dimensions: 7.5mm ( L ) x 4.2mm ( OUT D) x 1.3mm ( Inner D)
... PermalinkHow to re-register a sensor through the Sensor ID screen.
Enter Setup mode as shown below.


Return to the Home Screen to view the WH31L Lightning Sensor Data or whatever sensor you re-registerd

Select Station Settings from the ObserverIP Module.
Make sure the Weather Station Model Number WS-1550-IP is selected.

Product Manual
https://ambientweather.com/mwdownloads/download/link/id/549/
Product Page
https://www.ambientweather.com/amws1500.html
Even the smaller memory sized Micro SD Card will store more data than the life of the weather station.
It just needs to be FAT32 formatted (standard).
We recommend smaller than larger SD Cards (4 GB) because they are less expensive and fail or have to be reformatted less often:
https://www.ambientweather.com/kisdc48gb.html
... PermalinkIf the ObserverIP module MAC address reads 00:00:00:00:00:00, the ObserverIP module is defective and requires replacing.
We have a one year warranty here: www.AmbientWeather.com/rma.html
If out of warranty, the console is available here for purchase:
https://www.ambientweather.com/amobserverip.html

There are two versions of firmware:
- Console Firmware, which updates the console layout and general operation.
- WiFi Firmware, which is specifically for the WiFi chip.
To check the versions of firmware you are running, tap the Settings button ![]()
![]()
![]()
![]() four times to get to the Factory page.
four times to get to the Factory page.
Select up  to highlight About Display, and select plus
 ![]() .
.

In the example above:
Firmware Revision: 1.0.9
WiFi Firmware Revision: V4.0.2
... PermalinkYou must own a PC or Mac to update the firmware. Sorry, Linux products are currently not supported. Ambient Weather will update your ObserverIP at no cost (appropriate shipping charges will apply). Please fill out our Warranty Return form and mention you need the Observerip Firmware updated: https://ambientweather.com/reandex.html
... PermalinkRainfall spikes, or over reporting is generally caused by pole vibration.
Pole vibration can occur when it is very windy, or a bird lands on the weather station.
Hail can also cause the rain gauge mechanism to vibrate.
Make certain the pole is not vibrating during windy conditions, causing false readings.
If you were working on the weather station, the vibration may also result in rainfall spikes.
Debris and snow melt can also cause a delayed reporting of rain.
... PermalinkTemperature reads too high (or inaccurate) when placed in the sun or close to a radiant heat source, like a house, building or structure.
- Place the sensor inside next to the indoor console sensor. Wait about 1 hour for stabilization. The sensors should agree within the accuracy specifications. Most RTD (resistive thermal device) sensors are accurate within +/- 2 degF. Thus, the sensors should agree within 4 degF.
- Mercury or red spirit thermometers are very accurate. Inside your house, place a red spirit thermometer next to the digital thermometer. The thermometers should agree within 2 degF.
- If the sensor is separate, place the sensor in a shaded area on the north side of the structure to avoid direct and radiant heat.
- Temperature sensors that do not have radiation shields will absorb solar energy and read higher than the ambient temperature. To prevent this problem, purchase a solar radiation shield from Ambient Weather.
- We have a one year warranty and a 30 day return policy. For details, please visit: www.AmbientWeather.com/rma.html
- While at the website, enter the part number of the transmitter in the Search by Keyword to locate the product.
The WH31, WH31B and WH31E are 8-channel thermo-hygrometers that support a variety of Ambient Weather Stations
The WH31 and WH31E include a radio controlled clock (RCC). The WH31B does not.
The WH31 and WH31E are only required for the WS-3000 Series, which includes a Radio Controlled Clock.
Our Internet Connected weather stations receive the time from the Internet Time Server (NIST.gov).
... PermalinkThe WS-3000-X8 is designed to display eight sensors at the same time. The display is similar to as follows:
The WS-3000-X5 displays 5 sensors and a graph:

You can convert the display from 8 sensors to 5 sensors (or visa versa) by downloading and installing the firmware for the WS-3000:
Ambient Weather WS-3000 Download Center
You can share the same field for sensors 5, 6, 7 and 8 and use the scroll mode to view each parameter. Please reference your User Manual for assigning more than one sensor to a field.
... Permalink
How do I enter my WeatherCloud Station ID and Key?
- Create an account at WeatherCloud.net
- Add a New device
- Notate the WeatherCloud ID and Key

- Launch the AWnet App and tap on your device, as shown in the figure below.
- AmbientWeather.net console settings are displayed. Tap Next.
- Wunderground console settings are displayed. Tap Next.
- Weatherclould console settings are displayed.
- Enter your WeatherCloud ID and Key.
- Tap Save.

Product Manual:
https://p10.secure.hostingprod.com/@site.ambientweatherstore.com/ssl/Manuals/WS-5000.pdf
Product Page:
https://www.ambientweather.com/amws5000.html
AWNET app Google Play download: https://play.google.com/store/apps/details?id=com.dtston.ambienttoolplus
AWNET app Apple iOS download: https://itunes.apple.com/us/app/awnet/id1341994564
User Manual (required):
Download the current User Manual for the WS-3000.

Software (optional):
The WS-3000 Software allows you to program the console, set alarms and download archived data from SD Card.
1. Download the software from the link below.
2. Run the installer.
3. Connect the USB Cable.
4. Run the software
.
Firmware Updates:
Important Note: The WS-3000-X3 and WS-3000-X5 includes a graph on the display. The WS-3000-X8 removes the graph so all 8 sensors can be displayed at the same time.
Important Note: WS-3000 sold pre-05/2022 require firmware versions V1.2.2 for -X3 and -X5 configurations and V1.1.9 for -X8 configuration.
- WS-3000-X3 and WS-3000-X5::
 Version 1.2.2
Instructions:- Download the firmware file above.
- Extract the file (Firmware.bin).
- Copy the extracted files to the root directory of a blank Micro SD Card from your computer.
- Power down the WS-3000 Display Console.
- Insert the Micro SD Card into the WS-3000 Display Console Micro SD card slot.
- Power up the console.
- WS-3000-X8:
 Version 1.1.9
Instructions:- Download the firmware file Firmware.bin above.
- Copy the Firmware.bin file to the root directory of a blank Micro SD Card from your computer.
- Power down the WS-3000 Display Console.
- Insert the Micro SD Card into the WS-3000 Display Console Micro SD card slot.
- Power up the console.
In order to stay up to date with the latest Ambient Weather firmware or app updates, sign up for email notifications below. This way, you'll always be notified when a new update is available for your station or app.
... Permalink
Please follow the recommended steps when using a Mesh Network:
- Please make sure firmware is updated. Orbi: https://www.netgear.com/support/product/orbi.aspx#download , eero: https://support.eero.com/hc/en-us/articles/213376263-How-can-I-check-to-see-if-there-is-an-eeroOS-update-available-on-my-network– , Google: https://www.support.com/how-to/how-to-update-a-google-wifi-mesh-router-12703
- On the Mesh Network (examples, Orbi, eero or Google), temporarily turn off all of the secondary nodes, leaving only the primary node (the node connected to the Internet) powered up.If you use a Virtual Private Network (VPN), temporarily turn this off.
- Make sure 2.4GHz SSID and the 5GHz SSID are different names
- Temporarily disable 5GHz network while going through setup
- Consoles will not connect to Guest accounts
- Consoles will not connect to Hidden SSID
Reset your Network then connect to wifi: Perform A Network Reset
Make sure the consoles firmware is up to date:
WS-1000-WiFi, WS-1001-WiFi, WS-1002-WiFi: How Do I Update The Console Firmware, Observer Series ?
WS-2000: How Do I Update Firmware, WS-2000/WS-5000?
WS-2902A: How Do I Update Firmware, WS-2902A, WS-2902B, WS-2902C ?
WS-8478&WS-8480: Ambient Weather WS-8478 Falcon Download Center
**If you are using an ios device(ipad, iphone) and it just shows ‘wifi’ for your networks SSID then you may need to use an android device to get connected.
... PermalinkWhat is the correct Timezone/Time Zone setting for my location:
Here is a list of Time Zones:
| Hours from GMT | Time Zone | Cities |
| -12 | IDLW: International Date Line West | — |
| -11 | NT: Nome | Nome, AK |
| -10 | AHST: Alaska-Hawaii Standard CAT: Central Alaska HST: Hawaii Standard |
Honolulu, HI |
| -9 | YST: Yukon Standard | Yukon Territory |
| -8 | PST: Pacific Standard | Los Angeles, CA, USA |
| -7 | MST: Mountain Standard | Denver, CO, USA |
| -6 | CST: Central Standard | Chicago, IL, USA |
| -5 | EST: Eastern Standard | New York, NY, USA |
| -4 | AST: Atlantic Standard | Caracas |
| -3 | — | São Paulo, Brazil |
| -2 | AT: Azores | Azores, Cape Verde Islands |
| -1 | WAT: West Africa | — |
| 0 | GMT: Greenwich Mean WET: Western European |
London, England |
| 1 | CET: Central European | Paris, France |
| 2 | EET: Eastern European | Athens, Greece |
| 3 | BT: Baghdad | Moscow, Russia |
| 4 | — | Abu Dhabi, UAE |
| 5 | — | Tashkent |
| 6 | — | Astana |
| 7 | — | Bangkok |
| 8 | CCT: China Coast | Bejing |
| 9 | JST: Japan Standard | Tokyo |
| 10 | GST: Guam Standard | Sydney |
| 11 | — | Magadan |
| 12 | IDLE: International Date Line East NZST: New Zealand Standard |
Wellington, New Zealand |
Note: There are no half settings. Example: If your time zone is 5.5 then you would select a whole number such as 5 or 6.
... PermalinkTo set the dip switches in an 8 channel sensor, there are three dip switches with 8 different combinations.

| DIP SWITCH | FUNCTION | |||
| 1 | 2 | 3 | 4 | |
| DOWN | DOWN | DOWN | — | Channel 1 |
| UP | DOWN | DOWN | — | Channel 2 |
| DOWN | UP | DOWN | — | Channel 3 |
| UP | UP | DOWN | — | Channel 4 |
| DOWN | DOWN | UP | — | Channel 5 |
| UP | DOWN | UP | — | Channel 6 |
| DOWN | UP | UP | — | Channel 7 |
| UP | UP | UP | — | Channel 8 |
| — | — | — | DOWN | °F |
| — | — | — | UP | °C |
After you set the dip switches, you must always power down and up the remote sensor by removing and reinserting the batteries for the change to take effect.
Why do we do it this way instead of an 8 position switch? The reason is 8 position switches are much more difficult to implement, less reliable and takes up more space.
... Permalink- Replace the batteries.
- Clean the terminals of any corrosion.
- Reset the sensor array.
Cover the solar collector to shut of the solar energy source.
Cover remove the batteries.
Press the reset button for a full minute. There should be no LED flashing
Reinsert the batteries
Uncover the solar collector.
LED should flash once per 16 seconds. - If the problem persists, the sensor array must be replaced. We have a one year warranty. To replace under warranty, please visit: www.AmbientWeather.com/rma.html
- If out of warranty, a replacement array can be purchased here: https://www.ambientweather.com/amws2902array.html
Q: Can I have a label name for each of my sensors?
A: Yes you can with Firmware version 1.2.6. Please follow the steps below to install the version 1.2.6 firmware


WS-3000-X3, WS-3000-X5, WS-3000-X8:

Instructions:
- Download the firmware file above.
- Extract the file (Firmware.bin).
- Copy the extracted files to the root directory of a blank Micro SD Card (Less than 32Gb in size, formatted for FAT32) from your computer.
- Power down the WS-3000 Display Console.
- Insert the Micro SD Card into the WS-3000 Display Console Micro SD card slot.
- Power up the console.
Sensor Labeling
You can label the location of each of your sensors from the pre-programmed menu.
To add a label, Press the  Mode Key to the Channel Reference Screen. Highlight ‘Setup’ for the Channel you wish to add a label to. Press the
  Selection key to access the Channel Reference screen. Use the
  Scroll keys to highlight the label you wish to use. Press the
  Selection key to save the selected Channel Reference. Press the
  Mode key till you return to the Home screen to view the newly added label.
To align the sensor array to true north, use a GPS (a compass measures magnetic north).
The rain gauge points to the north as shown in the diagram below.

To display additional sensors 6-8, you will need to set up the sensors to scroll within the same display area.
In the Normal mode, press the MENU key once to enter Setup Mode.
In the example below, we will have display area scroll Channels 5-8.
Select CH Area5:

and select Channels 6-8 to display in Display Area 5:

The wind vane was designed to be dampened on purpose so that the slightest wind does not change the wind direction, which would result in the wind being scattered or variable all of the time.
If you review other products, it was a major complaint.
For example, you can read more here:
https://www.wxforum.net/index.php?topic=26951.0
Many customers were adding weights to the vane to make it less responsive. We came up with a better solution than making the wind vane heavier (which wears the bearings faster). We added some resistance or damping to the wind vane.
It takes about 2-3 mph for the wind vane to change direction.
... PermalinkIf firmware update file is not being read from your Micro SD Card:
- The Firmware.bin file must be the only file on the SD Card and not contained in a folder. Also, if you own a Mac, it may add a file extension to the name.
- Make sure the Micro SD Card is blank.
- We recommend an SD Card memory size of 32 GBytes or less. If the card is larger than 32 GBytes, it must be partitioned.
- Make sure the SD Card is FAT32 formatted. Right click on the SD Card Drive from your computer:

- Try a different SD Card.
- If the problem persists, we have a one year warranty. For details, please visit:www.AmbientWeather.com/rma.html
and we can attempt to update the firmware for you.
If only the temperature is stuck or does not change, and all of the other sensors are updating, it is possible the sensor array requires fresh batteries or needs resetting.
- Cover the solar collector to shut of the solar energy source.
- Cover remove the batteries.
- Press the reset button for a full minute. There should be no LED flashing
- Reinsert fresh batteries
- Uncover the solar collector.
- LED should flash once per 14 seconds. If it is not flashing, the sensor array must be replaced.
- Power down and up the console to resync
- If the outdoor temperature is still showing -40 or 140 degF after several minutes, the sensor array must be replaced.
- We have a one year warranty. To replace the sensor array, please visit: www.AmbientWeather.com/rma.html
- For out of warranty replacement, please visit: https://www.ambientweather.com/amws2902array.html
Here is how the sensors display on the console for the WS-3000×3, WS-3000×5 and WS-3000×8
WS-3000×3 showing sensors 1-3 With Bar Graph
WS-3000×5 showing sensors 1-5 With Bar Graph
WS-3000×5 showing additional sensors 6-8(optional) With Bar Graph 
The WS-3000×5 Will monitor up to 8 sensors. The WS-3000×5 Will display a bar graph with sensors 1-5 on the main screen then show any additional sensors(#6, #7 and #8) on the right section of the screen as shown in the image above.
WS-3000×5 Showing extreme temperature ranges:
WS-3000×8 showing sensors 1-8 No Bar Graph
You can convert the display from 8 sensors to 5 sensors (or visa versa) by downloading and installing the firmware for the WS-3000: https://www.ambientweather.com/ws3000.html
You can share the same field for sensors 5, 6, 7 and 8 and use the scroll mode to view each parameter. Please reference your User Manual for assigning more than one sensor to a field.
Manuals:
WS-3000-x3: https://p10.secure.hostingprod.com/@site.ambientweatherstore.com/ssl/Manuals/WS-3000.pdf
WS-3000-x5: https://p10.secure.hostingprod.com/@site.ambientweatherstore.com/ssl/Manuals/WS-3000.pdf
WS-3000-x8: https://p10.secure.hostingprod.com/@site.ambientweatherstore.com/ssl/Manuals/WS-3000-X8.pdf
There is no reason to cover the rain gauge. The plastic expands with the ice.
The rain collector mechanism can freeze in the Winter and stop updating. As the snow melts, the rain is counted by the rain collector mechanism.
... PermalinkIf your screen does not power up, the issue may be with the AC adapter. Measure the output voltage of the AC adapter, and it should be about 5 Volts.
If the AC adapter is not registering a voltage, we have a one year warranty here: www.AmbientWeather.com/rma.html
If out of warranty. the AC adapter is available here for purchase: https://www.ambientweather.com/amwewsacadre1.html
If the voltage is fine, the console needs replacing, we have a one year warranty here: www.AmbientWeather.com/rma.html
If out of warranty, the console is available here for purchase: https://www.ambientweather.com/amws3000c.html
... PermalinkThe WH31B is an 8-channel thermo-hygrometer sensor and is an accessory. It is designated as Channel 1-8 sensor on AmbientWeather.net.
The WH32B is a single channel thermo-hygrometer-barometer. It is designated as the indoor sensor on AmbientWeather.net.
It is included with some of our weather stations, including the WS-2000. It is optional for the WS-1550-IP weather staton.
... PermalinkIf the console no longer powers up, it will need replacing.
We have a one year warranty. For warranty replacements, please visit: www.AmbientWeather.com/rma.html
Otherwise, replacement consoles are available here:
https://www.ambientweather.com/amws3000c.html
... Permalink1 . Replace the batteries. We recommend Energizer Lithium Ultimate batteries like the following:
https://www.amazon.com/Energizer-Ultimate-Lithium-Batteries-Each/dp/B00003IEME
Lithium batteries have a wide temperature operating range. They operate between -40 degF and 140 degF. Alkaline batteries only operate to about +10 degF.
Rechargeable batteries often have a limited life and mean constant replacing, as well as a narrow temperature range.
If the problem persists, the sensor array needs replacing. We have a one year warranty. Please visit:
www.AmbientWeather.com/rma.html
If out of warranty, the sensor array can be replaced here:
https://www.ambientweather.com/amws2902array.html
... PermalinkYou cannot change the archive interval from the console, but you can change the archive interval from the PC software.
You can download the software here:
https://www.ambientweather.com/ws3000.html
Select Menu | Setup to set the time, date and display customization settings.
From this screen you can set the archive interval:


Virtual Weather Station Download Center WeatherSnoop For Mac How Do I Use Cumulus Software With EasyWeather?


EasyWeather Software For WS-1001-WiFi, WS-1002-WiFi Weather Station For PC And Mac


Ambient Weather VW-ANET AmbientWeather.net Website Access for Nano, WeatherBridge or WeatherBridgeProOur Price: $100.00

Ambient Weather ObserverIP Download Center

Ambient Weather WS-3000 Download Center


AmbientCamHD and AmbientCamHDA Download Center


Ambient Weather WS-8478 Falcon Download Center

Ambient Weather WS-1001-WiFi, WS-1002-WiFi Download Center

Ambient Weather WS-50 Firmware Download Center

Ambient Weather WS-2000 Download Center
... PermalinkIf one of the sensors does not communicate with the console, try swapping channels with another sensor.
For example, switch Sensor Channel 4 to 5 on one sensor and and 5 to 4 on another sensor. You will have to power down and up the remotes after you change the dip switches.
Place both sensors about 10 feet from the console, then power down and up.
The following sensors can be used with the WS-2000-C and WS-5000-C display consoles, and can be enabled or disabled on the Sensors ID Setup panel:
- WH65. Sensor array for model WS-2000:
https://www.ambientweather.com/amws2902array.html
- WH25. Thermo-Hygrometer-Barometer for models WS-1201-IP, WS-1401-IP and WS-1002-WiFi:
https://www.ambientweather.com/amws1000bth.html
- WH26. Also known as WH32E. Outdoor sensor allows you to substitute your existing sensor array thermo-hygrometer.
https://www.ambientweather.com/amwh32e.html
- WH80. Ultrasonic Sensor Array for model WS-5000:
https://www.ambientweather.com/amws5000.html
- WH40. Rain gauge for model WS-5000:
https://www.ambientweather.com/amws5000.html
- WH32B. Indoor thermo-hygrometer-barometer for models WS-2000, WS-5000:
https://www.ambientweather.com/amwh32b.html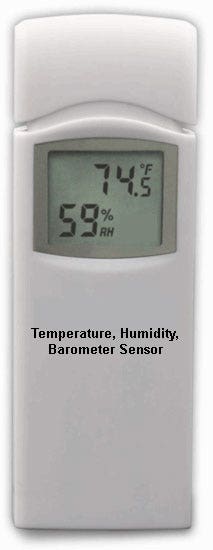
... Permalink
Console : Input 5V DC; 6.5′ 110-240V 50-60 Hz wall charger included,
Console Power Consumption: 5V / 200 mA
DC barrel connector dimensions: 9.0mm ( L ) x 2.5mm ( OUT D) x 0.70mm ( Inner D)
... PermalinkIf data is not being written to your Micro SD Card:
- Make sure the Micro SD Card is blank.
- We recommend an SD Card memory size of 32 GBytes or less. If the card is larger than 32 GBytes, it must be partitioned.
- Make sure the SD Card is FAT32 formatted. Right click on the SD Card Drive from your computer:

- Try a different SD Card.
- If the problem persists, we have a one year warranty. For details, please visit:www.AmbientWeather.com/rma.html
To export a csv file to your computer, you must insert an SD Card into the memory card slot on the console.

Backup data to micro SD / TF card.
The SD card will record data into the HISTORY directory.
The file is comma separated value (csv) and can be imported into Microsoft Excel, or other text based applications.
The file format is as follows:
YYYYCH#A
where YYYY is the year, # is the channel number and A is the revision letter.
Example: 2016CH2A is the data for 2016, Channel 2, and A is the revision letter each time you change a units of measure or calibration setting.
Below is an example of the file output:
Time,Temperature(F),Humidity(%),Dewpoint(F),HeatIndex(F)
2016/02/18 08:05,48.7,32,20.3,48.7
2016/02/18 08:10,49.1,33,21.2,49.1
2016/02/18 08:15,49.1,31,19.8,49.1
... PermalinkTemperature can read too low (or inaccurate) at night when placed close to a radiant heat source, like a house, building or structure. It can also read lower then other stations in your area due to irrigation or sprinklers.
- Place the sensor inside next to the indoor console sensor. Wait about 1 hour for stabilization. The sensors should agree within the accuracy specifications. Most RTD (resistive thermal device) sensors are accurate within +/- 2 degF. Thus, the sensors should agree within 4 degF.
- Mercury or red spirit thermometers are very accurate. Inside your house, place a red spirit thermometer next to the digital thermometer. The thermometers should agree within 2 degF.
- For colder temperature verification, place the sensor with the red spirit thermometer in the regrigerator or freezer.
- If the sensor is separate, place the sensor in a shaded area on the north side of the structure to avoid direct and radiant heat.
- Temperature sensors that do not have radiation shields will absorb solar energy and read higher than the ambient temperature. To prevent this problem, purchase a solar radiation shield from Ambient Weather.
- We have a one year warranty and a 30 day return policy. For details, please visit: www.AmbientWeather.com/rma.html
- While at the website, enter the part number of the transmitter in the Search by Keyword to locate the product.
How to reset the WS-3000 console:

https://p10.secure.hostingprod.com/@site.ambientweatherstore.com/ssl/Manuals/WS-3000.pdf
... PermalinkIf the WS-3000 console just flashes or keeps trying to boot up then a firmware update should correct this. Please refer to the steps below to download and install the firmware for your console.
Firmware Updates:
Important Note: The WS-3000-X3 and WS-3000-X5 includes a graph on the display. The WS-3000-X8 removes the graph so all 8 sensors can be displayed at the same time.
- WS-3000-X3 and WS-3000-X5:
 Version 1.2.2
Instructions:- Download the firmware file above.
- Extract the file (Firmware.bin).
- Copy the extracted files to the root directory of a blank Micro SD Card (Less than 32Gb in size, formatted for FAT32) from your computer.
- Power down the WS-3000 Display Console.
- Insert the Micro SD Card into the WS-3000 Display Console Micro SD card slot.
- Power up the console.
- WS-3000-X8:
 Version 1.1.9
Instructions:- Download the firmware file Firmware.bin above.
- Copy the Firmware.bin file to the root directory of a blank Micro SD Card (Less than 32Gb in size, formatted for FAT32) from your computer.
- Power down the WS-3000 Display Console.
- Insert the Micro SD Card into the WS-3000 Display Console Micro SD card slot.
- Power up the console.
If the temperature or humidity does not match between what is displayed on the remote sensor and what is displayed on the console:
- If you own more than one remote sensor:
The sensor has a channel number displayed on it, next to the temperature. Make sure that that Channel Number displayed on sensor matches the channel number shown on the display. If they do not match, refer to your User Manual on how to switch the channel display. - It is possible the temperature or humidity were adjusted or calibrated unintentionally. Refer to your individual User Manual on how to remove or correct the adjustment from the console.
Here is an example:
- Remote sensor reads 70.0
- Console for the same sensor channel reads 71.2
- Adjust the console down 1.2 degrees to match 70.0.
Ambient Weather stations are not designed to connect and send data over an open-air Internet connection such as cellular or satellite-based Internet. Even though the station may connect we cannot guarantee that it will send data consistently. This is due to a concept called Time to Live or TTL which states that our website is expecting data to arrive at a specific interval. The way data packets are handled by these type of connections does not allow the data to arrive when our website is expecting it. Therefore, the data is rejected as being invalid for not arriving at the correct time and you may see no data transmitting or inconsistent data transmission.
... Permalink
This was a bug in the firmware that was fixed on September 4, 2018.
To resolve this issue:
- Download and install the latest Version of EasyTemp software here:https://www.ambientweather.com/ws3000.html
- Download and install the Firmware for the WS-3000-X8 console here:https://www.ambientweather.com/ws3000.html
- To install the firmware in the console, copy the file Firmware.bin from your computer to a blank Micro SD Card.
- Insert the SD Card into the console.
- Power down and up the console. Once the firmware update is complete, eject and delete the Firmware.bin file if you wish to use this SD Card for data collection.
Product Manual
https://ambientweather.com/mwdownloads/download/link/id/466/
Product Page
https://www.ambientweather.com/amws3000x8.html
Ambient Weather stations are not designed to connect and send data over an open-air Internet connection such as cellular or satellite-based Internet. Even though the station may connect we cannot guarantee that it will send data consistently. This is due to a concept called Time to Live or TTL which states that our website is expecting data to arrive at a specific interval. The way data packets are handled by these type of connections does not allow the data to arrive when our website is expecting it. Therefore, the data is rejected as being invalid for not arriving at the correct time and you may see no data transmitting or inconsistent data transmission.
... PermalinkA solar radiation sensor measures solar energy from the sun.
Solar radiation is radiant energy emitted by the sun from a nuclear fusion reaction that creates electromagnetic energy. The spectrum of solar radiation is close to that of a black body with a temperature of about 5800 K. About half of the radiation is in the visible short-wave part of the electromagnetic spectrum. The other half is mostly in the near-infrared part, with some in the ultraviolet part of the spectrum.
The units of measure are Watts per square meter.
The device is typically used in agricultural applications, and is used in the calculation of Evapotransportation.
Evapotransportation is the potential for evaporation of moisture from the soil (or the reverse of rainfall) and is a function solar energy, wind and temperature.
... PermalinkTo clear the rain totals, go to the calibration screen and manually set each rain increments to 0.00:
Tap the Settings icon three times to page to the Calibration Settings.
![]()
![]()
![]()
Press ![]() to Enter the Calibration or Correction Mode.
to Enter the Calibration or Correction Mode.
Scroll down to adjust the daily, weekly, monthly and yearly rain totals.

To calibrate the wind direction, select the Calibration Panel from your display by tapping the Tool Icon four times:![]()
Enter the correct current Wind Direction into the Display Console:

If you live in the Southern Hemisphere, point the solar panel to the North and calibrate the wind direction with a 180 degrees offset.
... PermalinkAn ultraviolet sensor (UV sensor) is a device that measures UV light from the Sun.
The UV index is an international standard measurement of how strong the ultraviolet (UV) radiation from the sun is at a particular place on a particular day. It is a scale primarily used in daily forecasts aimed at the general public.
Its purpose is to help people to effectively protect themselves from UV light, of which excessive exposure causes sunburns, eye damage such as cataracts, skin aging, and skin cancer (see the section health effects of ultraviolet light).
- Wear sunglasses on bright days.
- If you burn easily, cover up and use broad spectrum SPF 30+ sunscreen.
- Watch out for bright surfaces, like sand, water and snow, which reflect UV and increase exposure.
A UV Index reading of 3 to 5 means moderate risk of harm from unprotected sun exposure.
- Stay in shade near midday when the sun is strongest.
- If outdoors, wear protective clothing, a wide-brimmed hat, and UV-blocking sunglasses.
- Generously apply broad spectrum SPF 30+ sunscreen every 2 hours, even on cloudy days, and after swimming or sweating.
- Watch out for bright surfaces, like sand, water and snow, which reflect UV and increase exposure.
A UV Index reading of 6 to 7 means high risk of harm from unprotected sun exposure. Protection against skin and eye damage is needed.
- Reduce time in the sun between 10 a.m. and 4 p.m.
- If outdoors, seek shade and wear protective clothing, a wide-brimmed hat, and UV-blocking sunglasses.
- Generously apply broad spectrum SPF 30+ sunscreen every 2 hours, even on cloudy days, and after swimming or sweating.
- Watch out for bright surfaces, like sand, water and snow, which reflect UV and increase exposure.
A UV Index reading of 8 to 10 means very high risk of harm from unprotected sun exposure. Take extra precautions because unprotected skin and eyes will be damaged and can burn quickly.
- Minimize sun exposure between 10 a.m. and 4 p.m.
- If outdoors, seek shade and wear protective clothing, a wide-brimmed hat, and UV-blocking sunglasses.
- Generously apply broad spectrum SPF 30+ sunscreen every 2 hours, even on cloudy days, and after swimming or sweating.
- Watch out for bright surfaces, like sand, water and snow, which reflect UV and increase exposure.
A UV Index reading of 11 or more means extreme risk of harm from unprotected sun exposure. Take all precautions because unprotected skin and eyes can burn in minutes.
- Try to avoid sun exposure between 10 a.m. and 4 p.m.
- If outdoors, seek shade and wear protective clothing, a wide-brimmed hat, and UV-blocking sunglasses.
- Generously apply broad spectrum SPF 30+ sunscreen every 2 hours, even on cloudy days, and after swimming or sweating.
- Watch out for bright surfaces, like sand, water and snow, which reflect UV and increase exposure.
The wind speed or wind direction anemometer can freeze when with cold weather and ice. This will not harm the weather station.
Take a broom or similar pole and gently tap the wind gauges to unfreeze them.
You can spray the top of the unit with teflon snow and ice repellent like this:
https://www.amazon.com/DuPont-Teflon-Snow-Repellant-10-Ounce/dp/B0031T82NO
but this is not 100% effective.
Snow and ice is considered normal maintenance.
... PermalinkNo, it does not. It comes with a bracket and two U-Bolts and to tighten around a 1 to 2″ diameter pole, which you supply.

Check to see if the WiFi icon ![]() is on (#2 below):
is on (#2 below):

If the WiFi icon is on:
- Power down and up the console by removing AC power. If the problem persists,
- Reboot your router.
If the WiFi icon is off:
- Power down and up the console by removing AC power. If the problem persists,
- Reboot your router. If the WiFi icon is still off, reconnect your console to your wireless router:
I Cannot Connect To My Wireless Router, WS-2000/WS-5000
There may be a firewall issue. To check, press the Set icon ![]() on the display console.
on the display console.
Tap the down arrow button  to highlight Setup and Time Setup.
Press ![]() to display the Time Settings Page.
to display the Time Settings Page.
Press the arrow button  to highlight the Time Server Update box.
Press ![]() to update.
to update.
If you receive an error, this means that both inboard and outboard Port 80 commands are being blocked.
If you do not receive an error (Next Synchronization with time shown), this means only outboard Port 80 commands are being blocked.
If you own a dual band router, make sure the 2.4 GHz band is connected to to the Internet and no commands are getting blocked.
... PermalinkIf the wind cups are turning but wind speed displays 0.0 on the display console:
- Make sure the wind cups set screw is properly fastened to the wind speed shaft. If the problem persists,
- The sensor array must be replaced. We have a one year warranty. To replace under warranty, please visit: www.ambientweather.com/rma.html
- If out of warranty, a replacement wind speed module can be purchased here:https://www.ambientweather.com/amws2902wcassembly.html
The Osprey series has a super capacitor that holds a lot of energy when there is no solar energy or low batteries. Even if you remove the batteries, the transmitter may still be transmitting.
- Bring your old sensor array inside the house or facility. The wind speed, UV and solar radiation will read 0.0.
- Press and hold the reset button on the bottom of the sensor array for about a minute while covering the solar collector with your hand.
- Next, power cycle the display console by removing AC power and batteries (WS-1900, WS-2902 series) or just AC power (WS-2000 series).
- If it still appears to pick up the old sensor array (UV, solar radiation and wind speed read zero), physically move the old weather station to a different location away from the house.
When a camera is setup and is not transmitting an image to the ambientweather.net this may be caused by the snapshot feature being set with a interval which is too short.
AmbientWeather.net requires a minimum interval of 60 seconds.
To check this setting please open the Ambient VMS application and click the three lines next to the camera and select setup

Once in the settings and click on Video -> Snapshot
1. Ensure the quality is set as medium and FTP,
2. If snapshot is enabled, please ensure it is set for 60 seconds or higher

If the sensor array drains batteries quickly after the batteries are replaced:
- Remove the batteries and replace with non-rechargeable Energizer Lithium Ultimate batteries. We have a discussion here:Why Are Lithium Ultimate Batteries Recommended And Not Alkaline Or Rechargeable Batteries?
2. Clean any corrosion around and on the battery terminals.
3. If the problem persists, the sensor array must be replaced. We have a one year warranty. To replace under warranty, please visit: www.AmbientWeather.com/rma.html
4. If out of warranty, a replacement array can be purchased here:
https://www.ambientweather.com/amws2902array.html
Yes, you can add as many consoles as you like.
The WS-2000 array works with four different consoles:
- WS-2000,
which is the one that came with your weather station. - WS-2902D
which is a lower quality but less expensive color film LCD - WS-1900A
which is identical to the WS-2902D console, but does not have a WiFi chip:
In order for your sunrise and sunset to be correct, your date, time zone, longitude and latitude must be entered correctly.
To find your longitude and latitude, enter your address into Bing Maps:
- To view your longitude and latitude, select the Tools icon
 to enter the Setup screen. Press the down arrow button
  until Longitude_Latitude Setup is selected, and press Plus
  to view the settings. Make sure your longitude, latitude and hemisphere settings (north vs south, east vs west) are correct.Note that if your longitude is negative, choose the western hemisphere. If your latitude is negative, choose the southern hemisphere.

2. To view your time zone settings, select the select the Tools icon ![]() to enter the Setup screen. Press the down arrow button
to enter the Setup screen. Press the down arrow button  until Date and Time Setup is selected, and press Plus
 ![]() to view the settings. Make sure your time zone is set correctly.
to view the settings. Make sure your time zone is set correctly.

The most common issues are:
- Longitude and latitude are reversed.
- The hemisphere is selected incorrectly.
- The time zone is set incorrectly.
Reset to Factory Default. Clears all stored memory, calibrations and other variables to factory default.
To restore your display console to factory default, press the Tool icon four times to display the Factory Page.
![]()
![]()
![]()
![]()

Press  to select Reset to Factory Default. Press or key to popup the Message Box ”Are you sure you want to reset to factory default?” Press
  to select Yes. Press the
 ![]() key to confirm the selection.
key to confirm the selection.
This model has a small back up battery inside the console that is not replaceable. It will store all of your settings if you lose power.
Once power is restored, the console will automatically reconnect to your wireless router and the Internet.
However, the console will not continue to archive data during the outage.
... PermalinkHere are the ports used:
1. 45000 for TCP
2. 46000, 43210 for UDP
3. 7000 for firmware update
4. 80 Http for read and writing of weather station data to AmbientWeather.net and Wunderground.com, and reading time from the NIST Internet Time Server.
... PermalinkA solar radiation sensor measures solar energy from the sun.
Solar radiation is radiant energy emitted by the sun from a nuclear fusion reaction that creates electromagnetic energy. The spectrum of solar radiation is close to that of a black body with a temperature of about 5800 K. About half of the radiation is in the visible short-wave part of the electromagnetic spectrum. The other half is mostly in the near-infrared part, with some in the ultraviolet part of the spectrum.
The units of measure are Watts per square meter (W/m2), Lux or Foot Candles (fc).
The device is typically used in agricultural applications, and is used in the calculation of Evapotransportation. Evapotransportation is the potential for evaporation of moisture from the soil (or the reverse of rainfall) and is a function solar energy, wind and temperature.
... PermalinkYou can add a second or additional console to your WS-2000 weather station:
https://www.ambientweather.com/amws2000c.html
It will read and display both your existing indoor and outdoor sensor.
There is also a lower cost alternative WS-2902D console:
Ambient Weather WS-2902D Wireless Console
If your second console does not require connection to the Internet, and is for display purposes only, you can save by ordering the WS-1900 console:
https://www.ambientweather.com/amws1900console.html
The WS-1900 does not support the PM2.5 sensor or the 8-channel WH31E sensor.
... PermalinkIt is possible the sensor array was not powered up properly. Please reset the sensor array:
- Cover the solar collector to shut of the solar energy source.
- Remove the batteries.
- Press the reset button for a full minute. There should be no LED flashing
- Reinsert fresh batteries. Make sure they are fresh alkaline or lithium Energizer non-rechargeable batteries.
- Uncover the solar collector.
- LED should flash once per 14 seconds.
- Power down and up the console to resync.
If the problem persists, we have a one year warranty. To replace under warranty, please visit:
www.AmbientWeather.com/rma.html
For out of warranty replacement, please visit:
https://www.ambientweather.com/amws2902array.html
... PermalinkYes, you can, but you will need to change the following Gain Factors on the console:
Wind Gain: 0.46
Rain Gain: 0.85
Here is how you change the gain factors on the WS-1000 series console:
- Press the Settings button
 three times to display the calibration panel:
- Press the down button
 until the temperature field is highlighted, and press plus
  or minus
  to adjust. Press the left
  or right
  button to change each multiple value.
 - Press the return button
 to return to the main screen.
IOS:

Ambient Weather Dashboard
- Free.
- The Ambient Weather Network is an ad-free weather platform enhanced by a powerful network of weather stations providing the most accurate hyperlocal conditions for your neighborhood, activity, or business. Connect your compatible Ambient Weather Station to access your data remotely and join one of the fastest-growing weather communities. Personalize your data tiles, set alerts, and share your weather updates with other weather enthusiasts - all for free!
ANDROID:
Ambient Weather
- Free.
- The Ambient Weather Network is an ad-free weather platform enhanced by a powerful network of weather stations providing the most accurate hyperlocal conditions for your neighborhood, activity, or business. Connect your compatible Ambient Weather Station to access your data remotely and join one of the fastest-growing weather communities. Personalize your data tiles, set alerts, and share your weather updates with other weather enthusiasts - all for free!
IOS:
awnet
- Free.
- The awnet app allows you to connect your Ambient Weather Station WS-2000, WS-2902A, WS-2902B, WS-2902C or WS-5000 console to your WiFi router and the internet. The WS-2902As were first sold in 06/2018.
ANDROID:
awnet
- Free.
- Connect your WS-2902A and other Ambient Weather Stations to WiFi, your router and the Internet, allowing you to publish on AmbientWeather.net and Wundeground.com.
IOS:
AmbientTool
- Free.
- The AmbientTool app allows you to connect your Ambient Weather Station WS-2902 console (sold from 12/2016 until 05/2018) to your WiFi router and the internet.
ANDROID:
Ambient Weather Osprey Tool
- Free.
- The Ambient Weather Osprey Tool allows you to communicate to your Osprey display console or internet module's WiFi connection, and program the connection to your wireless router and cloud services, such as Wunderground.
In order to stay up to date with the latest Ambient Weather firmware or app updates, sign up for email notifications below. This way, you'll always be notified when a new update is available for your station or app.
... Permalink

The WS-2000 weather station sensor array wirelessly updates wind speed and direction to the tablet every 16 seconds.
Product Manual
https://ambientweather.com/mwdownloads/download/link/id/1113
Product Page
https://www.ambientweather.com/amws2000.html
How to report to Automatic Packet Reporting System (APRS) using Weatherbridge
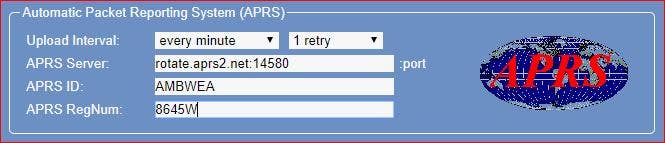
- In the Weatherbridge Control Panel select the ‘Weather Network’ tab.
- Select APRS from the ‘Add more Weather Networks’ drop down list
- APRS Server: rotate.aprs2.net:14580
- APRS ID is your Ham radio Call Sign
- APRS RegNum is generated here ( https://apps.magicbug.co.uk/passcode/ ). Enter your callsign, and it’ll return a passcode
- Click the ‘Save’ button at the bottom.
- You will soon be reporting to APRS: http://www.aprs-is.net/
There have been significant reports of connection issues with Asus and Arris routers. Our Wi-Fi chip manufacturer resolved these issues with an updated SDK (many non-Ambient Weather devices share the same issue), which was implemented in WiFi Firmware Version 4.2.6.
If you are running Firmware Version 4.2.4 (or prior), there are two options:
Option 1 - Temporarily change the encryption on your router, until after you upgrade, and then set the encryption back to the nominal settings.
Open up a web browser (Internet Explorer, for example) and enter the IP address http://192.168.0.1 in your browser’s address bar and press Enter. The Login window will prompt for the router configuration username and password.
- Select only 802.11 b/g/n mode. The other two options do not work at all for most Wi-Fi modules. We believe these routers have a general problem with 802.11n and 802.11b/g.
- Make sure “AP isolation” is disabled.
- Make sure no security option is selected.

To update the WiFi firmware, you must first download the awnet app for mobile devices a guide here can assist. After the firmware update, you can return your router to it’s normal settings.
Option 2 - Send the weather station to us, and we can upgrade the firmware for you. To get started, please visit: www.AmbientWeather.com/rma.html
... Permalink
Ambient Weather Manuals
1-9
1436R-12 | PDF
1436RS-22 | PDF
15-01 | PDF
1535-06 | PDF
1694R-22 | PDF
6152-AIRBRIDGE-KIT | PDF
6152C-WEATHERBRIDGE-KIT | PDF
6152-WEATHERBRIDGE-KIT | PDF
6153-AIRBRIDGE-KIT | PDF
6153-WEATHERBRIDGE-KIT | PDF
6162-AIRBRIDGE-KIT | PDF
6162C-WEATHERBRIDGE-KIT | PDF
6162-WEATHERBRIDGE-KIT | PDF
6163-AIRBRIDGE-KIT | PDF
6163-WEATHERBRIDGE-KIT | PDF
6250-AIRBRIDGE-KIT | PDF
6250-WEATHERBRIDGE-KIT | PDF
6251-AIRBRIDGE-KIT | PDF
6322-AIRBRIDGE-KIT | PDF
6357-AIRBRIDGE-KIT | PDF
A
AIRBRIDGE-KIT | PDF
AIRBRIDGE-RECEIVER-KIT | PDF
AMBIENTCAM | PDF
AMBIENTCAMHD | PDF
AMBIENTCAMHD3 | PDF
AW-YG637M | PDF
AW-YG737S-RD | PDF
B
BA212 | PDF
BA30806 | PDF
BAROMETER-26-M | PDF
BASWAN | PDF
BC-2000 | PDF
D
DHR70B-STAINLESS | PDF
E
EZ2-35W2MC | PDF
EZ-29-24 | PDF
EZ-30-12 | PDF
EZ-48-3AB-125-35 | PDF
EZ-GWA | PDF
EZ-HD-PTP | PDF
EZ-HD-PTP-100 | PDF
EZ-NPP | PDF
F
F007PF | PDF
F007T | PDF
F007TH | PDF
F007TP | PDF
G
GL164-M | PDF
H
HP816A | PDF
K
KTA-249-LCD | PDF
KTA-TEMP-50 | PDF
KTL-250-AL | PDF
M
MOBILEMOUNT | PDF
O
OBSERVERIP | PDF
P
PM25 | PDF
PM25IN | PDF
R
RAINSPIKE | PDF
RC-12112BS | PDF
RC-12116SB | PDF
RC-12118BW | PDF
RC-1800WSTH | PDF
RC-8300 | PDF
RC-8320 | PDF
RC-8365 | PDF
RC-8370 | PDF
RC-8401 | PDF
RC-8427 | PDF
RC-8473 | PDF
RG100-B | PDF
S
SRS100LX | PDF
T
TIDECLOCK-21 | PDF
TIDECLOCK-22 | PDF
TIDECLOCK-23 | PDF
TIDECLOCK-25 | PDF
TM-206 | PDF
TransformaFence | PDF
TX-3102 | PDF
TX-3107 | PDF
W
WEATHERBRIDGE | PDF
WEATHERBRIDGE Nano | PDF
WEATHERBRIDGEPRO | PDF
WEATHERHUB2 | PDF
WEATHERMOUNT | PDF
WEATHERMOUNT2 | PDF
WEATHERMOUNT-STAINLESS | PDF
WH2C | None, see console Item Number
WH31 / WH31E | None, see console Item Number
WH31B | None, see console Item Number
WH31L | PDF
WH31LA | PDF
WH3C | None, see console Item Number
WH5 | None, see console Item Number
WH6 | None, see console Item Number
WM-2 | PDF
WM-3 | PDF
WM-35 | PDF
WM-4 | PDF
WM-5 | PDF
WR-089 | PDF
WR-090 | PDF
WR-091 | PDF
WR-099 | PDF
WR-111, WR-111A, WR-111B | PDF
WR-112 | PDF
WR-299 | PDF
WR-335 | PDF
WR-336 | PDF
WR-77 | PDF
WR-SOLAR-BAG | PDF
WS-01 | PDF
WS-01T | PDF
WS-01T-C | PDF
WS-0100 | PDF
WS-0101 | PDF
WS-0211 | PDF
WS-02, WS-02A | PDF
WS-0262 | PDF
WS-0262A | PDF
WS-0265 | PDF
WS-0270 | PDF
WS-03 | PDF
WS-04 | PDF
WS-05 | PDF
WS-06 | PDF
WS-07 | PDF
WS-08 | PDF
WS-0800-IP | PDF
WS-09 | PDF
WS-10 | PDF
WS-1000-WiFi | PDF
WS-1001-WiFi | PDF
WS-1002-WiFi | PDF
WS-1050 | PDF
WS-1070 | PDF
WS-1075 | PDF
WS-108 | PDF
WS-1080 | PDF
WS-1090 | PDF
WS-11 | PDF
WS-110 | PDF
WS-1170 | PDF
WS-1171 | PDF
WS-1171A | PDF
WS-1171B | PDF
WS-1172 | PDF
WS-1173 | PDF
WS-1173A | PDF
WS-1173B | PDF
WS-1175 | PDF
WS-12 | PDF
WS-1200 | PDF
WS-1201 | PDF
WS-1200-AIRBRIDGE-KIT | PDF
WS-1201-AIRBRIDGE-KIT | PDF
WS-1201-IP | PDF
WS-1280 | PDF
WS-1285 | PDF
WS-1400-IP | PDF
WS-1401-IP | PDF
WS-14 | PDF
WS-15 | PDF
WS-152B | PDF
WS-152BN | PDF
WS-152T | PDF
WS-1550-IP | PDF
WS-16 | PDF
WS-1900 | PDF
WS-2000 | PDF
WS-2063 Series | PDF
WS-2080 | PDF
WS-2080A | PDF
WS-208T | PDF
WS-208TBH | PDF
WS-2090 | PDF
WS-2095 | PDF
WS-21 | PDF
WS-228TBH | PDF
WS-23 | PDF
WS-23-C | PDF
WS-24 | PDF
WS-24-C | PDF
WS-25 | PDF
WS-26 | PDF
WS-2800 | PDF
WS-2801 | PDF
WS-2801A | PDF
WS-2902 | PDF
WS-2902-RAINSPIKE | PDF
WS-2902A | PDF
WS-2902B | PDF
WS-2902C | PDF
WS-3000-X3 | PDF
WS-3000-X5 | PDF
WS-3000-X8 | PDF
WS-40 Series | PDF
WS-50 Series | PDF
WS-5000 | PDF
WS-5000-RAINSPIKE | PDF
WS-5300 | PDF
WS-5305 | PDF
WS-70 | PDF
WS-7078 | PDF
WS-7079 | PDF
WS-8365 | PDF
WS-8400 | PDF
WS-8460 | PDF
WS-8482 | PDF
WS-8478A | PDF
WS-8480 | PDF
WS-8482 | PDF
WS-8600 | PDF
WS-B1025C | PDF
WS-G3303THB | PDF
WS-GA1141305 | PDF
WS-GA1141710 | PDF
WS-GA1142010 | PDF
WS-GL025 | PDF
WS-GL025-CM | PDF
WS-GL026 | PDF
WS-GL032 | PDF
WS-GL032-CM | PDF
WS-G3303THB | PDF
WS-HE01 | PDF
WS-HT12 | PDF
WS-HT350 | PDF
WS-L0801TBH | PDF
WS-L3303THB | PDF
WS-M0921THB | PDF
WS-MOF0831-CTH | PDF
WS-M2021301TB | PDF
WS-M201301THB | PDF
WS-MDF0705THB | PDF
WS-TB1071305 | PDF
WS-YG302A-G | PDF
WS-YG302A-Y | PDF
WS-YG313-G | PDF
WS-YG313-Y | PDF
WS-YG315 | PDF
WS-YG332 | PDF
WS-YG357 | PDF
WS-YG501 | PDF
WS-YG633 | PDF
WS-YG634 | PDF
WS-YG709 | PDF
WS-YG710-6 | PDF
WS-YG710S-G | PDF
WS-YG710S-Y | PDF
WS-YG720 | PDF
WS-YG901 | PDF
... Permalink- Visually inspect the rain funnel. Is the funnel missing? To replace the funnel, please visit:https://www.ambientweather.com/amws2902funnel.html
- Check the funnel for any debris. Clean the funnel.
- Remove the funnel and check for any debris that may be affecting the tipping mechanism. Tip the mechanism back and forth. Does the rain update on the console? Check for any bugs or dirt. Clean with a damp, soft cloth.

- If the problem persists, we have a one year warranty. Please visit www.AmbientWeather.com/rma.html
- If out of warranty, the sensor array can be replaced here: https://www.ambientweather.com/amws2902array.html
Why does my PM25/PM2.5 not show up on AmbientWeather.net/ Ambient Dashboard app?
You will need to update your consoles firmware and your wifi firmware to the most current versions as shown below.
How Do I Update Firmware, WS-2000/WS-5000?
How Do I Update The WiFi Firmware, WS-2000 And WS-5000?
... PermalinkPlease see here for mobile devices:
Please see here for handling on the website: ... PermalinkPlease see this quick video on the process and details of what this subscription improves.
AWN Enhanced Camera Subscription: Unlock Your Camera's Full Potential
Get more out of your AWN Camera with HD resolution and increased cloud storage capacity. You'll also benefit from instant access to detailed data analysis about your video feed and a host of other features – all designed to make your life easier and your video quality better.
What's Included
Upgrade your resolution to stunning HD or Full HD for more vivid images, increase time-lapse refresh and sampling rates, and access increased 30 or 60-day storage space, so no sunset goes uncaptured. And get even more value from powerful data insights directly on your camera dashboard.

Enhanced Camera Subscription Tiers
Standard Tier – FREE
The Standard Tier is free and is included when you add a camera to the Ambient Weather Network.
Includes:
- Basic 640 x 320 resolution
- Time-lapse Updated: 4 times-a-day
- Map Icon: Standard
- Sampling: 5 Minutes
- Time-lapse Storage: 1 Day
Silver Tier – $4.99/Month
The Silver Tier is an upgrade to the Standard Tier and offers a clearer image resolution.
Includes:
- 1280 x 720 HD resolution
- Time-lapse Updated: 6 times-a-day
- Map Icon: Silver
- Sampling: 3 Minutes
- Time-lapse Storage: 30 Days
- Library Dashboard Tab for managing your storage
- Weather Cam Dashboard Tab for viewing time-lapse data analysis
Gold Tier – $9.99/Month
The Gold Tier is our premium tier and offers the highest resolution image and storage capacity.
Includes:
- 1920 x 1080 Full HD resolution
- Time-lapse Updated: 8 times-a-day
- Map Icon: Gold
- Sampling: 3 Minutes
- Time-lapse Storage: 60 Days
- Library Dashboard Tab for managing your storage
- Weather Cam Dashboard Tab for viewing time-lapse data analysis
How to Upgrade Your Subscription
In order to upgrade to one of the subscription tiers, you will need to log in to your Ambient Weather Network account on a desktop by visiting https://ambientweather.net. You will also need to ensure an Ambient Weather Station and Ambient Weather Network Camera are connected to the account.
- Once logged in, select the AWN logo in the top left corner to open the menu bar.
- Choose the "Devices" tab on the menu.
- Scroll to the device card that has the camera you want to upgrade.
- Select "View Details" next to the camera, which will open a window where you will see an "Upgrade" button.
- Select "Upgrade," and the subscription options will appear.
- Select "Upgrade" again under the tier you wish to upgrade to.
- You will be taken to a payment page, where you can enter your credit card information.
- Once payment has been confirmed, your camera will automatically upgrade to the new subscription level and be set to Auto-Renew. Also, depending on the color tier you choose, and if your camera is public, the main map will now display either a silver or gold play icon.
How do I Manage my Subscription?
To manage your subscription, click on your avatar image and scroll to the bottom of your account page. Locate the "Managed Subscriptions" section to view your active subscriptions and toggle on and off auto-renew.
FAQs
Does my subscription cover more than one camera?
- No, subscriptions are per camera. If you have two cameras, you will need two subscriptions.
Can I pay for an annual subscription?
- Yes, this option will be available soon.
Where can I access my new camera dashboard tabs and subscription features?
- Right now, the enhanced camera subscription and dashboard tabs are only accessible on the desktop version of AWN. iOS and Android access are coming soon (Q1 2023)
Can I downgrade my subscription?
- Yes, you can downgrade your subscription at any time by following the "Upgrade your Subscription" steps above, but instead of an "upgrade button," you will see a "downgrade button."
What if I upgrade in the middle of a month?
- We will pro-rate the cost of the new tier with your payment for the lower tier. For example, if you were at the silver tier and upgraded to the gold tier mid-month, $2.50 would apply to your gold tier subscription for that month.
Can I cancel my subscription?
- Yes, simply downgrade to the free standard tier to cancel your subscription.
Can I add more than one credit card to my account?
- At this time, we are only accepting one card per account.
Please see this video.
... PermalinkPlease see this video:
... Permalink