Frequently Asked Questions
Tag WS-2902D

Preventive Maintenance and Reset of the Outdoor Sensor Array. (Printed Part: WH65B)
To ensure that the outdoor weather station array stays in proper working condition please follow the steps below:
1.Replace the batteries. We recommend fresh Lithium Energizer and here is why:Why Are Lithium Ultimate Batteries Recommended And Not Alkaline Or Rechargeable Batteries?
2. Make certain the rain gauge is level. If not perfectly level, the tipping mechanism will not work properly and under report rain.
3. Visually inspect the rain funnel. Is the funnel missing? To replace the funnel, please visit: https://www.ambientweather.com/amws2902funnel.html
4. Check the funnel for any debris. Clean the funnel.
5. Remove the funnel and check for any debris that may be affecting the tipping mechanism. Tip the mechanism back and forth. Does the rain update on the console? Check for any bugs or dirt. Clean with a damp, soft cloth.
6. In heavy downpours or sideways wind, the rain droplets can “bounce” out of the rain gauge. Use Teflon spray: https://www.amazon.com/DuPont-Silicone-Lubricant-Aerosol-14-Ounce/dp/B00D3ZKVAS to prevent accumulation of the droplets on the walls of the rain gauge.
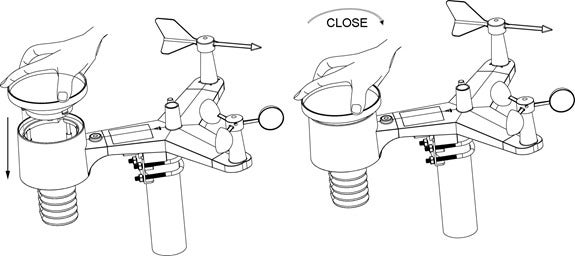
How to Reset the Outdoor Sensor Array:
- Cover the solar collector to shut of the solar energy source.
- Remove the batteries.
- Let sit for up to 24 hours to drain the solar capacitor.
- Reinsert fresh batteries.
- Press the reset button (#10, below) for a full minute with a pointed object, such as a pen tip:

6. Uncover the solar collector.
7. LED(#11) should flash once per 16 seconds. If it is not flashing, the sensor array must be replaced.
8. Power down and up the console to resync(Remove batteries and AC Adapter then reinsert)
9. May take a few minutes for the outside array information to display on the console
*If the weather station array is not communicating properly with the indoor console AFTER performing ALL of the steps above then the outdoor sensor array OR individual sensor/sensors will need to be replaced.
**Why Preventive/Routine Maintenance needs to be done:

If the temperature and / or humidity are showing dashes (–), and all of the other sensors are updating, it is possible the sensor array requires fresh batteries or needs resetting.
Replace the batteries. We recommend fresh Lithium Energizer and here is why:
Why Are Lithium Ultimate Batteries Recommended And Not Alkaline Or Rechargeable Batteries?
- Cover the solar collector to shut of the solar energy source.
- Remove the batteries.
- Let sit for 24 hours to drain the solar capacitor
- Press the reset button (#10, below) for a full minute with a pointed object, such as a pen tip:

- Reinsert fresh batteries
- Uncover the solar collector.
- LED should flash once per 14 seconds. If it is not flashing, the sensor array must be replaced.
- Power down and up the console to resync
- If the outdoor temperature is still showing -40 or 140 degF or dashes (–) after several minutes, the sensor array must be replaced.
- We have a one year warranty. To replace the sensor array, please visit: www.AmbientWeather.com/rma.html
- For out of warranty replacement, please visit: https://www.ambientweather.com/amws2902array.html
No, it does not. It comes with a bracket and two U-Bolts and to tighten around a 1.25" to 2″ diameter pole, which you supply.

Yes, you can add as many consoles as you like.
The WS-2000 array works with four different consoles:
- WS-2000,
which is the one that came with your weather station. - WS-2902D
which is a lower quality but less expensive color film LCD - WS-1900A
which is identical to the WS-2902D console, but does not have a WiFi chip:
You can add a second or additional console to your WS-2000 weather station:
https://www.ambientweather.com/amws2000c.html
It will read and display both your existing indoor and outdoor sensor.
There is also a lower cost alternative WS-2902D console:
Ambient Weather WS-2902D Wireless Console
If your second console does not require connection to the Internet, and is for display purposes only, you can save by ordering the WS-1900 console:
https://www.ambientweather.com/amws1900console.html
The WS-1900 does not support the PM2.5 sensor or the 8-channel WH31E sensor.
... PermalinkYes, you can purchase as many consoles as you like.
To purchase a second console, visit: https://www.ambientweather.com/amws2902aconsole.html
If your second console does not require connection to the Internet, and is for display purposes only, you can save by ordering the WS-1900 console:
https://www.ambientweather.com/amws1900console.html
The WS-2000 console also supports the Osprey Sensor array:
https://www.ambientweather.com/amws2000c.html
but requires the indoor thermo-hygrometer-barometer, since it is not included inside the console:
https://www.ambientweather.com/amwh32b.html
... Permalink
You can add or delete a device from the Devices panel:
To add a device, tap the + button next to Connect a New Device:
To delete a device, tap on the Ambient Weather icon to open the drop down menu, and select Delete this device.
Product Page
https://www.ambientweather.net
Replacement parts are available for the WS-2902,WS-2902A,WS- 2902B,WS-2902C,WS-2902D here:
https://ambientweather.com/weather-station-parts-accessories?ambient_compatible_with=6373
... PermalinkThe follow consoles are compatible with your WS-2000 array.
WS-2902D console
WS-2000 console
WS-1900A Console
The WS-1900A is the same layout as the WS-2902D console but does not have WiFi capabilities.
You can connect the WS-2902D to Wi-Fi using a computer, smartphone, or tablet with a browser.
To connect the WS-2902D, connect the console to power and ensure the Wi-Fi symbol in the time area is flashing 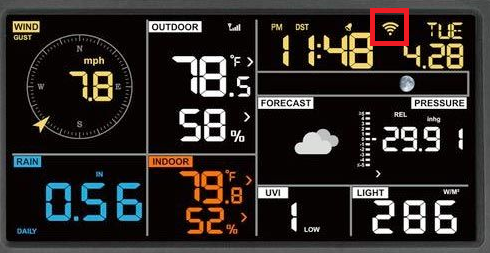
If it is not, please press and hold the WIND + and PRESSURE – buttons at the same time for four seconds. (2) The Wi-Fi icon will begin flashing rapidly and the characters M-B will flash, indicating the console is broadcasting a Wi-Fi signal.
Access your Wi-Fi connection settings and look the following Wi-Fi network:
Connect to the network and then open a browser. Note: You may be told that the network has no internet.
Navigate to the following IP address: 192.168.4.1. You will be presented with the following screen:
If you are presented with a login screen, please leave the password blank and click login.
You will now be presented with the screen below.
You will want to navigate to the Wi-Fi Network area to connect to Wi-Fi. Click [SCAN ROUTER] to find the network, or enter the appropriate network name and the password.
Click [APPLY] to connect the console to Wi-Fi. You will receive a message confirming the successful connection.
... Permalink
If you get to a screen white screen that says 200 OK after clicking login. Click refresh on the web browser.
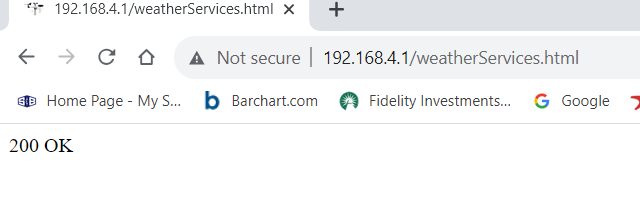
After refreshing, the Web GUI will load for you so you can enter your email and wifi credentials.
- Getting Started
- WS-2902 Weather Station
- WS-2000 Weather Station
- WS-5000 Weather Station
- All Weather Stations
- Outdoor Weather Sensors
- Weather Station Mounting
- WS-4000 Weather Station
- DROP
- Indoor Home Monitoring Stations
- Indoor Home Monitoring Sensors
- Weather Cameras
- Ambient Weather Network
- Video Guides
- WS-2000 Videos
- WS-5000 Videos
- WS-3000 Videos
- WS-8482 Videos
- Build Your Own Weather Station Videos
- Ambient Weather Misc
- data (6)
- WS-2000 (189)
- WS-5000 (139)
- WS-1550-IP (80)
- WS-1900 (78)
- WS-2902 (175)
- WS-2902A (189)
- WS-2902B (86)
- WS-2902C (131)
- 6152-AIRBRIDGE (17)
- 6152-WEATHERBRIDGE (19)
- 6152-WEATHERBRIDGEPRO (19)
- 6152C-WEATHERBRIDGE (18)
- 6153-AIRBRIDGE (19)
- 6153-WEATHERBRIDGE (17)
- 6162-AIRBRIDGE (20)
- 6162-WEATHERBRIDGE (20)
- 6162C-WEATHERBRIDGE (19)
- 6163-AIRBRIDGE (19)
- 6163-WEATHERBRIDGE (20)
- 6250-AIRBRIDGE (18)
- 6250-WEATHERBRIDGE (19)
- 6250-WEATH (9)
- WS-0101 (6)
- WS-0262A (12)
- WS-0270 (8)
- WS-04 (6)
- WS-0416 (6)
- WS-05 (7)
- WS-06 (7)
- WS-07 (16)
- WS-08 (16)
- WS-0800-IP (50)
- WS-0802 (10)
- WS-09 (17)
- WS-0900-IP (71)
- WS-10 (22)
- WS-1000-WiFi (119)
- WS-1001-WiFI (123)
- WS-1002-WIFI (127)
- WS-1075 (14)
- WS-11 (15)
- WS-110 (17)
- WS-1171 (26)
- WS-1171A (17)
- WS-1171B (24)
- WS-1172 (23)
- WS-2002 (51)
- AmbientWeather.com (111)
- AmbientWeather.net (215)
- WS-100 (7)
- WS-1201-IP (121)
- WS-1401-IP (101)
- WS-1500-IP (34)
- WS-1900A (8)
- WS-50 (14)
- WS-50-WEATHERSTATION (8)
- WS-7078 (13)
- WS-7079 (13)
- WS-8478 (48)
- WS-8478A (48)
- 6250-WEATHERBRIDGEPRO (8)
- OBSERVERIP (50)
- WEATHERBRIDGE (13)
- WS-1200 (65)
- WS-1200-IP (113)
- WS-8480 (23)
- WS-1400-IP (98)
- WS-1600-IP (46)
- WS-1001-AIRBRIDGE (44)
- WS-1050 (6)
- WS-1175 (6)
- WS-1201 (71)
- WS-1201-AIRBRIDGE (43)
- WS-2000 (8)
- WS-5000 (8)
- WS-12 (14)
- WEATHERBRIDGEPRO (9)
- WS-1401-IP-WEATHERBRIDGE (55)
- PM2.5 (6)
- PM25 (13)
- WS-0265 (12)
- WS-0265-3000 (7)
- RC-8401 (17)
- WS-1173 (23)
- WS-1173A (23)
- WS-2080 (23)
- WS-2090 (24)
- WS-2095 (26)
- WS-2801 (20)
- WS-5305 (16)
- WH31B (8)
- WH31E (11)
- WH31L (10)
- WH31LA (8)
- WH31P (8)
- WH31SM (7)
- WH32B (7)
- AQIN (11)
- WH31 (7)
- WS-3000-X3 (18)
- WS-3000-X8 (16)
- AMBIENTCAM (13)
- AMBIENTCAMHD (12)
- WS-3000-X5 (17)
- WS-4000 (12)
- WS-09-C (6)
- WS-091-C (8)
- WS-2902D (11)
- WS-8482 (33)
- WS-5050 (27)
- WS-1965 (10)
- WeatherUnderground.com (27)
- WS-1000-BTH (7)
- F007TH (13)
- WS-2800 (13)
- WS-2801A (18)
- WS-8460 (11)
- Webcam (14)
- RC-8401A (7)
- RC-8465 (12)
- RC-8300 (6)
- RC-8300-WHITE (6)
- RC-8370-BLUE (8)
- RC-8370-GRAY (8)
- RC-8370-GREEN (8)
- RC-8370-RED (8)
- RC-8370-ROSE (8)
- RC-8370-SILVER (8)
- RC-8427 (11)
- WS-14 (13)
- WS-15 (8)
- WS-16 (8)
- WS-17 (8)
- WS-18 (9)
- WS-19 (9)
- WS-20 (10)
- WS-21 (8)
- WS-22 (6)
- WS-23 (6)
- WS-24 (7)
- WS-25 (9)
- WS-26 (6)
- WS-28 (6)
- WS-70 (6)
- WS-5000-IP (9)
- WH31PF (8)
- AMBIENTCAMHD3 (12)
- WS-2080A (13)
- WC-FMWAC2K (7)
- WS-1170 (7)
- WS-8365 (8)
- WS-2700 (7)
- WS-8400 (9)
- F007PF (18)
- F007T (8)
- F007TP (12)
- F008PFN (11)
- WS-5300 (10)
- WS-1000-WIFI (119)
- WS-1001-WIFI (123)
- ambientweather.com (111)
- Observerip (50)
- Weatherbridge (13)
- Ambientweather.net (215)
- ambientweather (15)
- ws-2000 (189)
- ws-5000 (8)
- Ws-5000 (139)
- ws-7078 (13)
- ws-7079 (13)
- WS-4000 (9)
- screen (0)
- kestrel4000 (0)
- measurements (0)
- LiNK (3)
- app (1)
- mobile (0)
- bluetooth (0)
- data (6)
- firmware (0)
- upgrade (0)
- battery (4)
- kestrel5features (0)
- elite (0)
- sportsman (0)
- 5700 (0)
- 5700elite (0)
- hornady (0)
- 2700 (0)
- elitevssportsman (0)
- 5700vselite (0)
- kestrelvskestrelballistics (0)
- nightvision (0)
- calibration (0)
- BerryComplaint (0)
- (11)
- altitude (0)
- iphone (0)
- android (0)
- gunprofile (0)
- setup (0)
- laser (0)
- range (0)
- finder (0)
- rangefinder (0)
- terrapin (0)
- bushnell (0)
- steiner (0)
- m830 (0)
- conx (0)
- newcon (0)
- raptar (0)
- cugr (0)
- sig (0)
- kilo (0)
- 1800 (0)
- nitro (0)
- 4000vs5000 (1)
- VaneMount (0)
- chronograph (0)
- gun (0)
- densityaltitude (0)
- BarometricPressure (0)
- StationPressure (0)
- SyncBaro (0)
- SyncAlt (0)
- errormessages (0)
- inclination (0)
- slant (0)
- angle (0)
- target (1)
- impeller (0)
- temperature (0)
- humidity (0)
- blackglobe (0)
- Android (0)
- alerts (2)
- downloads (1)
- iOS (0)
- OSX (0)
- Windows (0)
- warranty (1)
- tune-up (0)
- training (0)
- wind (1)
- megaphone (0)
- repair (0)
- Products (0)
- ab (0)
- profile (0)
- loader (0)
- transfer (0)
- windows (0)
- manuals (1)
- troubleshooting (1)
- CoxBox (0)
- maintenance (0)
- 25 (0)
- SpeedCoach (0)
- heartratebelt (0)
- SUP (0)
- factoryreset (0)
- strokerate (0)
- speed (0)
- split (0)
- speedreading (0)
- storkerate (0)
- timer (0)
- bluesensor (0)
- blacksensor (0)
- wiring (0)
- strokemodes (0)
- display (0)
- StrokeCoach (0)
- rubber (0)
- bumper (0)
- backlight (0)
- installation (0)
- graphs (0)
- force (0)
- curve (0)
- angles (0)
- wash (0)
- riggers (0)
- power (0)
- work (0)
- slip (0)
- pitch (0)
- bushings (0)
- releasenotes (0)
- strokecoach (0)
- stroke (0)
- coach (0)
- speedcoach (0)
- ballistics (0)
- instruction (0)
- instructions (0)
- manual (0)
- K4Firmware (0)
- AverageWindDirection (0)
- WindRoseUse (0)
- accurateKestrel5seriesreadings (0)
- spraydrift (0)
- Dicamba (0)
- NaN (0)
- BadEnviro (0)
- ballisticsolutions? (0)
- HiDegError (0)
- chargingCoxBox (0)
- empoweroarlock (0)
- rifle (0)
- twist (0)
- gun (0)
- oarlock (0)
- port (0)
- starboard (0)
- KestrelLiNKiOSDataExportsolutions (1)
- email (1)
- export (1)
- issue (1)
- OarlockCalibration (0)
- pininterferance (0)
- dongle (0)
- link (3)
- 1000 (0)
- 2000 (0)
- 3000 (0)
- 2500 (0)
- 3500 (0)
- blank (0)
- issues (0)
- connect (1)
- connecting (0)
- pair (0)
- pairing (0)
- kestrel (0)
- heart (0)
- rate (0)
- belt (0)
- find (0)
- Speedcoach (0)
- GPS (0)
- Firmware (0)
- Update (2)
- Bluetooth (0)
- Live (0)
- Link (3)
- speedocach (0)
- gps (0)
- oc (0)
- sup (0)
- live (0)
- stream (0)
- remotely (0)
- phone (0)
- logbook (0)
- ios (0)
- error (0)
- compare (0)
- boats (0)
- rowing (0)
- crew (0)
- varsity (0)
- 8 (0)
- mac (0)
- osx (0)
- application (0)
- program (0)
- software (0)
- cellular (0)
- wifi (4)
- coverage (0)
- model (0)
- multiple (0)
- two (0)
- empower (0)
- viewed (0)
- trainingpack (0)
- streaming (0)
- cloud (0)
- different (0)
- which (0)
- stream.live (0)
- one (0)
- boat (0)
- oar (0)
- length (0)
- inboard (0)
- oars (0)
- span (0)
- outboard (0)
- register (1)
- magnetic (0)
- declination (0)
- var (0)
- variable (0)
- true (0)
- noth (0)
- magnet (0)
- compass (0)
- direction (0)
- hailer (0)
- blueocean (0)
- charging (0)
- capacity (0)
- usage (0)
- device (0)
- dataplan (0)
- celluar (0)
- crack (0)
- door (1)
- defect (0)
- Kestrel (0)
- waterproof (0)
- defective (0)
- line (0)
- 5000 (0)
- change (1)
- changelog.software (0)
- code (0)
- update.difference (0)
- version (0)
- VER (0)
- Ruger (0)
- ammo (0)
- ammunition (0)
- wizard (0)
- high (0)
- definition (0)
- window (0)
- small (0)
- adjust (0)
- monitor (0)
- subsonic (0)
- transonic (0)
- drop (4)
- scale (0)
- factor (0)
- long (0)
- muzzle (0)
- velocity (0)
- 22 (0)
- LR (0)
- 22LR (0)
- life (1)
- bars (0)
- shut (0)
- off (0)
- turn (0)
- on (0)
- solar (0)
- charge (0)
- pressure (0)
- wbgt (0)
- equation (0)
- formula (0)
- measurement (0)
- natural (0)
- wet (0)
- bulb (0)
- density (0)
- evaporation (0)
- rad (0)
- delta (0)
- dew (0)
- point (0)
- chill (0)
- heat (0)
- index (0)
- internet (0)
- connection (0)
- reconnecting (0)
- reconnect (0)
- difference (0)
- differences (0)
- corecoxbox (0)
- cox (0)
- box (0)
- changes (0)
- coxbox (0)
- core (0)
- 08 (0)
- backwards (0)
- compatible (0)
- harness (0)
- microphone (0)
- charger (0)
- cup (0)
- trade (0)
- discount (0)
- trade-in (0)
- in (0)
- Credit (0)
- connector (0)
- smart (0)
- additional (0)
- new (2)
- replaceable (0)
- update (2)
- maintain (0)
- salt (0)
- saltwater (0)
- water (0)
- corrosion (0)
- float (0)
- communication (0)
- wireless (0)
- upload (0)
- session (0)
- summary (0)
- csv (0)
- fit (0)
- download (2)
- distance (0)
- time (0)
- sensor (1)
- seat (0)
- accessory (0)
- accessories (0)
- gps.speaker (0)
- flex (0)
- record (0)
- start (0)
- begin (0)
- accumulate (0)
- purchase (0)
- come (0)
- date (0)
- set (0)
- daylight (0)
- timezone (0)
- zone (0)
- incorrect (0)
- nk (0)
- UN (0)
- number (0)
- lithium (0)
- batteries (0)
- ship (0)
- shipment (0)
- UPS (0)
- mail (0)
- view (0)
- text (0)
- texts (0)
- alert (1)
- maxordinate (0)
- bullet (0)
- course (0)
- instructional (0)
- learn (0)
- more (0)
- tutorial (0)
- how (0)
- button (0)
- cable (0)
- side (0)
- top (0)
- 5500 (0)
- 4dof (0)
- Hornady (0)
- holder (0)
- mount (0)
- tight (0)
- file (0)
- rebalance (0)
- Manuals (1)
- axial (0)
- form (0)
- aff (0)
- adjustment (0)
- create (0)
- sensitivity (0)
- table (0)
- mv (0)
- temp (0)
- mvtemp (0)
- drifting (0)
- recalibration (0)
- lose (0)
- losing (0)
- profiles (0)
- store (0)
- storage (0)
- targets (0)
- hold (0)
- cal (0)
- cps (0)
- calibrate (0)
- ballistic (0)
- solver (0)
- AB (0)
- tab (0)
- broken (0)
- replacement (1)
- longest (0)
- max (0)
- maximum (0)
- 3rd (0)
- party (0)
- apps (0)
- applications (0)
- capture (0)
- steps (0)
- getting (0)
- started (0)
- units (0)
- metric (0)
- imperial (0)
- mph (0)
- kph (0)
- celsuis (0)
- fahrenheit (0)
- bad (0)
- real (0)
- Elite (0)
- Applied (0)
- athlete (0)
- team (0)
- personal (0)
- account (0)
- dark (0)
- mode (0)
- sessions (0)
- maxpbr (0)
- NoGo (0)
- FarZR (0)
- hud (1)
- simultaneous (0)
- switch (0)
- screens (0)
- toggle (0)
- single (0)
- card (0)
- dope (0)
- remote (0)
- control (0)
- purpose (0)
- use (0)
- values (0)
- elevation (0)
- spin (0)
- drift (0)
- simultaneously (0)
- Picatinny (0)
- fw (0)
- back (0)
- light (0)
- red (0)
- white (0)
- notch (0)
- front (0)
- clip (0)
- drain (0)
- minimum (0)
- HUD (1)
- concrete (0)
- 5200 (0)
- pouring (0)
- pour (0)
- MK-III (0)
- Agriculture (0)
- Ag (0)
- Farming (0)
- Portlog (0)
- portable (0)
- bl (0)
- Rain (1)
- Gauge (1)
- tipping (1)
- buckets (1)
- quick (0)
- aj (0)
- accy (0)
- 1st (0)
- first (0)
- spddrp (0)
- dot (0)
- qkwind (0)
- wnddot (0)
- 12" (0)
- drill (0)
- accuracy (0)
- RainWiseNet (0)
- windlog (0)
- datalogger (0)
- dataloggers (0)
- reed (0)
- mkiii (1)
- mk-iii (0)
- rain (1)
- gauge (1)
- raingauge (0)
- agromet (0)
- telemet (0)
- MKIII (1)
- Anemometer (0)
- Wind (1)
- Sensor (1)
- Fan (0)
- Blades (0)
- Direction (0)
- Speed (0)
- Top (0)
- Relative (0)
- Cables (0)
- Wires (0)
- MAV (0)
- Mini (0)
- Aervane (0)
- Humidity (0)
- Temperature (0)
- Sensors (1)
- weather (0)
- station (0)
- receiver (0)
- IP-100 (0)
- CC3000 (0)
- Receiving (0)
- Signal (0)
- frequency (0)
- transmit (0)
- transmission (0)
- receive (0)
- packets (0)
- oracle (0)
- multi (0)
- factory (0)
- reset (0)
- reboot (0)
- refresh (0)
- unfreeze (0)
- Portable Weather Station (0)
- computer (0)
- laptop (0)
- Portable (0)
- Weather (0)
- Station (0)
- working (0)
- operational (0)
- logging (0)
- interval (0)
- intervals (0)
- 15 (0)
- minutes (0)
- telemetry (0)
- cell (0)
- fifteen (0)
- rainwise.net (0)
- down (0)
- offline (0)
- no (0)
- radio (0)
- signal (0)
- rainwise (0)
- rainguage (0)
- guage (0)
- clogged (0)
- rainfall (0)
- missing (0)
- count (0)
- assembly (0)
- outside (0)
- 6 (1)
- volt (0)
- panel (0)
- placeholder (0)
- id (0)
- google (0)
- itunes (0)
- realtime (0)
- plus (0)
- + (0)
- Profile (0)
- Loader (0)
- 4500 (0)
- library (0)
- broke (1)
- d1 (2)
- d2 (2)
- d3 (2)
- active (1)
- bore (0)
- height (0)
- site (0)
- scope (0)
- guid (0)
- os/x (0)
- disease (0)
- spread (0)
- virus (0)
- corona (0)
- covid (0)
- covid19 (0)
- contagious (0)
- fire (0)
- DOF (0)
- WD (0)
- ambient (0)
- environment (0)
- head (0)
- of (0)
- charles (0)
- regatta (0)
- hocr (0)
- gpx (0)
- 4072 (0)
- release (0)
- notes (0)
- latest (0)
- hosr (0)
- schuykill (0)
- quik (0)
- legal (1)
- legends (0)
- PWSWeather (2)
- WeatherUnderground (0)
- images (0)
- diagram (0)
- magnetospeed (0)
- magneto (0)
- v3 (0)
- sporter (0)
- MagnetoSpeed (0)
- military (0)
- V3 (0)
- Sporter (0)
- Chronograph (0)
- sd card (0)
- suppressors (0)
- silencers (0)
- lab barrels (0)
- projectiles (0)
- bullets (0)
- suppressor (0)
- rail adapter (0)
- spacer (0)
- bayonet (0)
- dashes (0)
- t1000 (0)
- target hit indicator (0)
- KestrelMet (5)
- disconnect (0)
- save (0)
- MK4 (0)
- notify (0)
- MK4-C (0)
- WS-2000 (189)
- WS-5000 (139)
- RAIN COIL (1)
- WS-1550-IP (80)
- WS-1900 (78)
- WS-2902 (175)
- WS-2902A (189)
- WS-2902B (86)
- WS-2902C (131)
- 6152-AIRBRIDGE (17)
- 6152-WEATHERBRIDGE (19)
- 6152-WEATHERBRIDGEPRO (19)
- 6152C-WEATHERBRIDGE (18)
- 6153-AIRBRIDGE (19)
- 6153-WEATHERBRIDGE (17)
- 6162-AIRBRIDGE (20)
- 6162-WEATHERBRIDGE (20)
- 6162C-WEATHERBRIDGE (19)
- 6163-AIRBRIDGE (19)
- 6163-WEATHERBRIDGE (20)
- 6250-AIRBRIDGE (18)
- 6250-WEATHERBRIDGE (19)
- 6250-WEATH (9)
- WS-0101 (6)
- WS-01PF (4)
- WS-01T (5)
- WS-0262A (12)
- WS-0270 (8)
- WS-04 (6)
- WS-04-WHITE (5)
- WS-0416 (6)
- WS-05 (7)
- WS-06 (7)
- WS-07 (16)
- WS-08 (16)
- WS-0800-IP (50)
- WS-0802 (10)
- WS-09 (17)
- WS-0900-IP (71)
- WS-10 (22)
- WS-1000-WiFi (119)
- WS-1001-WiFI (123)
- WS-1002-WIFI (127)
- WS-1075 (14)
- WS-11 (15)
- WS-110 (17)
- WS-1171 (26)
- WS-1171A (17)
- WS-1171B (24)
- WS-1172 (23)
- WS (1)
- WS-2002 (51)
- AmbientWeather.com (111)
- AmbientWeather.net (215)
- WS-100 (7)
- WS-1201-IP (121)
- WS-1401-IP (101)
- WS-1500-IP (34)
- WS-1900A (8)
- WS-50 (14)
- WS-50-WEATHERSTATION (8)
- WS-7078 (13)
- WS-7079 (13)
- WS-8478 (48)
- WS-8478A (48)
- WS- (3)
- 6250-WEATHERBRIDGEPRO (8)
- 6251-AIRBRIDGE (4)
- 6322-AIRBRIDG (1)
- OBSERVERIP (50)
- WEATHERBRIDGE (13)
- WS-1200 (65)
- WS-1200-IP (113)
- WS-8480 (23)
- WS-1400-IP (98)
- WS-1600-IP (46)
- WS-1001-AIRBRIDGE (44)
- WS-1050 (6)
- WS-1175 (6)
- WS-1201 (71)
- WS-1201-AIRBRIDGE (43)
- WS-1401-IP-WEATHERBRID (1)
- WS-2902B (3)
- WS-2902A (3)
- WS-2902 (2)
- WS-2000 (8)
- WS-2002 (2)
- WS-5000 (8)
- WS-8482 (2)
- WS-0262A (1)
- WS-50 (1)
- WS-8478 (1)
- WS-8480 (2)
- WS-1000 (1)
- WS-1001 (1)
- WS-1002 (1)
- WS-12 (14)
- WEATHERBRIDGEPRO (9)
- WS-1401-IP-WEATHERBRIDGE (55)
- PM2.5 (6)
- PM25 (13)
- WS-0265 (12)
- WS-0265-3000 (7)
- WS-84 (2)
- RC-8401 (17)
- WS-1173 (23)
- WS-1173A (23)
- WS-1280 (4)
- WS-2080 (23)
- WS-2090 (24)
- WS-2095 (26)
- WS-2801 (20)
- WS-5305 (16)
- WS-1070 (3)
- WS-1080 (5)
- WS-1090 (5)
- WH31B (8)
- WH31E (11)
- WH31L (10)
- WH31LA (8)
- WH31P (8)
- WH31SM (7)
- WH32B (7)
- WH32E (4)
- AQIN (11)
- WH31 (7)
- WS-3000-X3 (18)
- WS-3000-X8 (16)
- Weathercloud.net (4)
- 6250 (3)
- AIRBRIDGE (4)
- AMBIENTCAM (13)
- AMBIENTCAMHD (12)
- CWOP (4)
- EasyWeather (3)
- NANO (3)
- WS-3000-X5 (17)
- WS-4000 (12)
- WS-09-C (6)
- WS-091-C (8)
- specs (0)
- carrier (0)
- plan (0)
- WS-290 (1)
- WS-2902D (11)
- WS-8482 (33)
- WS-8482-KITS (5)
- cost (0)
- place (0)
- same (0)
- baro (0)
- barometric (0)
- public (0)
- others (0)
- can (0)
- see (0)
- WS-8480WS-2902C (3)
- WS-5050 (27)
- WS-1965 (10)
- OBSERVERIP2 (2)
- WeatherUnderground.com (27)
- WS-02A (2)
- WS-1000-BTH (7)
- WS-50-C (1)
- WS-1401-IP-WEA.WS-GL032 (1)
- F007TH (13)
- FT005TH (2)
- FT012TH (5)
- WS-03 (1)
- WS-2800 (13)
- WS-2801A (18)
- WS-8460 (11)
- WS-2902C (1)
- 6251-AI (1)
- Webcam (14)
- OBSERVERIP2.0 (1)
- PM25 (2)
- PM25IN (4)
- 625 (1)
- RC-8401A (7)
- RC-8465 (12)
- WH19 (1)
- WH2C (4)
- WH2F (3)
- WH32G (2)
- WH32M (2)
- WH3C (2)
- WH5 (2)
- WH6 (2)
- RC-6050 (4)
- RC-8300 (6)
- RC-8300-WHITE (6)
- RC-8320 (3)
- RC-8365 (4)
- RC-8370-BLUE (8)
- RC-8370-GRAY (8)
- RC-8370-GREEN (8)
- RC-8370-RED (8)
- RC-8370-ROSE (8)
- RC-8370-SILVER (8)
- RC-8419 (5)
- RC-8427 (11)
- RC-8473 (5)
- RC-8487 (4)
- WS-01 (2)
- WS-14 (13)
- WS-15 (8)
- WS-16 (8)
- WS-17 (8)
- WS-18 (9)
- WS-19 (9)
- WS-20 (10)
- WS-21 (8)
- WS-22 (6)
- WS-23 (6)
- WS-24 (7)
- WS-25 (9)
- WS-26 (6)
- WS-28 (6)
- WS-70 (6)
- connectivity (0)
- lost (0)
- WS-5000-IP (9)
- WH31PF (8)
- WC-FMWAC2K.WS-1965 (1)
- Amazon.com (1)
- globe (0)
- 5400 (0)
- stress (0)
- WS2902 (1)
- AMBIENTCAMHD3 (12)
- RC-1200BS (2)
- RC-1200BSNA (2)
- RC-1200BWDN (2)
- RC-1200MTTHA (2)
- RC-1200WB-IL (2)
- RC-1200WBA (2)
- RC-1200WBDN (2)
- RC-1200WSA (2)
- RC-1250CHA (2)
- RC-1400WBA (2)
- RC-1800WSTH (2)
- WS-2080A (13)
- WS-5050 (4)
- WC-FMWAC2K (7)
- RC-8461 (3)
- RC-9362 (4)
- WC-FMWAC2K WH31E (2)
- WS-1170 (7)
- WS-8365 (8)
- W (2)
- WS-1401-IPWS-1550-IP (1)
- Ambient Devices Forecaster (1)
- WR-111B (2)
- WR-112 (1)
- 9175-22 (2)
- WS-152B (1)
- WS-152BN (1)
- WS-208TBH (1)
- WS-228TBH (1)
- WS-G3303THB (1)
- WS-GL025 (3)
- WS-GL025-CM (3)
- WS-GL026 (3)
- WS-GL032 (4)
- WS-GL032-CM (3)
- WS-L0801TBH (1)
- WS-L0801THB (1)
- WS-L3303THB (1)
- WS-M0402THB (1)
- WS-M0921THB (1)
- WS-M201301TB (1)
- WS-M201301THB (1)
- WS-MDF0705THB (1)
- WS-YG302A-G (2)
- WS-YG302A-Y (2)
- 6322-WEATHERBRIDGEP (1)
- BAROMETER-26 (1)
- WEATHERSTATION-10 (1)
- WS-YG313-G (1)
- WS-YG313-Y (1)
- WS-YG315 (1)
- WS-YG332 (1)
- WS-YG357 (1)
- WS-YG365 (1)
- WS-YG633 (1)
- WS-YG634 (1)
- WS-YG640 (1)
- WS-YG709 (1)
- WS-YG710-6 (1)
- WS-YG710S-G (1)
- WS-YG710S-Y (1)
- WS-2700 (7)
- WS-8480A (1)
- Shipping (1)
- 6322-WEATHERBRIDGEPRO (3)
- 6357-WEATHERBRIDGEPRO (3)
- WEATHE (1)
- WS-8400 (9)
- 6322-AIRBRIDGE (3)
- Order Confirmation (1)
- F007PF (18)
- F007T (8)
- F007TP (12)
- F008PFN (11)
- 632 (1)
- WS-40 (2)
- WS-41 (2)
- WS-42 (4)
- WS-5300 (10)
- FT004T (1)
- FT005T (1)
- 9103-22 (1)
- 6357-AIRBRIDGE (2)
- AIRBRIDGE-RECEIVER (3)
- WEAT (1)
- 6251 (1)
- 6312 (1)
- 6351 (1)
- 6357 (1)
- WS-1401- (1)
- AmbientWeather.net AmbientWeather.com (1)
- AmbientWeather.net (2)
- AmbientWeather.com (1)
- WS-342 (2)
- TX-8340 (1)
- WS-8600 (5)
- WS-1000-WIFI (119)
- WS-1001-WIFI (123)
- TX-3110B (2)
- WR-111 (1)
- Affected Products AmbientWeather.net (1)
- Q-1400WB (1)
- WS-2902C-WS-2000 (1)
- ambientweather.com (111)
- WS-02 (1)
- WS-314 (1)
- TX-3102 (2)
- Affected Products AmbientWeather.com (1)
- BA212 (1)
- BA30806 (1)
- BASWAN (1)
- Fischer Instruments (1)
- WM-2 (2)
- 117-01 (1)
- 117-122-WOODBASE (1)
- 122-01 (1)
- WEATHERMOUNT (2)
- WEATHERMOUNT2 (2)
- WEATHERMOUNT-STAINLESS (1)
- WR-333 (1)
- WR-334 (1)
- TX-3107 (1)
- WR-091 (1)
- WR-088 (1)
- WR-089 (1)
- WM-5 (2)
- WS-2063 (1)
- WS-2063-W (1)
- WS-2063-W-P (1)
- rowing (0)
- strava (0)
- link (1)
- logbook (0)
- upload (0)
- fit (0)
- files (0)
- sync (1)
- sessions (0)
- bluetooth (1)
- xfr (0)
- sporter (0)
- app (1)
- connect (2)
- connection (0)
- no (1)
- power (2)
- turn (1)
- on (1)
- battery (1)
- d1 (2)
- d2 (2)
- d3 (2)
- kestrel (1)
- led (1)
- gun (0)
- profile (0)
- error (0)
- connected (0)
- ballistics (1)
- kestrelmet (5)
- name (0)
- names (0)
- enter (0)
- scroll (0)
- scrolling (0)
- tax (0)
- exempt (0)
- tax-exempt (0)
- taxes (0)
- free (0)
- order (0)
- sale (0)
- (1)
- long (0)
- range (0)
- lr (0)
- 22lr (0)
- true (0)
- centerfire (0)
- center (0)
- fire (0)
- share (0)
- weather (1)
- kmet (1)
- 6000 (2)
- underground (0)
- ambientweater.net (1)
- firmware (0)
- fw (0)
- updfate (0)
- spc (0)
- speedcoach (0)
- coxbox (0)
- oarlock (0)
- donge (0)
- Observerip (50)
- WS-1002-ip (1)
- WS-1600-IP (1)
- WS-1550-IP (1)
- bluetooh (0)
- iphone (0)
- ipad (0)
- change (0)
- log (0)
- update (0)
- drop (0)
- calibrate (0)
- calibration (2)
- direction (0)
- Soil Sensor Array (1)
- download (0)
- csv (0)
- data (1)
- kestrelmet (1)
- ObserverIP 2.0 (0)
- appear (0)
- appearing (0)
- showing (0)
- up (0)
- version (0)
- lightning detector (1)
- Weatherbridge (13)
- WS-5000-HEATER-AC (0)
- swingulator (0)
- use (0)
- empower (0)
- gate (0)
- oarsport (0)
- disable (0)
- inactivate (0)
- targets (0)
- hud (0)
- hide (0)
- not (0)
- show (0)
- first (0)
- 1st (0)
- quick (0)
- set (0)
- button. (0)
- Ambientweather.net (215)
- ssf (0)
- 1.49 (0)
- software (0)
- NANO-SD (0)
- no (0)
- estimate (0)
- speed (0)
- distance (0)
- mover (0)
- card (0)
- all (0)
- wind (0)
- capture (0)
- time (0)
- gps (0)
- wrong (0)
- locked (0)
- sig (0)
- sauer (0)
- 5k (0)
- 10k (0)
- air-soft (0)
- air (0)
- soft (0)
- dry (0)
- ammo (0)
- echo (0)
- suppress (0)
- filter (0)
- detect (0)
- berms (0)
- par (0)
- setting (0)
- length (0)
- longest (0)
- highest (0)
- wear (0)
- hold (0)
- shot (0)
- timer. (0)
- elapsed (0)
- filter (0)
- off (0)
- buzzer (0)
- mute (0)
- timer (0)
- batteries (0)
- life (0)
- how (0)
- delay (0)
- function (0)
- times (0)
- amount (0)
- presets (0)
- preset (0)
- group (0)
- saved (0)
- configuration (0)
- elite (0)
- code (0)
- practice (0)
- practiscore (0)
- score (0)
- shots (0)
- entry (0)
- rain (2)
- wet (0)
- pool (0)
- waterproof (0)
- withstand (0)
- ambientweather (15)
- ws-2000 (189)
- WS-1550 (0)
- ambientweather (1)
- ws-5000 (8)
- ws-3000 (1)
- weather station (1)
- Ws-5000 (139)
- WS-3000 (1)
- api (0)
- communication (0)
- protocol (0)
- ws-1000 (1)
- ws-2902-array (1)
- osprey (1)
- ambienweather (0)
- windows (0)
- osx (0)
- mac (1)
- new (1)
- WS-8487 (0)
- WS--2000 (1)
- issues (0)
- stop (0)
- working (0)
- sending (0)
- send (0)
- solutions (0)
- disconnect (0)
- Kestrel Met 6000 (1)
- heatstress (0)
- soil (0)
- moisture (0)
- kit (0)
- array (1)
- install (1)
- installation (0)
- sensor (1)
- v3 (0)
- display (0)
- issue (0)
- low (0)
- light (0)
- dark (0)
- night (0)
- optical (0)
- export (1)
- historical (1)
- past (1)
- shot-timer (0)
- shot (0)
- sensitivity (0)
- failed (0)
- google (0)
- pixel (0)
- live (0)
- stream (0)
- wi-fi (2)
- optimization (1)
- check (0)
- out (0)
- loading (0)
- purchase (0)
- stuck (0)
- personal information (1)
- 6000 (0)
- location (1)
- device (1)
- WS-5050 (0)
- ObserverIP2 (2)
- WS-1551-IP (0)
- ws-7078 (13)
- ws-7079 (13)
- AMBIENTWEATHERNETWORK (1)
- awn (3)
- add (1)
- additional (1)
- station (1)
- address (1)
- camera (1)
- better (1)
- resolution (1)
- share (0)
- public (0)
- ambient (1)
- met (0)
- internet (1)
- wifi (1)
- setup (1)
- kesterlmet (1)
- Humidity (1)
- ssf (0)
- scope (0)
- correction (0)
- sight (0)
- scale (0)
- factor (0)
- Rain (2)
- rain reset (1)
- WS-1938 (1)
- Indoor (2)
- Outdoor (2)
- WH31E (2)
- PM25in (1)
- WH31P (1)
- WH31PF (1)
- WH32B (1)
- barometeric pressure (0)
- heat stress (0)
- heat stress monitoring system (0)
- indoor sensor (2)
- outdoor sensor (2)
- ambientweather (1)
- non (0)
- metal (0)
- target (0)
- proof (0)
- hit (0)
- indicator (0)
- ws-1965 wh31e (1)
- kestrelmet.net (0)
- garmin (0)
- 901 (0)
- fortrex (0)
- compatible (0)
- WH51LW (1)
- changelog (0)
- WS-2902E (0)
- WS-1553-IP (1)
- WS-8480A (0)
- WS-4000 (9)
- tipping (1)
- bucket (1)
- gauge (1)
- Ambient Weather Network (3)
- Metric (1)
- Imperial (1)
- starting (1)
- boot (1)
- loop (1)
- rebooting (1)
- beep (1)
- beeping (1)
- Console (2)
- blank (1)
- black (1)
- New (2)
- Array (1)
- existing (1)
- console (2)
- talk (1)
- communicate (1)
- resync (1)
- humidity (1)
- readings (0)