
Return to Help Center >>
Apps By Ambient Weather:
Ambient Weather Dashboard by Ambient Weather (Android). The Ambient Weather App requires that you must own a weather station that reports data to AmbientWeather.net. You can stream live, real-time, data from your weather station to the internet as well as view charts and graphs of historical data. You can view information like temperature, humidity, rainfall, ultraviolet radiation, and more, directly from your device. more info
Ambient Weather Dashboard by Ambient Weather (Apple iOS). The Ambient Weather App requires that you must own a weather station that reports data to AmbientWeather.net. You can stream live, real-time, data from your weather station to the internet as well as view charts and graphs of historical data. You can view information like temperature, humidity, rainfall, ultraviolet radiation, and more, directly from your device. more info
Ambient Weather Network Works With:
IFTTT. Connect your weather station sensors and AmbientWeather.net to IFTTT, and control external devices, like smart blinds, irrigation and sprinkler systems, lights and switches. more info
Amazon Alexa. The Ambient Weather Amazon Alexa skill provides Ambient Weather personal weather station owners with the ability to get real-time, and past weather information generated by the devices you have set up at AmbientWeather.net – more info
Google Home. The Ambient Weather Google Home app provides Ambient Weather personal weather station owners with the ability to get real-time, and past weather information generated by the devices you have set up at AmbientWeather.net – more info
PWSWeather. Connect your weather station sensors and AmbientWeather.net to PWSWeather, to share your weather data online and integrate with Rachio Sprinklers – more info
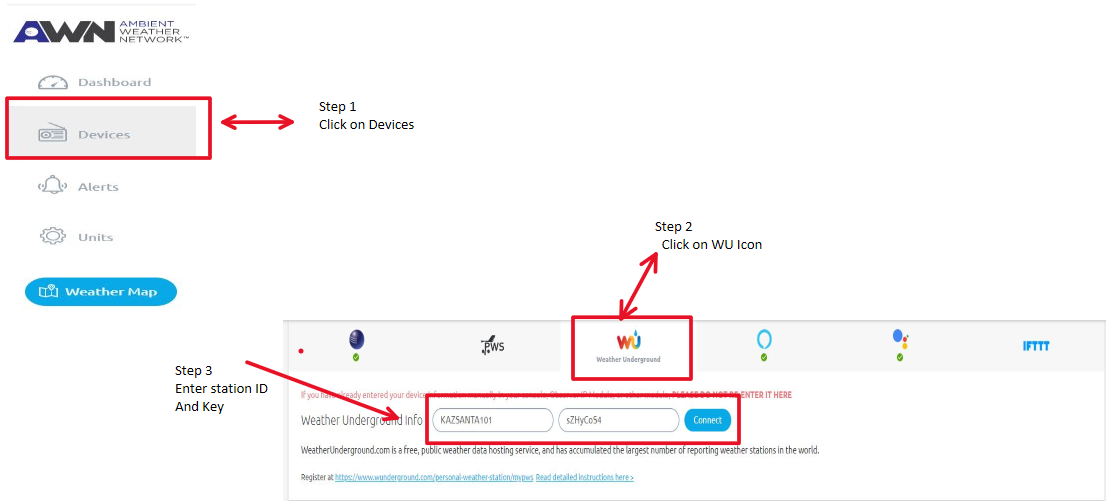
WeatherUnderground.com. Connect your weather station sensors and AmbientWeather.net to WeatherUnderground, to share your weather data online – more info
Home Assistant by Aaron Bach. Connect your weather station sensors and AmbientWeather.net to Home Assistant, and control external devices in your Home Assistant environment – more info
SmartThings by Kurt Sanders. Connect your weather station sensors and AmbientWeather.net to SmartThings, and control external devices in your SmartThings environment – more info
Note:Samsung no longer supports Groovy as of 03/2022
CWOP Reporting by Dan Muntz Connect your weather station sensors and AmbientWeather.net to CWOP, to share your weather data online – more info
HomeSeer. Connect your weather station sensors and AmbientWeather.net to HomeSeer, and control external devices, like HVAC, security, lights and switches –more info
Saratoga Templates by Ken True (AJAX or php). Create your own weather website with your live weather station data generated by the devices you and others have set up at AmbientWeather.net – more info
Weather Station by Pierre Lannoy (Plugin for WordPress). Weather Station is a free WordPress plugin that collects meteorological data from AmbientWeather.net and displays it in many elegant ways: gauges, LCD, charts, and heat maps. It makes it very easy to use the weather data from one or more stations in a site made with WordPress. – more info
Ambient Weather NodeServer for Universal Devices ISY994i Automation Platform by SimplexTech.net
This Polyglot NodeServer integrates real-time AmbientWeather.Net API into the UDI ISY system providing data feed information of all the sensors on your Ambient Weather PWS. This information can be used to optimize your Home or Business automation. – more info
Ubidots IoT Development Platform by ubidots.com. Integrate AmbientWeather.Net API into Ubidots IoT Development Platform to analyze Weather Stations Data by using its Analytics Engine, Dashboard customization, Scheduling Reports and Management of alerts/events to control third-party devices. – more info
ambientweatheR R package by Andrew Flack. ambientweatheR is an R package that makes it easy to interact with the Ambient Weather REST API, providing programmatic access to a user’s weather station data, and converts it to other simple formats. The package provides wrapper functions to list a user’s devices and to fetch data for a given device. – more info
 openHAB by Mark Hilbush. openHAB empowers the Smart Home. The Ambient Weather binding integrates weather station data that’s stored on the Ambient Weather online service. The binding uses Ambient Weather’s real-time API, so updates from weather stations are delivered to the binding in near real-time – more info
Apps We Like:
Weather Display by Brian Hamilton (Windows, OSX, Linux). Weather Display is weather monitoring software that receives real time and historical weather data from the AmbientWeather.net network. Weather Display is a powerful and customizable software package that sends your data to a wide range of cloud services, and FTP to your own personal web site. more info
WeatherSnoop by TEE-BOY (macOS). WeatherSnoop is the premier weather station software for your Mac! With support for nearly a dozen stations, you can share your personal weather data online easily. Customizable dashboards give you the power to visualize your weather data using graphs, gauges, and more. And WeatherSnoop’s extensible plug-in architecture makes it easily expandable and upgradable. more info
Weather Underground by Weather Underground, LLC (iOS and Android). The most hyper-local weather data wherever you are in the world generated by the devices you and others have set up at Wunderground.com – more info
Wunderstation by Weather Underground, LLC (iOS iPad and iPad Pro). Your personalized, all-inclusive home weather dashboard generated by the devices you and others have set up at Wunderground.com – more info
PWS Weather Station Monitor by Matt Brady (iOS). Weather readings and charts generated by the devices you and others have set up at Wunderground.com – more info
 AW-DASH by Ciro Ippolito (Windows). AW-DASH replicates the look and feel of a WS-2902 LCD display. The app uses Ambient Weather’s real-time API, so updates from weather stations are delivered in near real-time – more info
 JWeatherWatch by Julian Werfel (Apple WatchOS). JWeatherWatch is an Apple Watch App that allows you to view your weather station information from your watch. You can view current weather information from all of your weather stations and view the current temperature on the watch face. – more info

Lawn Journal by Austin Van Alfen (IOS). Connect your weather station and AmbientWeather.net to Lawn Journal to display your station's weather data while you keep track of your lawn's progress. - more info
Ambient Weather Network Facebook User’s Group:
Facebook Ambient Weather Network User’s Group. Join the private Ambient Weather Network Facebook User’s Group, and share and compare info with thousands of other like-minded weather station owners – more info
Ambient Weather Network API:
AmbientWeather API RESTful And Real-Time APIs.
Retrieve your own real-time and historical personal weather station data, or build 3rd party apps and get data from multiple devices.
The Ambient Weather Network API makes it easy for programmers to integrate historical and present weather data into the application you design, generated by the devices you have set up at AmbientWeather.net.
For more information about our API, please visit: AmbientWeather.com/api.
Facebook API Group. Join the private Ambient Weather API User’s Group, and ask questions and get answers from other programmers familiar with the Ambient Weather Network API – more info
GitHub.You’ll find Ambient Weather API sample apps, developer tools, and even our documentation. Share your code with the community. – more info
...
Permalink


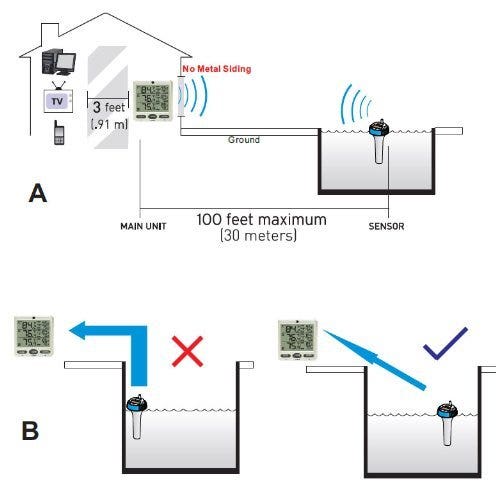
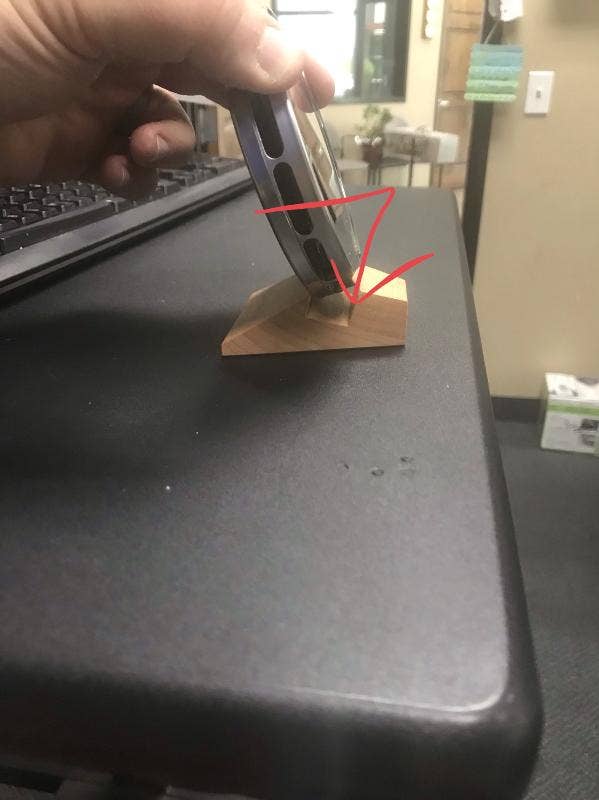
 Weather Station Mounting General Guidelines (pdf)

 to your phone or tablet. The awnet app is only a console configuration tool and is not used to view your live data.The app is available here:
 , and select Add a Device:
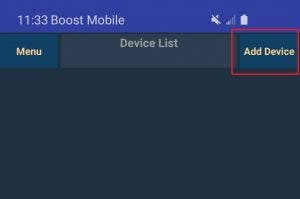

 WiFi Connection Video, Android:


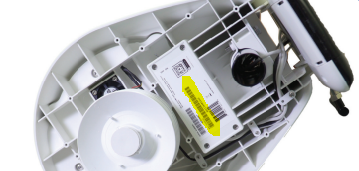
 on your mobile device or tablet, the weather station MAC address is displayed in the Device List.
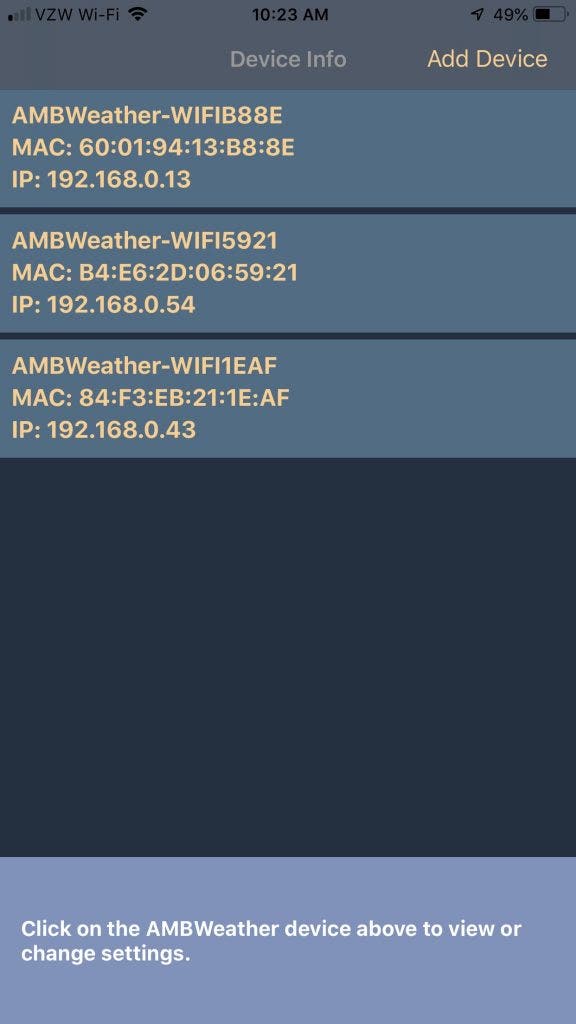


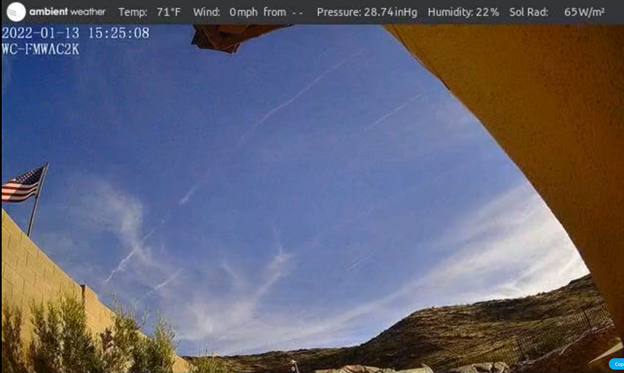
 , your station is reporting.
 to your phone or tablet. The awnet app is only a console configuration tool and is not used to view your live data.The app is available here:Apple iOS:

 , and select Add a Device:


 .
.


 mobile application for configuring the console.
 from your mobile device.
 WiFi Connection Video, Android:
  AWNET app Download Android:
 to your phone or tablet. The awnet app is only a console configuration tool and is not used to view your live data.The app is available here:
 , and select Add a Device:
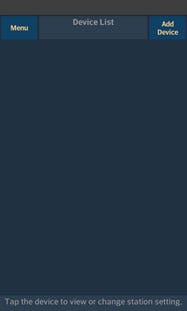

 WiFi Connection Video, ios:
  AWNET app Download ios:


 iphone/ios:

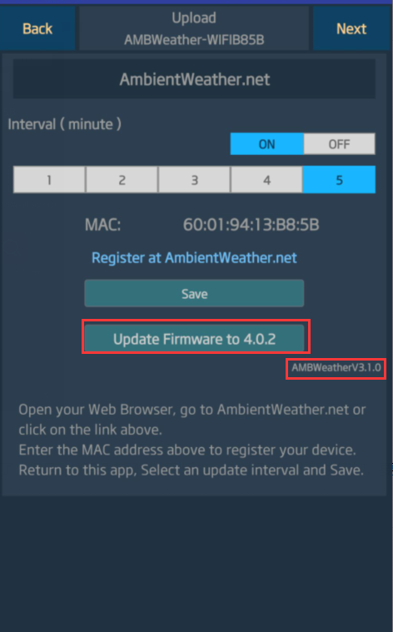
 button to view the timer and MAC.


 app from your Mobile Device or Tablet, and select the Upgrade Firmware link.


 on your devices panel:


 where
where

 will flash to signify that it has entered wireless access point (WAP) mode, and is ready to connect to the console’s WiFi.


 Switch in down position.
  Switch in up position.
 button and look for Firmware revision number.
 button to view the timer and MAC.


 3. Once connected, enter the following IP address into any browser’s address bar:


 key to confirm the selection.
 . Switch in up position
  .
.

 or minus
  to adjust. Press the left
  to return to the main screen.


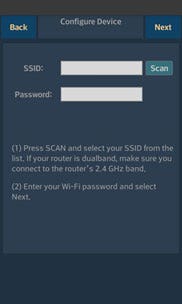
 .
. button to enter the password.

 to scroll to the character and press enter
  to select the character. Press OK when complete.
 to return to the WiFi Network setup page. Leave the password blank of the WiFi network is not encrypted.


 will flash to signify that it has entered wireless access point (WAP) mode, and is ready to connect to the console’s WiFi.


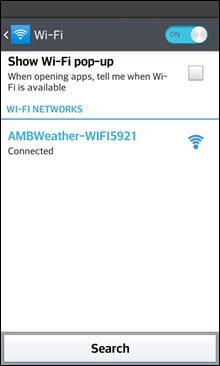
 on your mobile device or tablet, and click on the device in the device list. Make sure the auto upload is on, and the MAC address matches what you entered on the
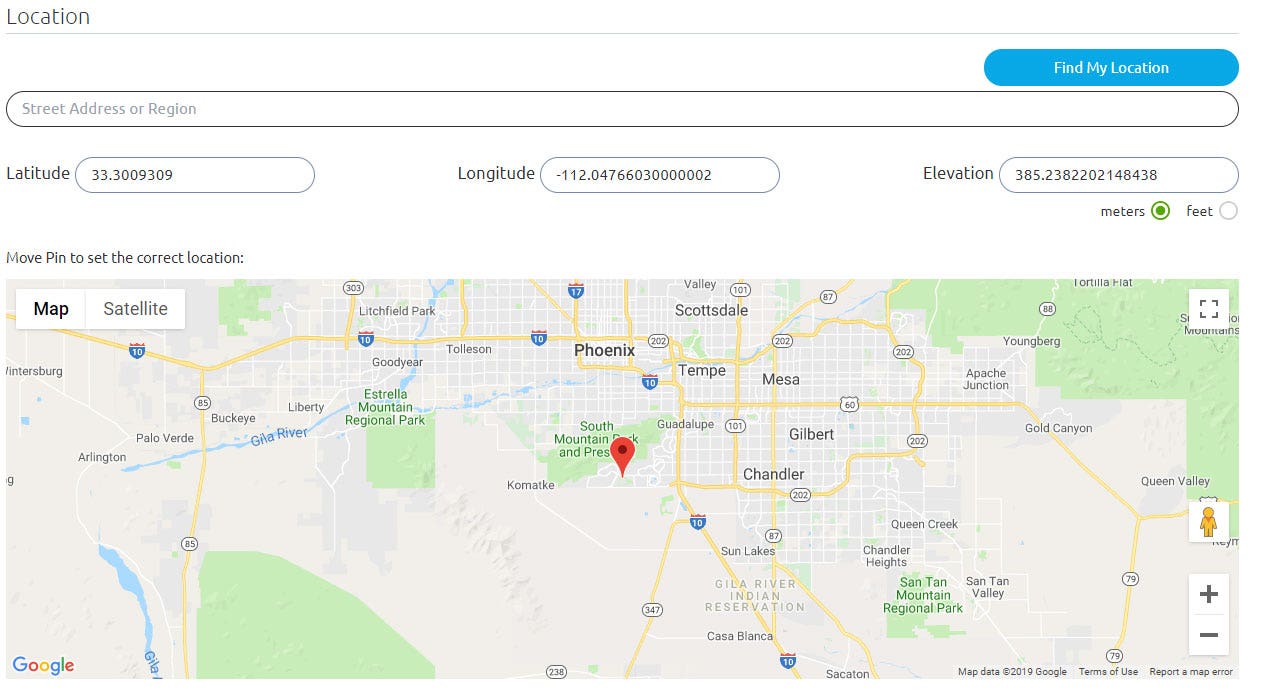
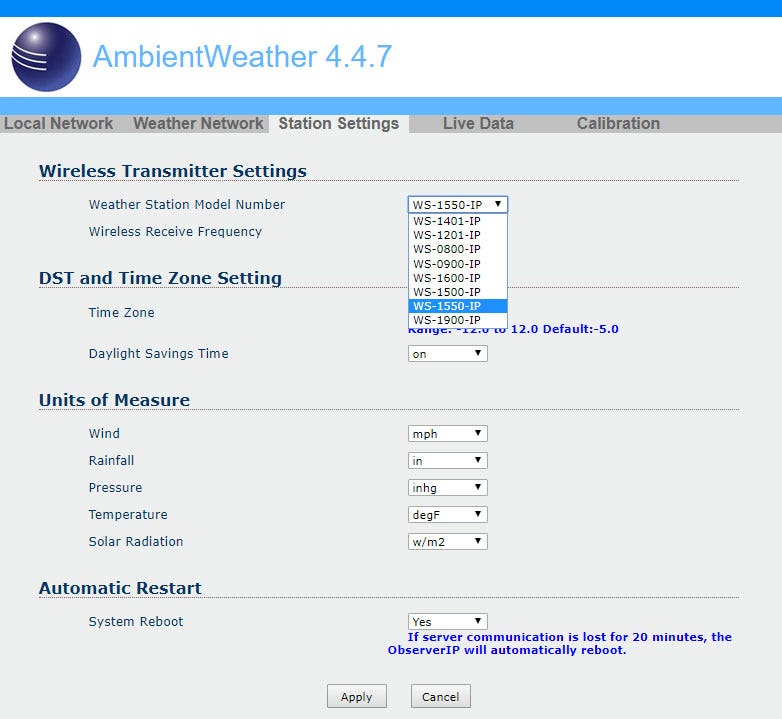
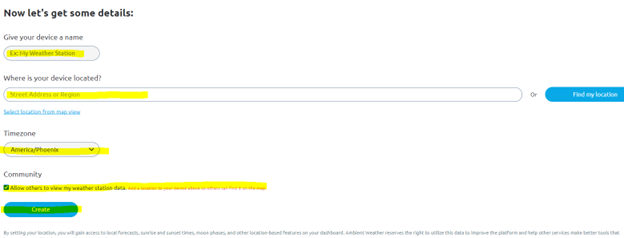
 to view the settings. Make sure your longitude, latitude and hemisphere settings (north vs south, east vs west) are correct.Note that if your longitude is negative, choose the western hemisphere. If your latitude is negative, choose the southern hemisphere.
 to view the settings. Make sure your time zone is set correctly.


 2. Next, enter your email address and tap the Reset your Password button.


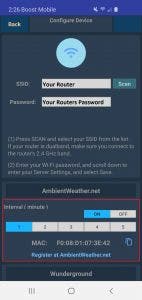
 tool on your mobile device, tap on the device, which takes you to the AmbientWeather.net page. Set the upload interval in minutes, and make sure the Auto Upload switch is ON.


 A common mistake is to download the wrong application from Ambient Weather (examples, awnet or Ambient Weather Dashboard).
 on your mobile device or tablet.


 .
. to confirm the selection, and the year field will turn from green to purple.
 to start the backup, or press play
  again to cancel the backup.


 or
or  to change the calibrated value.

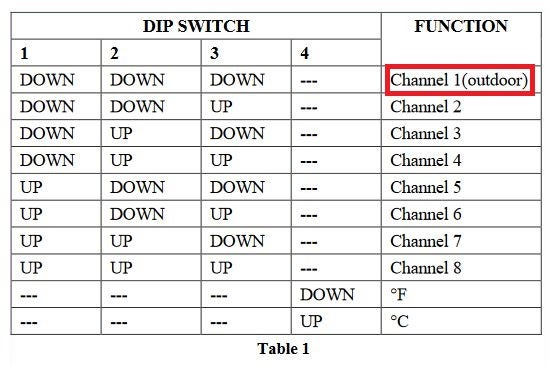
 will be displayed next to the channel number, and will scroll every 5 seconds.
 . It will turn off and display channel 1.


 to your phone or tablet. The awnet app is only a console configuration tool and is not used to view your live data.The app is available here:
 , and select Add a Device:


 or
or  to change the calibrated value.


 to delete the device.


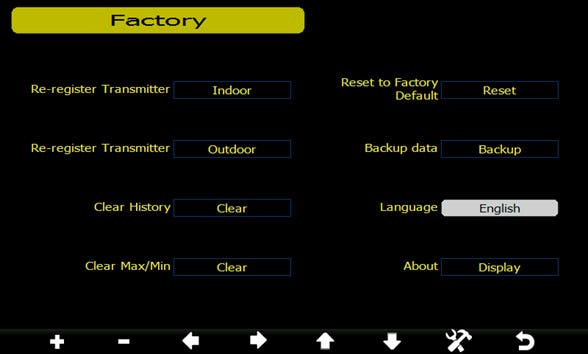
 to display the Time Settings Page.
 to update.


 to enter the backlight setup screen.


 from the main screen:
 key to turn this feature ON or OFF. When turned ON, the highs and lows or minimum and maximums will reset at Midnight every day.


 next to the specific alert you wish to delete.
 key to confirm the selection.
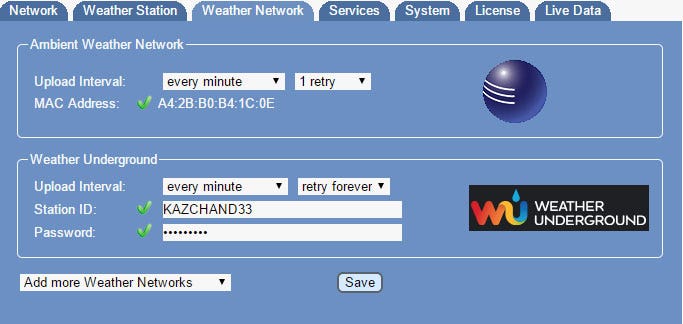


 at the bottom of the expanded tile.


 to view this panel:


 will flash to signify that it has entered wireless access point (WAP) mode, and is ready to connect to the module’s WiFi.


 at the bottom of the tile. To unpin, tap the pin icon again.


 . You will need to scroll down the page a bit.


 at the bottom of the page.


 will be present next to the Channel number.
 in the Indoor section of the display.


 button. The Setup Date and Time Panel will be displayed.
 or minus
  buttons to increase or decrease the hour.
 or minus
  buttons to increase or decrease the minute.
 or minus
  buttons to increase or decrease the second.
 or minus
  buttons to increase or decrease the month.
 or minus
  buttons to increase or decrease the day.
 or minus
  buttons to increase or decrease the year.
 or minus
  buttons to increase or decrease the time zone.
 button to automatically synchronize the date and time based on the Internet NIST Time Server.
 button to exit the Set Date and Time field.


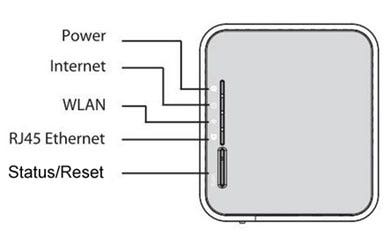
 flashing but is unable to locate the Wireless Network Connection ‘WeatherHome’ please verify you are using the AC adapter that came with the WS-50. This adapter is 5.9 volts. If using a different AC adapter it may not have the correct voltage to work properly.


 on your mobile device or tablet.


 is static and does not change. It is a universal symbol for Wind Direction.


 https://www.ambientweather.com/recall.html


 AmbientCamHD Quick Start Guide
 AmbientCamHD User Manual
 AmbientCamHD IP Search Tool
 AmbientCamHD Central Management Software
 AmbientCamHD Smart Phone App


 at the bottom of the tile:


 AmbientCam Quick Installation Guide
 AmbientCam User Manual
 AmbientCam IP Search Tool
 AmbientCam Central Management Software
 AmbientCam Smart Phone App


 AirBridge Quick Start Guide for Davis Instruments Weather Stations
 AirBridge Quick Start Guide for Ambient Weather Observer Stations
 Windows IP Scan Tool
 Apple IP Scan Tool
 Linux IP Scan Tool
 Wunderground.com Weather applications for your computer, phone and tablet
 MeteoBridge Website
 SDK
SDK


 WS-2902/WS-1900
 WS-1965